Web based School
HTML & Scripting |
Chapter two Today you start applying the theory of scripting.
Web pages are written in hypertext markup language (HTML). This chapter starts a crash
course on HTML. You will learn how to design a basic Web page with nothing but your brain,
this chapter, and a text editor. In addition to learning basic HTML functions, you will
also learn the mechanics of inserting scripting language and ActiveX objects on your Web
pages. You are going to have fun today, so lets get started. Overview of HTML
HTML is related to (or rather, descended from)
another formatting standard for text documents called standard generalized markup language
(SGML). SGML is used as a standard to share data across diverse systems. HTML is a
document type definition(DTD) of SGML. DTD is a fancy way of saying subset. So,
HTML is a subset of SGML. Remarkably, HTML files are written in plain ASCII
text. It is probably an accident that something so useful didn't wind up in an obscure
format. Or it could be that HTMLs usefulness derives from its format, which is common
enough for any text editor to generate. So fire up your text editor and launch your
browser. Lets make Web pages! The Basic Form
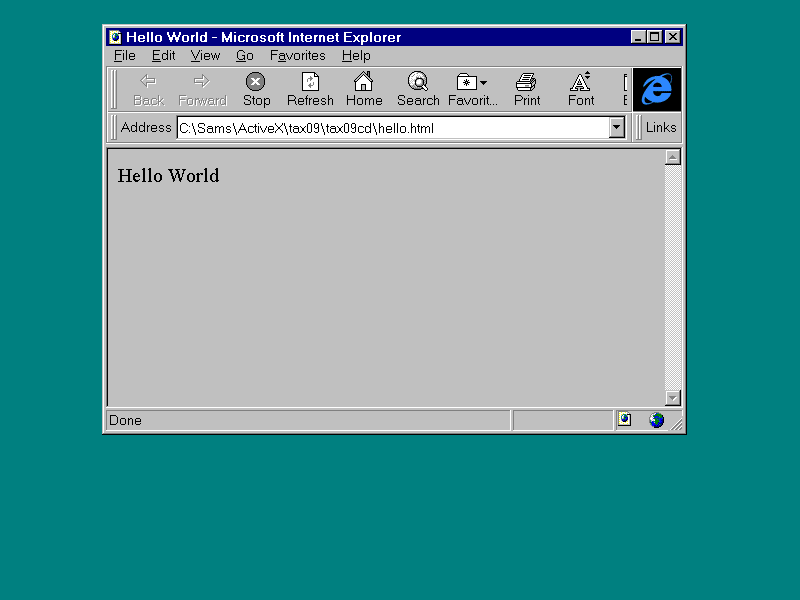
Type listing 2.1 into your text editor. Listing 2.1. The traditional Hello World
introduction .
Save your file as hello.aspl, then launch your Web
browser .
Your creation should look something like Figure 2.1.
Figure
2.1 Your first Web page. Not bad for your first try. Lets learn how to
improve on this simple start. Elements of HTML
HTML uses tags to convey ideas to the Web browser.
Listing 2.1 is full of tags, such as <HTML> and <BODY>. Tags are enclosed in
brackets (<>). You will look at tags during the next several pages. You will start
with the most common tags, and end with the tags <SCRIPT> and <OBJECT>.
<SCRIPT> and <OBJECT> are the keys to using scripting language and ActiveX
components. While this chapter does not cover every element of HTML, it should cover
enough to build a foundation for your knowledge of how a Web page is constructed. Each
HTML element that we examine will appear in the following format: The <TAG> Tag Description: Contains a brief description of
the tag. Some tags take the form <TAG>...</TAG> to indicate the elements
affected by the tag. Other tags appear as <TAG>, which normally sets an attribute of
the element on the page that follows it. Appears As: <TAG> </TAG> or
<TAG> Attributes: Properties that can be set for
the tag, such as color and position. Not all tags have attributes. Can Contain: Other tags that can be used
within this tag. (Not all tags will have entries in this section.) Can Be In: Other tags that this tag can be
used in. Example: Contains an example that illustrates
the capabilities of a given HTML tag . Overall Page Structure
There are three tags used in almost every web page ,
<HTML>, <HEAD>, and <BODY>. All the action in your web pages will take
place inside these tags. Take a look at how to use them. The <HTML> Tag
Description: The beginning and ending of an
HTML document. Appears As: <HTML> </HTML> Attributes: None Can Contain: <BODY>, <HEAD> Can Be In: N/A Example:
Reduce your Hello World page to just three lines using the <HTML> tag (see Listing
2.2). Listing 2.2. The simplified Hello World page .
<HTML> Hello World </HTML> Notice the output shown in Figure 2.2 is the same as
that shown in Figure 2.1. Figure
2.2. The simple Hello World. All your HTML documents will be enclosed with the
<HTML> tag. The <HEAD> Tag
Description: This section is where you can
save information about the Web page. The information stored here is not displayed. This
section is loaded before other sections of the document, which makes it a great place to
put <SCRIPT> tags and <OBJECT> tags (I'll discuss these tags later in this
chapter).
Listing 2.3. Giving a title to a Web page . <HTML> <HEAD> <TITLE>MY WEB PAGE</TITLE> </HEAD> <BODY> This is My Very Own Web Page </BODY> </HTML> Notice in figure 2.3 that the title doesn't show up
on the form. Figure
2.3. The phantom title. You might be saying, "If is doesn't show up,
what good is it?" Well, for one thing, if someone wants to remember where your page
is and adds it to their browser's "favorites" list, the browser will use the
text inside the <TITLE> tags. In this case, MY WEB PAGE would be added to the list.
Examine the Start bar pictured in Figure 2.4. It shows that the browser has extracted the
title from this Web page and is using it as a Start bar button. Figure
2.4. The title on the Start bar button. The <BODY> Tag
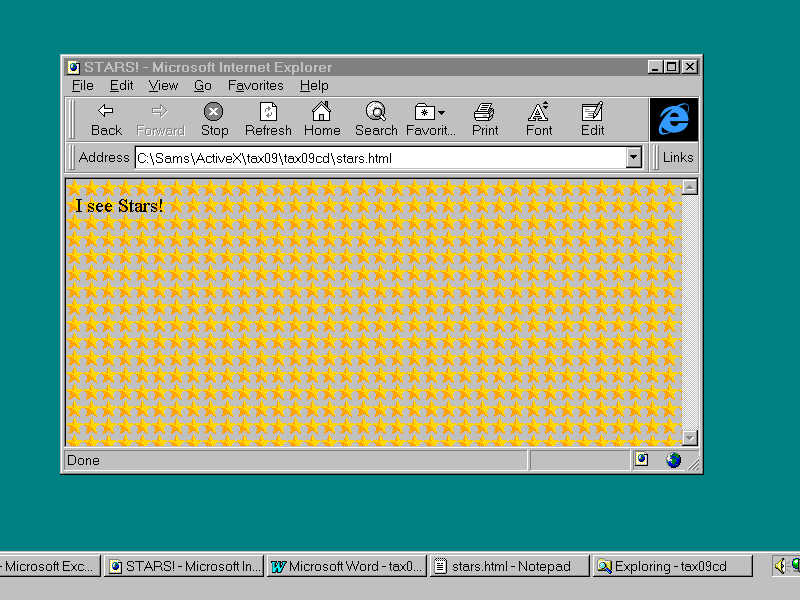
Listing 2.4. Setting the background inside the
<BODY> tags . <HTML> <HEAD> <TITLE>STARS!</TITLE> </HEAD> <BODY BACKGROUND = "GoldStar.gif"> I see Stars! </BODY> </HTML> The result of Listing 2.4 is shown in Figure 2.5. Figure
2.5. Setting the BACKGROUND attribute . Notice the Start bar at the bottom of the picture.
It contains the STARS! attribute that you saw in the <TITLE> tag. Also notice that
the single star contained in the GIF file ("GoldStar.gif") was tiled to fill the
entire screen. The <HTML>, <HEAD>, and <BODY>
tags are the backbone of the HTML page. Working Inside the Body of the Web Page
Now
that you have mastered the skeleton of the HTML page, take a look at some of its vital
organs. Comment Tags
Description: Those of you with a programming
background were probably hoping that HTML wouldn't have any comments. The merits of
comments have been debated in break rooms across the world. One school of thought is that
the lack of comments has probably made more work for programmers (in general, a good thing
if one wants to make a living by programming). Admittedly, I have never seen anyone lose a
job due to lack of comments, but if you want to make your Web-page-building life a little
easier, comments are important. When asked what a particular poem meant, the great poet
Robert Frost is supposed to have said, "When I wrote this poem, only God and I knew
what it meant. Now only God knows." That is because his poems didn't have comments. Appear As: <!...> Example:
Add a comment to the previous STARS! example. Listing 2.5. Using comment tags inside the
<BODY> tags .
The result is the same as Figure 2.5, but when you
have to maintain this page you will know where the picture came from. Comments can speak
to future programmers tasked to maintain or learn from your pages. The comment tags can
also be used in conjunction with the <SCRIPT> tags: To keep older browsers that
don't recognize the <SCRIPT> tag from seeing the code inside the <SCRIPT>
tags, the <SCRIPT> tags themselves are placed inside of comment tags. Heading Tags
Description: Heading tags provide you the
ability outline your Web page. Visually, the lower the number, the bigger the print. Avoid
using heading just to achieve the visual effect. A program building an index from you page
might use the text in your index as the entry in the index.
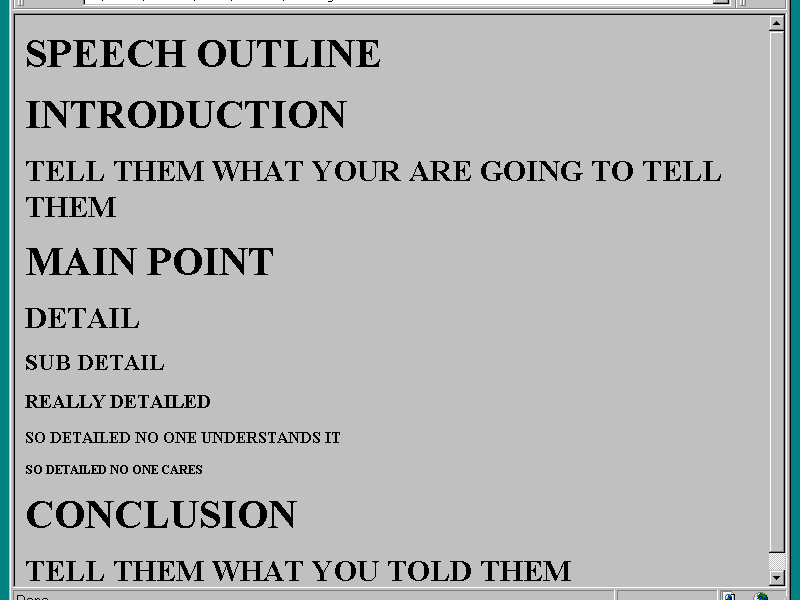
<HTML> <HEAD> <TITLE>SPEECH</TITLE> </HEAD> <BODY> <H1>SPEECH OUTLINE </H1> <H1>INTRODUCTION </H1> <H2>TELL THEM WHAT YOUR ARE GOING TO TELL THEM</H2> <H1>MAIN POINT</H1> <H2>DETAIL</H2> <H3>SUB DETAIL</H3> <H4>REALLY DETAILED</H4> <H5>SO DETAILED NO ONE UNDERSTANDS IT</H5> <H6>SO DETAILED NO ONE CARES</H6> <H1>CONCLUSION</H1> <H2>TELL THEM WHAT YOU TOLD THEM</H2> </BODY> </HTML> This example shows another common use for heading
tags. The title to a form is often echoed in an <H1> Tag, as shown in seventh line
of Listing 2.6. Listing 2.6 produces the page shown in Figure 2.6. Paragraph Tags
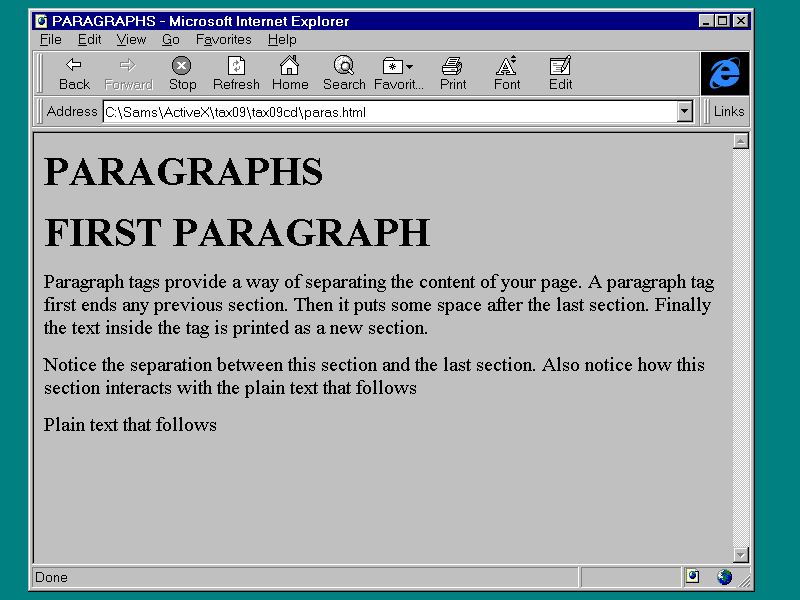
Description: Paragraph tags provide a way to
separate the content of your page. A paragraph tag ends any previous section, then puts
some space after that section. Finally, the text inside the tag is printed as a new
section. Appear As: <P> </P>
Listing 2.7 produces the page shown in Figure 2.7 Figure
2.7. Paragraphs in action. Links (The <A> Tag)
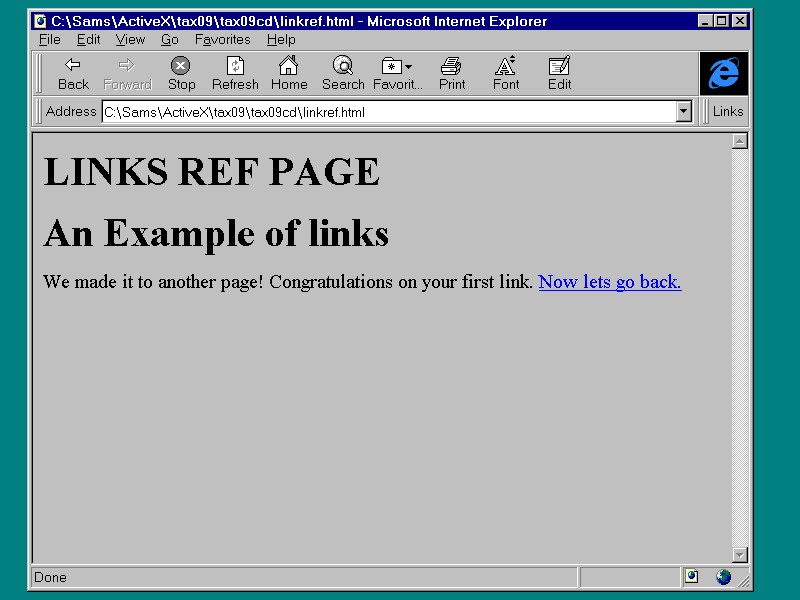
Listing 2.8. Links: the main page .
Listing 2.9. The page referenced .
Notice the syntax for the <A> tag. The
filename of the link is placed with the beginning tag, like this: <A
HREF="linkmain.aspl">. The text you want to associate with the tag is placed
between the <A> tag and the </A> tag. The main form is shown in Figure 2.8. Figure
2.8. The original document. Clicking the line Click Here to Go to another page
displays the page shown in Figure 2.9. Figure
2.9. The referenced document. Clicking the phrase Now lets go back returns you to
the main document. Lists
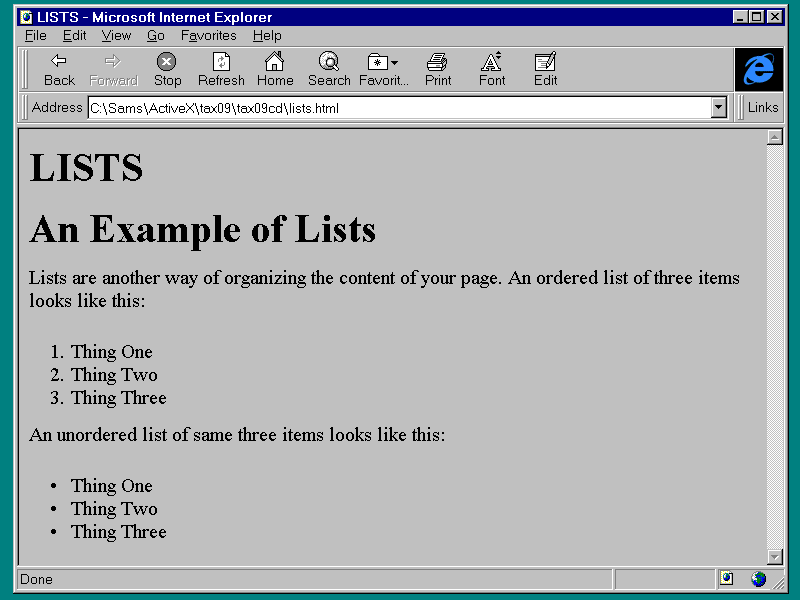
A list is a very common way of presenting data. HTML
provides two mainstream ways to show them: the <OL> tag and the <UL> tag. The <OL> Tag
Description: An ordered list. Items in this
list are numbered by the Web browser. Appears As: <OL> </OL> Attributes: TYPE, START Can Contain: <LI>
The <UL> Tag
Description: An unordered list. This doesn't
mean the data in the list is chaotic. It means that the Web browser designates the item
with a symbol. Appears As: <UL> </UL> Attributes: TYPE Can Contain: <LI>
Example: Listing 2.10 shows how these two tags are used. Listing 2.10. An ordered and unordered list .
The <LI> tag denotes the items placed on the
list. The output is shown in Figure 2.10 . Figure
2.10. Displaying lists. The TYPE attribute is browser dependent. TYPE allows
you to change the numbering system or symbol depending on the kind of list you are
building. The START attribute allows you to start the list at a particular number. See
Exercise 2 at the end of this chapter for an example of the START attribute. Tables
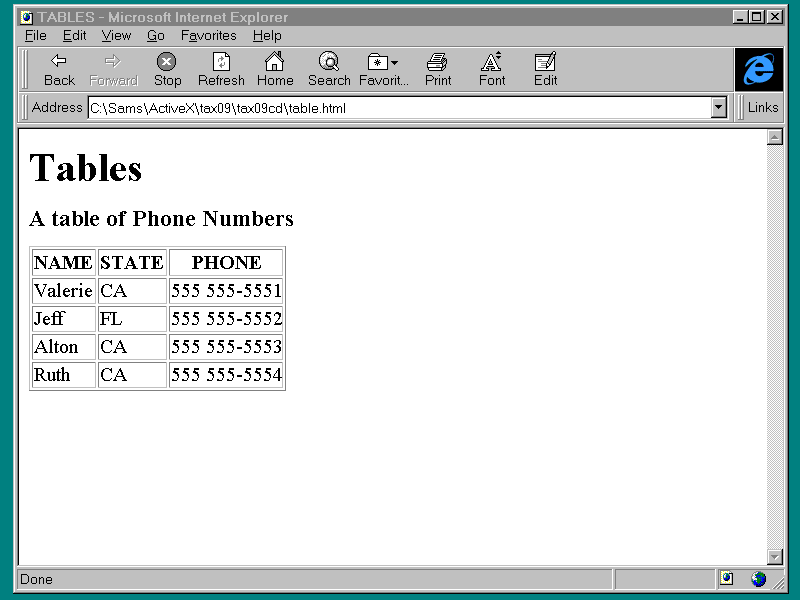
Tables are a useful way of showing any data that can
be put into rows and columns. Using the <TABLE> tag allows you to do this. The <TABLE> Tag
Description: A <TABLE> Allows you to
present the contents of your pages in column and row format. Appears As: <TABLE> </TABLE> Attributes: BORDER Can Contain: <CAPTION> Can Be In: <BLOCKQUOTE>, <BODY>,
<DD>, <LI>, <FORM> Example:
Create your own table. Listing 2.11 shows the source code for a simple table in a Web
page. Listing 2.11. Web page with table .
Three tags, <TR>, <TH>, and <TD>,
work inside a table. Rows in the table are defined between <TR> and </TR>.
Within these rows, headings are denoted using <TH> and </TH>, and data is
enclosed by <TD> and </TD>. The primary difference between a data element and
a heading element is the heading element is bolded by the browser. See Figure 2.11 for the
resulting page. Figure
2.11. A table of phone numbers. Notice the use of the BORDER attribute . If the
BORDER attribute was left out, the border shown in Figure 2.11 would disappear. Forms and Inputs
The <FORM> and <INPUT> Tags work
hand-in-hand to provide a way to get information from the user and pass it to your server.
The <FORM> tag provides the framework and the <INPUT> tag provides the user
interface elements. The <FORM> Tag
The <INPUT> Tag
Example:
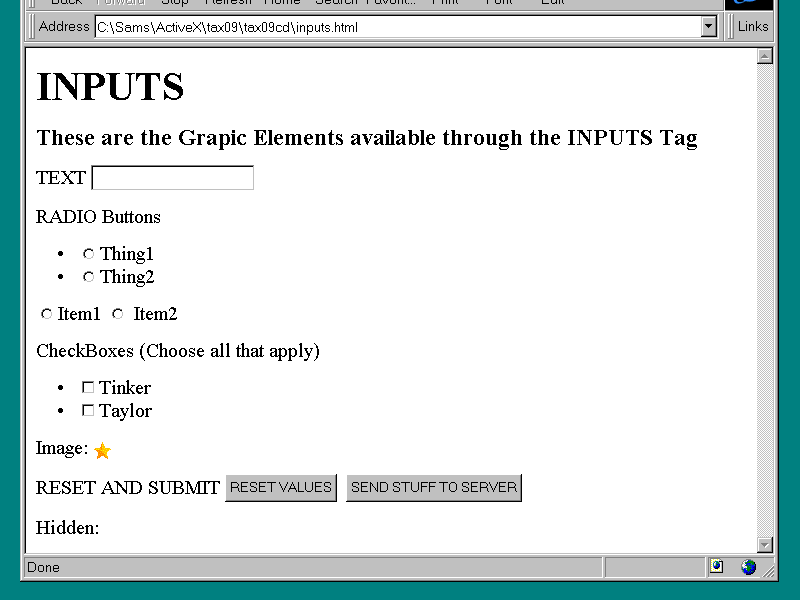
You will do two examples for these tags. The first will show all the user interface
elements available from the <INPUT> tag, and the second will show how <FORM>
and <INPUT> work together to collect data and pass data back to the server. Listing 2.12. Sample source code for <INPUT>
There are a couple of things you should look at
here. Notice the use of the attributes SIZE and MAXLENGTH in the line <INPUT TYPE
="TEXT" NAME ="TextBox1" SIZE = "20" MAXLENGTH
="15">. This sizes the text box at 20 characters and limits the user to 15
characters. If MAXLENGTH is left out, the user can type an unlimited amount of text. In
general, the attribute VALUE is what is submitted along with the attribute NAME when the
<FORM> is sent back for processing. Also note how the two sets of radio buttons are
grouped by their respective names. The page looks like Figure 2.12. Figure
2.12. An <INPUT> sampler. Lets see how a script is submitted using the
<FORM> tag. Listing 2.13 shows how <FORM> does this. Listing 2.13. Sending data back to the server .
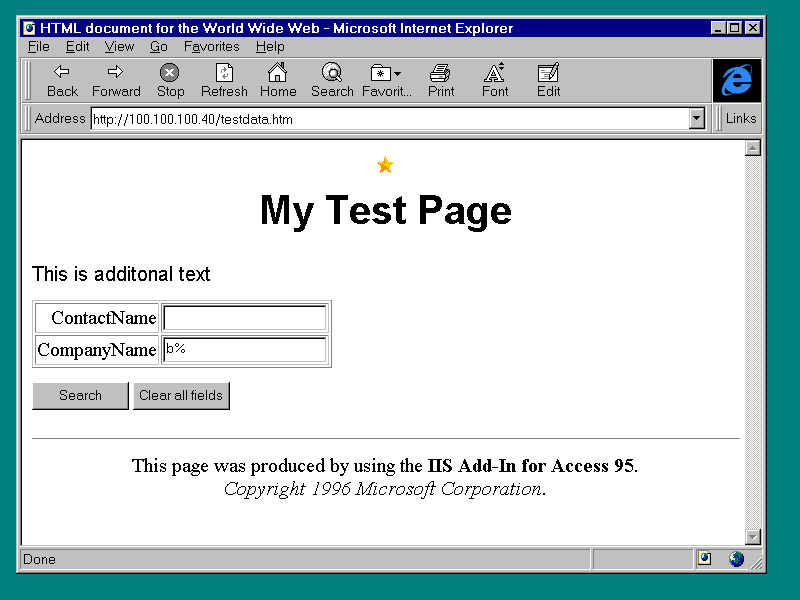
Pages like this can also be generated by several
software tools. The IIS add-in for Access 95, which I will talk about in some detail
tomorrow, is one such tool. Remember, this is a crash course in HTML, not CGI. Between
this example and tomorrow's description of the tool that created it, you will cover some
CGI basics. For now, note that this form is passed to a script called testdata.idc, shown
in listing 2.14, and returned via a template called testtata.htx, shown in listing 2.15. Listing 2.14. testdata.idc .
Listing 2.15. testdata.htx .
You have seen enough HTML to understand the basics
of the template file (testdata.htx). Notice how testdata.htx sets up a <TABLE> tag
to put the data the server finds into. Those of you with database backgrounds will
understand the database query set up in the testdata.idc file pointed to in the
<FORM> tag (FORM ACTION="/scripts/testdata.idc" METHOD =
"POST"). Hands are waved, some pixie dust is thrown, and the page comes up
looking like Figure 2.13. Figure
2.13. Searching for records. The user indicates a need to see all companies with
that start with the letter "B" by entering b% in the company name <INPUT>
field. (Notice in Listing 2.13 how the <INPUT> tags are placed in a table). The
server returns the list seen in Figure 2.14. Figure
2.14. All the companies that start with the letter "B". The <SCRIPT> Tag
Description: There are some pretty neat
things you can do with <FORM> and <INPUT>, but the processing and error
checking is still being conducted by the server. <SCRIPT> was created make your Web
pages smarter. Appears As: <SCRIPT> </SCRIPT> Attributes: LANGUAGE, SRC Can Contain: JavaScript VBScript Can Be In: <HEAD> Example: Lets do
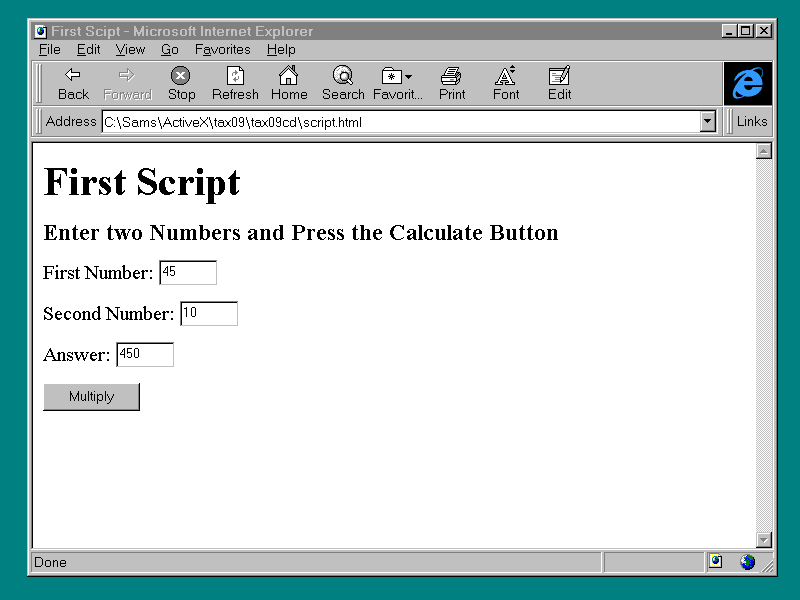
a form that uses <SCRIPT> to compute and display a value. Listing 2.16. A sample script .
Don't worry about the scripting language syntax yet.
Remember, you will have four days to study scripting in detail (one each on VBScript and
JavaScript, and two projects). The important thing here is how to fit scripts into HTML.
Notice that the <SCRIPT> was placed inside the <HEAD> tag. This ensures the
code is loaded before the page has a chance to do anything else. Also notice that the code
is enclosed in a remark tag. This prevents older browsers from trying to figure out what
to do with the code. If you want to use comments inside the code, use the notation native
to the language. Call this script up in your browser, enter a couple of numbers, and push
the Multiply button. This form isn't long on format, but it computes well. The <OBJECT> Tag
Description: The relatively few user
interface objects supported by HTML are augmented by the <OBJECT> tag .
<OBJECT> can also be used to bring in self-contained, non-visual programs that have
functions and values you can access via scripting. Appears As: <OBJECT> </OBJECT> Attributes: ID, CLASSID, DATA, PARAM, NAME Can Contain: N/A Can Be In: <BODY> Example:
The next example is a simple ActiveX textbox control. It illustrates the difference
between using the HTML components and the ActiveX components. Listing 2.17. Using <OBJECT>.
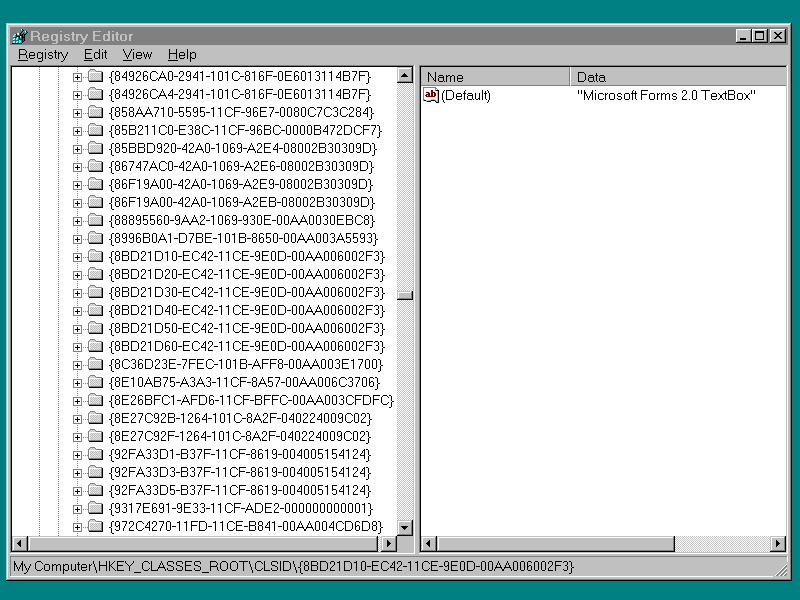
Notice the overhead has increased. And there is one
very puzzling attribute, CLASSID, that looks like a cross between a Visa number and the
national debt! CLASSID is an identifier for an ActiveX control. These numbers can be found
by finding a control in the Windows Registry under the CLSID subdirectory. Figure 2.15
shows some of the CLASSID's on my system, including the one used in Listing 2.17. Figure
2.15. CLASSIDs found on my system. Run the page in your Web browser; your screen should
look like figure 2.16. Figure
2.16. Your first ActiveX object. Not very impressive visually, but it does along with
scripting, start a whole new era for Web pages . Summary
Now you have some practical knowledge of basic HTML.
You have also solved the mysteries of how <SCRIPT> and <OBJECT> tags are used.
If you stopped reading this guide today, you would have a good foundation for understanding
and using current HTML technology. But do not stop, because tomorrow you will focus on
several tools that go well beyond the text editor, including the most important tool
available today for ActiveX programming, the ActiveX Control Pad. Before the end of the
week, you'll have written two projects using scripting and ActiveX controls. Q&A
Workshop
Rewrite the ordered part of Listing 2.10 to start
numbering the list at 5 (hint: use the START attribute). Quiz
|
Popular Tutorials
-
 MS Access
1109
MS Access
1109
-
 C++
1222
C++
1222
-
 HTML
584
HTML
584
-
 JavaScript
616
JavaScript
616
-
 Vbscript
873
Vbscript
873
-
 Oracle
473
Oracle
473
-
 VC++
875
VC++
875
-
 SQL
2959
SQL
2959
-
 XML
514
XML
514
-
 Java
814
Java
814
-
 Perl
455
Perl
455
-
 Linux
451
Linux
451


