Web based School
Red Hat Linux rhl24


- What Is OPEN LOOK?
- Getting Started with OpenWindows
- Working Within OpenWindows and olwm
- Menus
- Configuring Menus for OpenWindows
- The Virtual Desktop
- Resources in OpenWindows
- Using Text-Editing Features
- Support for Left-Handed Users
- Troubleshooting
- Environment Variables
- Special Help for Sun Workstation Users
- Internet Sites for XView
- Where To Go for More Information
- Summary
24
OPEN LOOK and OpenWindows
This chapter introduces you to OPEN LOOK on Linux. Ideally, this chapter could be expanded into a guide of its own. That being impossible however, we will cover some of the basics of OPEN LOOK in this chapter, including
- What is OPEN LOOK?
- What to install on Linux.
- How to work with a look and feel that's different from Motif.
- How to work with the virtual desktop.
- How to customize your desktop.
- Troubleshooting tips.
- Where to get more information about OPEN LOOK.
If you have not already done so, please read Chapter 23, "Using Motif." This chapter will build on that chapter, so there won't be duplicate information for you to weed through. The information you require from the
Motif chapter is the discussion on X Window, working with pointers, and the Motif environment. You will definitely need to know how to use resources in the .Xdefaults files and starting X Window via shell scripts like startx.
What Is OPEN LOOK?
OPEN LOOK is a specification of a Graphical User Interface (GUI). A GUI determines the look and feel of a system—the shape of windows, buttons, and scrollbars; how you resize things; how you edit files; and so on. The OPEN LOOK GUI is specified,
developed, and maintained primarily by Sun Microsystems Inc. XView is simply the port on Linux. When I talk about OpenWindows, I will refer to XView for Linux in this chapter.
OpenWindows is a windowing environment that conforms to the OPEN LOOK Graphical User Interface Specifications. It's compatible with the X11 window system from MIT as well as (currently) Sun's NeWS and SunView, so you can intermix programs written for
any of these systems. It comes from Sun and also with UNIX System V Release 4 from certain vendors.
OpenWindows should not be called "Windows" or "OPEN LOOK" or "OpenLook," because these terms are either wrong or apply to something else. OpenWindows is sometimes also called openwin or xnews, after the program used to start it and the main executable itself, respectively.
The X Window system is a trademark of the Massachusetts Institute of Technology. OPEN LOOK is a trademark of AT&T. OpenWindows is a trademark of Sun Microsystems, Inc.
Portions "Copy Bigelow & Holmes 1986, 1985. Lucida is a registered trademark of Bigelow & Holmes. Permission to use the Lucida trademark is hereby granted only in association with the images and fonts described in this file. Portions may be "1990 Solbourne Computers.
Portions of olvwm not covered under the above s are ©1991 Scott Oaks.
Several toolkits exist for programmers to use in developing programs that conform to the OPEN LOOK specifications:
- OPEN LOOK Intrinsics Toolkit (OLIT)
- XView (This is what you have for Linux.)
- The NeWS Toolkit (TNT)
- C++ User Interface Toolkit (UIT)
OLIT was AT&T's OPEN LOOK Intrinsics Toolkit for the X Window system. OLIT used a widget set and was therefore easy to learn for people who were already X11/Xt programmers. You could buy the source from AT&T, although you didn't get the same
version that Sun would ship.
Sun includes the OLIT library in OpenWindows. OLIT is also often included in UNIX System V Release 4. OLIT was written in C. The last release of OLIT in OpenWindows 3.0 was OLIT 3.0. OLIT support passed to USL (UNIX System Laboratories), who replaced it
with MoOLIT (see the following Tip).
You need an OLIT source in order to develop a large application or anything else that uses subclasses.
XView is Sun's toolkit for X11, written in C. It is similar in programmer interface to SunView. There's even a shell script to help migrate source code from SunView to XView. XView is often said to be the easiest toolkit to learn if you are not familiar
with X Window.
The XView toolkit is included in OpenWindows, and full source is available by anonymous FTP from export.lcs.mit.edu (and elsewhere). The current version of XView from Sun is 3.2p1.
The NeWS Toolkit (TNT) is an object-oriented programming system based on the PostScript language and NeWS. TNT implements many of the OPEN LOOK interface components required to build the user interface of an application. It's currently included in
OpenWindows.
The current version of TNT from Sun is 3.1. Release 3 contains some incompatibilities with TNT 1.0 and TNT 2.0, but Sun is committed to supporting the API, at least until it stops NeWS support some time later this year and replaces it with Display
PostScript. Wait. You might ask what "is committed to" means in this context; the answer seems to be that it means absolutely nothing.
Sun currently asserts that it is committed to OLIT, however.
The C++ User Interface Toolkit (UIT) consists of an object-oriented C++ class library layered on top of XView and a tool to generate code from files written in a graphical interface language called DevGuide 2 GIL. The UIT also includes features that
simplify event management and the use of PostScript and color. It is said to be compatible with OpenWindows Versions 2 and 3, and presumably Version 3.0.1, as the release mentions that it works on Solaris 2.
UIT is not an official Sun-supported product but an ongoing project of various people within Sun. It can be found on export.lcs.mit.edu in the MIT /R5contrib directory as UITV3.tar.Z (use binary mode!).
If you cannot decide which GUI to use, consider the MoOLIT interface. MoOLIT is a version of OLIT from AT&T/USL that lets users choose between a Motif- and an OPEN LOOK—type feel at runtime.
olwm and olvwm
There are two window managers for OpenWindows: olwm and olvwm. A window manager is responsible for deciding how to lay out windows on the screen, and for managing the user's interaction with the windows.
olwm is the standard OPEN LOOK window manager. It is included with all of the OpenWindows implementations, and you can also get the source via FTP because Sun donated it to the freeware domain.
The olvwm program is a version of olwm that manages a virtual desktop (hence the v in its name). It shows a little map on the screen, with the currently displayed area represented by a small rectangle. You can move around by dragging the rectangle or
with the arrow keys. This enables you to run several clients (applications) that occupy the full screen and move the display around from one to the other. Olvwm was derived from the OpenWindows 3.0 olwm by Scott Oaks. You need to have XView 3.0 to compile
it.
The olvewm and olwm packages are included on the CD at the back of the guide.
Getting Started with OpenWindows
First, confirm that you have installed the XView system on your Linux system. The XView distribution consists of the files in Listing 24.1. You will need to follow the directions included with XView to install these files.
Listing 24.1. XView package contents.
xv32_a.tgz Static Libraries for developing Xview 3.2

applications.

xv32_sa.tgz Static Libraries for debugging Xview 3.2

applications.

xv32_so.tgz Shared Libraries for Xview 3.2.

xv32exmp.tgz Sample programs for Xview 3.2.

xvinc32.tgz Include files for Xview 3.2 programming.

xvmenus.tgz Menus and help files for the OpenLook Window

Manager.

xvol32.tgz Xview 3.2 Configuration files, programs, and

documentation.
Install the packages shown in Listing 24.1 for your XView system using the setup program as shown in Chapter 3, "Installing and Updating Linux." If you have already done this installation, you should have at least some
files in /usr/openwin/bin.
Starting OpenWindows
You need one of two files to get started with OpenWindows: either .xinitrc or .xsessionrc.
The first time you run OpenWindows, a .xinitrc file is created in your login directory ($HOME). If it already exists, you might have to edit it somewhat. It's best to move all old X11 files you have to another directory, and then merge the old and new
files.
If you use xdm, you should use .xsessionrc instead of .xinitrc, because xdm doesn't look at your .xinitrc file.
Please refer to Chapter 23 for a detailed discussion on .xinitrc and installing X on your Linux system.
You should take the following steps to convert this .xinitrc file into one for using OpenWindows:
- Change the reference to your window manager to either olwm or olvwm depending on which window manager you want to use.
- Ensure that the /usr/openwin/bin directory is in your path.
- You need an environment variable, OPENWINHOME, to be set to the directory where the files for your openwin system will reside. This variable is usually set to /usr/openwin when you log in.
- Copy the .xinitrc file into .xsessionrc file if you are going to use xdm.
There are other optional files you can create in your $HOME directory, depending on which version of olwm or olvwm you use:
- .openwin-init
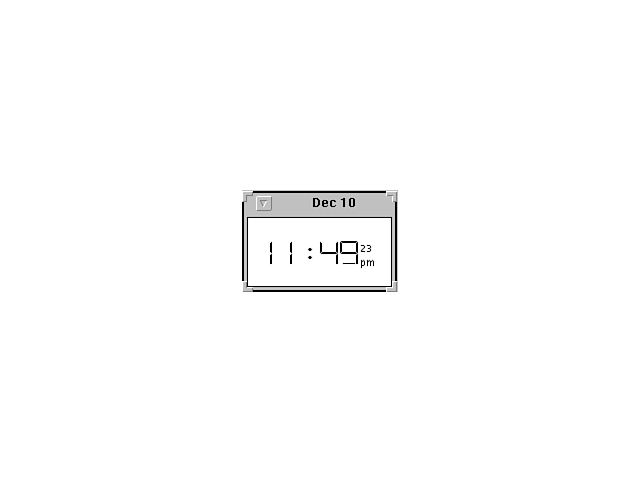
- This file is used to initialize your desktop when you start OpenWindows with olwm or olvwm. A sample .openwin-init file is shown in Listing 24.2. This sample file shows how two xterms and one clock application are started every time you start a
session. OpenWindows looks at a file called .openwin-init in your home directory. If .openwin-init is not found in the home directory, OpenWindows looks in the $OPENWINHOME/lib directory. The .openwin-init file contains a list of applications to start by
default.
Listing 24.2. A sample .openwin-init file.
#!/bin/sh

#

# Created by 'xtoolplaces' on Fri Dec 9 23:10:23 1994

#

/usr/bin/X11/xterm -sb -sl 500 -j -ls -fn 7x14 -geom 82x24+45+52 &

clock -Wp 4 5 -Ws 172 52 -WP 224 533 +Wi &

xterm -e /bin/bash -geom 80x24+103+89 &
- .openwin-menu*
Look in $OPENWINHOME/lib (normally /usr/openwin/lib) for this and other similarly named (openwin-menu-s, openwin-menu-d, and so on) files without the leading period (.). We will discuss these files in the "Environment Variables" section later in this chapter.
- .Xdefaults
The .Xdefaults file applies to OpenWindows as well. You can put X Window resource specifications in here. In particular, it is a good idea to include at least
OpenWindows.FocusLenience: true

*Input: TRUE
These enable non-ICCCM-compliant programs to receive input even if they forget to ask for it.
props, the program that runs when you select Properties from the default root menu under olwm or olvwm, writes your choices into .Xdefaults.
Don't put comments in .Xdefaults, because props deletes them.
Note that the mouse speed for OpenWindows is best set in your .xinitrc with xset m. See the man page for xset (man xset and xset -help) for more information. Do not use the .startup.ps file for setting the mouse speed as suggested by some texts. This is because the .startup.ps method can cause more problems if not used correctly.
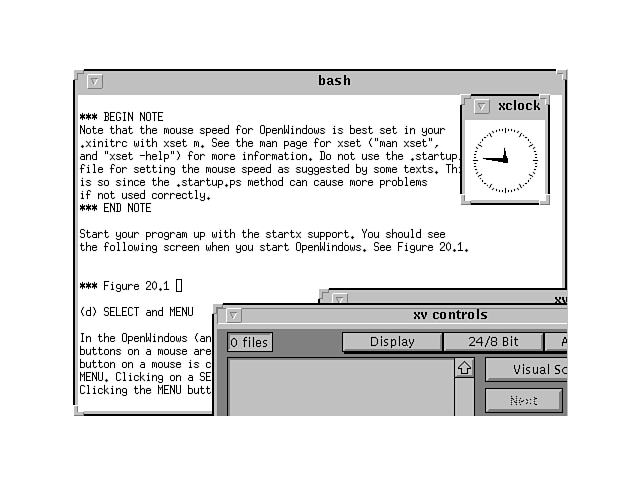
Start your program up with the startx support. See Figure 24.1 for what you should see when you start OpenWindows.
Figure 24.1. The Xterm in OpenWindows.
SELECT and MENU
In OpenWindows (and Sun Workstations, for that matter), the left and right buttons on a mouse are referred to as SELECT and MENU, respectively. Clicking the SELECT button in a window selects a window. Clicking the MENU button in a window displays any
menu for that application.
If you have a three-button mouse, the middle button is called the ADJUST button. You can simulate an ADJUST button on a two-button mouse by clicking both buttons together.
The Shift-Button1 combination is also ADJUST, and Ctrl-Button1 is also MENU. These two combinations are useful if you have a one-button mouse.
Working Within OpenWindows and olwm
Let's examine the borders on an Xterm in OpenWindows in greater detail. (See Figure 24.2.) These borders are drawn by olwm and have special functionality.
Figure 24.2. OpenWindows borders.
The resize handles (buttons) are the indentations on each window. You can resize a window by pressing and holding SELECT over any of the resize corners and then dragging the mouse to the new location.
Releasing the mouse button sets the new size of the window. If you hold down the Ctrl key while you are dragging, the resize operation is constrained to resize vertically or horizontally, depending on which direction you move first.
The window button is the small box with a downward-pointing triangle near the left end of the title bar. Clicking MENU over the window button brings up the window menu. Clicking SELECT over the left mouse button on the window button executes the window
menu's default action. This usually closes the window into an icon. You can change the window menu's default action by holding down the Ctrl key while manipulating the window menu.
An icon represents a closed window. You can still do most of the same operations as with an open window. Moving and selecting icons with SELECT and ADJUST is exactly the same as for open windows. A similar version of the Window menu is available on an
icon by pressing MENU. Double-clicking SELECT opens the icon. Icons cannot be resized.
You can select a group of windows and icons by using the left or middle mouse buttons over the workspace (the area of the screen outside of all windows and icons, commonly known as the "root window"). Pressing either SELECT or ADJUST and
dragging the mouse defines a rubber band rectangle.
When you release the mouse button, you will be operating on the set of windows and icons enclosed by this rectangle. If you created the rectangle using SELECT, the windows and icons within will be selected, and all other objects will be deselected. If
you used ADJUST, the objects within will have their selected state toggled, and any other windows and icons already selected will remain selected.
Some OPEN LOOK pop-up windows have a pushpin instead of a Window button. The pin is either in or out, and you can click SELECT on the pin to change it to the other state. If the pin is out, pressing a command button inside the window executes the command and then dismisses (takes down) the window. If the pin is in, the window is "pinned" to the workspace, and it remains on the screen even after you have pressed a command button in the window. This enables you to press several command buttons in the same window. Pulling the pin out (by clicking SELECT over it) dismisses the window immediately.
Menus
XView supports menus of the form shown in Figure 24.3. This is a sample menu containing options for you to choose. These menus are called pop-up menus.
Figure 24.3. The pinnable Workspace menu.
Pop-up menus are operated using the MENU mouse button. There are two methods of operating with an OPEN LOOK menu: the click-move-click method and the press-drag-release method. You choose either method by clicking the MENU button (pressing and releasing
it quickly) or by pressing it down and holding it.
If you click the MENU button, a menu pops up and will stay up indefinitely. To continue operating the menu, click the MENU button over a menu item. To dismiss the menu, click the MENU button on an area of the screen outside the menu. To operate menus in
press-drag-release mode, press the MENU button and hold it down while you move the mouse. The menu remains on the screen as long as you hold down the MENU button. To execute an action, move the pointer over a menu item and release the mouse button. To
dismiss the menu, move the pointer outside the menu and release the MENU button. Some menu items have a submenu. This is indicated by a right-pointing triangle at the right edge of the item. To activate a submenu, click on the item (in click-move-click
mode) or move the pointer to the item and then move toward the right edge of the menu (in press-drag-release mode).
Some menus have pushpins. If a menu has a pushpin, it will initially be in the "out" state. If you click on the pin (in click-move-click mode) or move over it and release (in press-drag-release mode), you will pin the menu to the workspace.
The menu will remain on the screen indefinitely, and you can execute commands from it by clicking on its items. To remove the menu, move over the pin and click SELECT on it.
The Workspace Menu
Pressing MENU over the workspace brings up the Workspace menu. This menu is customizable, but it typically contains at least the following items. The arrows to the right of any item indicate a submenu for the displayed item. (See Figure 24.3.)
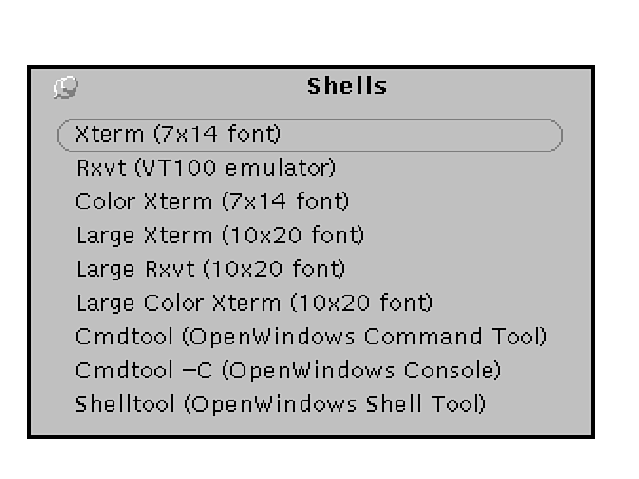
- Shells This item opens up another submenu with shells to choose from, including color terminals, X Terminals, VT100 emulator, and other assorted shells. (See Figure 24.4.) You can also pin this menu to your desktop. Clicking the MENU button on the menu
brings up another submenu enabling you to resize this menu.
Figure 24.4. The Shell selections from the main menu.
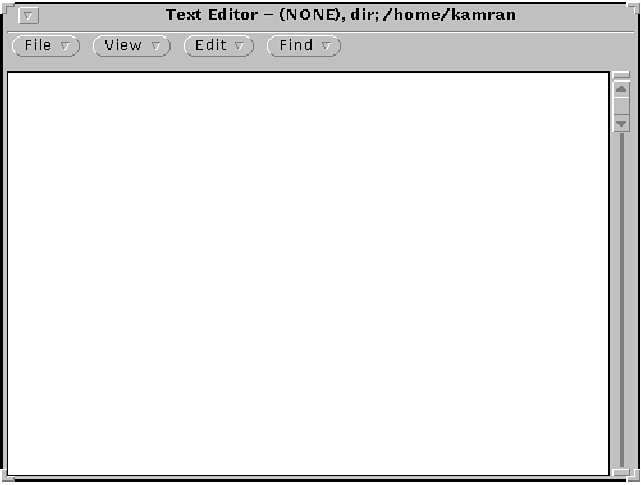
- Editors This item lets you select many types of editors, including Textedit, the standard OpenWindows text editor. See Figure 24.5 for a view of the Textedit.
Figure 24.5. The Textedit utility.
The Cut utility can be used to cut and paste sections between files. You can access any of the menu items by using the SELECT button on any of the menu items.
- Tools This opens up the File Manager, manual reader, calculator, spreadsheet, and other assorted items. (See Figure 24.6.)
Figure 24.6. The File Manager utility.
- Games This item has a submenu that enables you to invoke games. Check it out.
- Utilities This item has a submenu that contains several utility functions for the workspace, including Refresh (redisplay all windows on the screen), Lock Screen, and Save Workspace.
- Properties This item brings up the Workspace Properties window, which enables you to view and customize settings of the OpenWindows environment.
- X11 programs This item brings up a very long menu of all the X11 programs in /usr/bin/X11.
- XView programs This item brings up a very long menu of all the X11 programs in /usr/bin/openwin.
- XV 3.00 This brings up the program that I used to capture all the screens for this guide.
- The Window menu This lets you choose any window on your desktop as your active window.
- Screen saver option This item lets you select a screen saver for your session. The Lock screen item is similar to screen saver except that it requires your password to restore the desktop.
- Exit This selection shuts down all applications and exits the windowing system. A confirmation notice appears first to give you a chance to cancel the operation.
In the menu for a window, you will see two selections: Close and Quit. The Close selection closes the window into an icon, but the application for that window is not terminated. The Quit selection actually terminates the program and gets rid of the window.
Configuring Menus for OpenWindows
Look in $OPENWINHOME/lib (normally /usr/openwin/lib) for the file openwin-menu and other files of the form openwin-menu-*. Copy these files into your home directory with a period in front of them. For example, copy openwin-menu as .openwin-menu.
The .openwin-menu file is used to set up your workspace menu. Look at Listing 24.3 for this file.
Listing 24.3. The default .openwin-menu file.
#

# @(#)openwin-menu 23.15 91/09/14 openwin-menu

#

# OpenWindows default root menu file - top level menu

#

"Workspace" TITLE

"Shells " MENU $OPENWINHOME/lib/openwin-menu-s

"Editors " MENU $OPENWINHOME/lib/openwin-menu-e

"Tools " MENU $OPENWINHOME/lib/openwin-menu-t

"Games " MENU $OPENWINHOME/lib/openwin-menu-g

"Utilities " MENU $OPENWINHOME/lib/openwin-menu-u

#"Slingshot Examples " MENU $OPENWINHOME/lib/openwin-ss-ex

#

#"UIT Examples " MENU $OPENWINHOME/lib/openwin-uit

"Properties " PROPERTIES

SEPARATOR

"X11 Programs " DIRMENU /usr/X11R6/bin

"XView Programs " DIRMENU $OPENWINHOME/bin

"XV 3.00" exec /usr/X11R6/bin/xv

"Window Menu " WINMENU

SEPARATOR

"Screensaver " MENU $OPENWINHOME/lib/openwin-menu-screensave

"Lock Screen " MENU $OPENWINHOME/lib/openwin-menu-xlock

"Exit" EXIT
Let's look at some of the entries in this .openwin-menu file.
- The # signs mark lines as comments.
- The line "Workspace" TITLE defines the name of the menu.
- The next line defines "Shells " as a menu located in a file $OPENWINHOME/lib /openwin-menu-s.
- The "XV 3.00" entry executes the command /usr/X386/bin/xv via the exec command.
- The "Window Menu " entry invokes a special entry for selecting windows via a WINMENU type of window.
- The "XView Programs " entry uses a type DIRMENU to list all the files in $OPENWINHOME/bin.
- The SEPARATOR type draws an empty box at its position.
You can now use different files for customizing your menus differently by adding or deleting items to this file.
The menu specification language has a number of keywords, all of which are in all-uppercase letters.
The syntax for this file is straightforward. Each line typically specifies one menu button. There are three fields per each uncommented line. The first field defines a label, an optional keyword, and an action to take if the item is selected.
The label is either a single word or a string enclosed in double quotes. This string appears in the menu button. If the optional keyword DEFAULT appears next, this menu item becomes the default item for this menu. The rest of the line (excluding leading
whitespace) is considered to be a command. It is executed by sending it to bash. Any shell metacharacters are passed through to the shell unchanged.
The command field can be extended onto the next line by placing a backslash (\) at the end of the line. The newline will not be embedded in the command.
A submenu is specified using the special keyword MENU in place of a command. A button is added to the current menu, and clicking or pulling right on this button brings up the submenu. Subsequent lines in the menu file define buttons for the submenu,
until a line that has the special keyword END in the command field is encountered. The label of the MENU line must match the label on the END line; otherwise an error is signaled.
Submenus can be nested arbitrarily, bracketed by MENU and END lines with matching labels.
Submenus can be defined in a different file using either the MENU or the INCLUDE keyword. To include a submenu from another file, use a line with a label, either the MENU or the INCLUDE keyword, and then the filename. The file so named is assumed to
contain lines that specify menu buttons. The submenu file need not have any MENU or END lines (unless it has submenus itself). The current file need not have a matching END line if the submenu is read from another file. Submenu files included with the MENU
keyword are considered to be an integral part of the menu tree, and any error encountered during the reading of the file will cause the entire menu to be considered invalid. A submenu file included with the INCLUDE keyword is considered optional, and any
error encountered during reading of the file is not considered fatal. If an error occurs during INCLUDE processing, a disabled (grayed-out) item is inserted in place of the submenu and processing of the current menu file continues.
To make a submenu pinnable, add the special keyword PIN after the END keyword on the line that ends the submenu definition, or after the TITLE directive (I'll discuss that in a minute).
By default, the label in a menu button is used as the title of the submenu.
This can be overridden by specifying a line that has the special keyword TITLE in the command field. The label from this line is used as the submenu's title. This line can appear anywhere in the submenu definition.
It does not add an item to the menu. In addition, if the PIN keyword follows the TITLE keyword on this line, the submenu is made pinnable.
This construct is useful for declaring a submenu defined in a separate file as pinnable.
A line containing only the keyword SEPARATOR adds extra space before the next item.
Table 24.1 lists keywords that can be used in the command field of a menu item. They specify functions that are internal to olwm and that are not invoked by running a shell.
| BACK_SELN | Moves the selected windows and icons behind other windows. |
| EXIT | Kills all applications and exits the window manager after getting confirmation from the user. (This is useful for exiting the entire window system.) |
| EXIT_NO_CONFIRM | Like EXIT but skips the confirmation notice. |
| FLIPDRAG | Toggles the state of the DragWindow resource. |
| FLIPFOCUS | Toggles the state of the SetInput resource. |
| FULL_RESTORE_SIZE_SELN | Toggles the full-sized/normal-sized states of the selected windows and icons. |
| NOP | No operation. Don't do anything. |
| OPEN_CLOSE_SELN | Toggles the opened/closed states of the selected windows and icons. |
| QUIT_SELN | Quits the selected windows and icons. |
| PROPERTIES | Brings up Workspace Properties. |
| REFRESH | Causes all windows on the screen to be repainted. |
| REREAD_MENU_FILE | Forces an immediate rereading of the workspace menu customization file. Olwm starts a complete search for a menu file and uses the first valid file it finds. |
| RESTART | Restarts the window manager. |
| SAVE_WORKSPACE | Takes a snapshot of the set of currently running applications, and put the command lines so obtained into a file $HOME/.openwin init (in the user's home directory). This runs the command specified by the SaveWorkspaceCmd resource. |
| START_DSDM | Starts providing the DSDM service. |
| STOP_DSDM | Stops providing the DSDM service. |
| WMEXIT | Exits the window manager without killing any applications. |
The Virtual Desktop
olvwm is a window manager with a virtual desktop. You use the olvwm command to invoke this window manager. Change olwm to olvwm in your .xinitrc file.
olvwm is a virtual window manager for the X Window System that implements parts of the OPEN LOOK graphical user interface. olvwm differs from olwm in that olvwm manages a virtual desktop that is larger than the actual screen.
The Virtual Desktop Manager
When it is started, olvwm displays a Virtual Desktop Manager (VDM) window. The VDM is the window that provides a scaled-down version of the entire desktop.
If the desktop is running in default mode, it displays a grid, each square of which maps to the size of the monitor. Each square is termed a Logical Screen.
The Current View is that part of the desktop that is currently displayed on the screen. A Virtual Window is a small rectangle displayed in the VDM. Every window on the desktop has a corresponding virtual window in the VDM.
The VDM always appears on the screen. (See Figure 24.7.)
Figure 24.7. The Virtual Desktop Manager.
"The Virtual Desktop" section was authored by Scott Oaks, scott.oaks@sun.com, who is also responsible for its maintenance. This olwm and olvwm code is not supported by Sun Microsystems in any way. The staff at Sun Microsystems, and especially Stuart Marks, deserve credit as original author(s) of olwm for most of the work contained in XView.
By default, the VDM (and hence the desktop) is divided into a grid. Each square of the grid represents a screen size. The dividing lines between each logical screen are represented by dashed lines in the VDM. This division into logical screens is purely
informational. If you like, windows can straddle these boundaries, the current view into the desktop can straddle them also, and windows can be moved at will between them. However, by default, most actions in the VDM keep the current view along these
boundary lines.
You can use the resize corners on the VDM to resize the virtual desktop. If you make the virtual desktop smaller, windows that might be off the new virtual desktop are NOT moved (though they are not lost, either, because you can get them back by
resizing the desktop). Space added or subtracted is always done so from the right and bottom of the desktop (regardless of which resize corner you used).
Working with Virtual Windows
Events that occur in a particular virtual window behave just as if they were delivered to the corresponding application's frame. Thus, pressing the MENU button over a virtual window brings up the Frame menu and enables the real (and virtual) windows to
be opened, closed, resized, and so on.
Pressing the SELECT button selects that real (and virtual) window. Pressing the ADJUST button adds (or subtracts) that window from the selection list.
SELECTing and dragging one or more virtual windows moves the real and virtual windows (just as in olwm). Note that if you drag the mouse outside of the VDM, the window can be moved onto to the screen. Conversely, when dragging a window on the screen, if
the mouse moves into the VDM the window's icon moves to another location within the VDM. However, if part of the VDM is obscured, you cannot move a window into that part of the VDM.
Note that events are delivered only to the real application's frame. Thus, typing characters or using the COPY/CUT/PASTE keys has no effect.
It is possible to drop something onto a virtual window as if it were dropped onto the corresponding application. This enables you to drag a file in one window on the screen to another application on another part of the desktop.
Double-clicking the SELECT button on an area in the VDM background moves the current view to the logical screen containing the point where the mouse was double-clicked.
The MENU button brings up a (pinnable) menu that enables movement based on full screen sizes in the direction indicated. See Figure 24.8.
Sticky Windows
You'll notice that the Virtual Desktop Manager never moves on your screen if you change views into the desktop. That's because the VDM is permanently sticky.
Windows that are sticky never move position on the screen when you change your view into the desktop. To set a particular window as sticky, simply select Stick in its Frame menu. You may similarly unstick the window via its menu.
Menus for base windows include the Stick and Unstick commands.
Only base frames—those that can be iconified, as opposed to those that have a pushpin—are eligible to become sticky. Some frames inherit the stickiness of their base frames. Thus, for most applications, either all windows are sticky or none of them are. The exception to this is applications that create two or more base frames: All base frames are originally created as unsticky (but see the following discussion on the VirtualSticky resource).
Windows that are sticky always appear in the same place on the screen no matter which part of the virtual desktop you're viewing. Windows that are not sticky (by default, all windows except the VDM) move when you change the current view on the virtual
desktop.
Like olwm, olvwm uses key bindings for certain actions. All actions are specified in olwm as well as an additional set of actions to control the view into the desktop. You can use the Function keys F1 through F9 with the Alt key to switch virtual
screens.
Resources in OpenWindows
You can customize OpenWindows using resources. Resources affect the behavior of applications in olwm. Global resources in olwm consist of two resource components:
- The resource name is taken from the trailing pathname component of argv[0]. This value is typically olwm.
- The second resource component names the global attribute being set.
Thus, to set the AutoColorFocus attribute, one would use olwm.AutoColorFocus as the resource specification in .Xdefaults. olvwm will read a resource file ($HOME/.olvwmrc) for your resources.
olwm automatically picks up changes to many of these resources if the resource database changes at runtime. You can modify olwm's behavior by changing the resource database with xrdb or with Workspace Properties.
If a resource value is specified on olwm's command line, it overrides the value in the resource database. Therefore, changing the resource's value in the database has no effect on this resource setting.
Some customizations include the following:
| Hot Keys | You can specify that when a certain key (or, more likely, key in combination with modifiers) is pressed, certain actions are performed. You can warp to a particular application, and open, raise, close, execute, and quit applications. |
| Screen Bindings | You can specify that certain applications will always start on a particular logical screen. |
| Menu Options | You can alter the behavior of WINMENU selections on a particular window. |
More resources are listed in the man pages for olwm, olvwmrc, and olvwm.
Using Text-Editing Features
In general, the editing/moving commands go in the opposite direction when shifted—that is, Ctrl-W deletes a word, and Ctrl-Shift-W deletes the word to the right of the insertion point.
Alt-i - include file Alt-f - find selection (forward/backward)

Ctrl-a - start of line Ctrl-< - back word

Ctrl-e - end of line Ctrl-> - forward word

Ctrl-w - delete word Ctrl-u - delete to start/END of line

Ctrl-Return - move to end/START of document
See the olwm and olvwm man pages for a list of some of the default keys.
You can cut and paste between XTerm and other OpenWindows programs. I will use textedit as a sample program.
To go from XTerm to textedit (for this example):
- Select the text you want to copy by dragging the SELECT mouse button in XTerm.
- Press COPY in the XTerm (this key is Alt-C).
- Move to the textedit window, and press PASTE (Alt-V).
To go the other way, from textedit to XTerm:
- Select the text in textedit. No need to use COPY.
- Move to the XTerm window and press the middle mouse button.
(If you have a two-button mouse, press both left and right buttons together.)
You can also use the COPY/CUT and PASTE buttons.
For Quick Copy within textedit, mailtool, and similar programs:
- Click SELECT to get a text caret where you want the copied text to go.
- Press and hold down the PASTE (or CUT) button.
- Select the text you want to copy/move. You'll see that it's underlined or crossed out—or even a different color.
- Let go of the PASTE (or CUT) button. The text you underlined or crossed out appears at the insert caret.
To drag-and-drop to move a selection, follow these steps:
- Select the text you want to copy or move by dragging or multiple-clicking the SELECT or ADJUST mouse button.
- Put the mouse pointer anywhere within the selection.
- Press and hold down the SELECT mouse button and move the mouse pointer a little to the right. You'll see the cursor change into the first three letters of the text (or some other icon).
- Still holding down the SELECT button, move the mouse over the point where you want to drop the text.
- You may see the mouse pointer change to a rifle sight or target, to show that it's OK to drop things there.
- Release SELECT and the text is moved. This works in text fields of dialog boxes as well as in text subwindows.
To drag-and-drop to copy a selection, you must hold the Ctrl key down as well as the SELECT mouse button.
Support for Left-Handed Users
You can configure OPEN LOOK for a left-handed mouse and keyboard. Use xmodmap to change the mouse buttons. Type man 7 xview for a list of key bindings you can change, at least for XView programs.
Unlike the Motif release, the xmodmap for mouse-key reversal sometimes does not work right. In fact, it may actually reverse some keys on your keyboard or have some other surprising results. You have been warned.
With OpenWindows 2.0, you can use defaultsedit to set the mouse mappings and then let SunView handle them. The status returned by svenv should tell you whether your server is running under SunView or not; put this in your .xinitrc:
if eval 'svenv -env'

then

xmodmap -e "pointer = 1 2 3"

input_from_defaults

else

xmodmap -e "pointer = 3 2 1"

fi
Troubleshooting
Here are some solutions to problems you might have:
- If man doesn't seem to find OpenWindows commands, even though you are running OpenWindows, try setting the MANPATH environment variable:
MANPATH=$OPENWINHOME/share/man:/usr/man; export MANPATH
or
setenv MANPATH $OPENWINHOME/share/man:/usr/man
for csh users. $OPENWINHOME should be /usr/openwin on most systems. Set your path so that $OPENWINHOME/bin (and $OPENWIN/bin/xview for OpenWindows 2) come before /bin (or /usr/bin, they're the same), or you'll get the SunView versions of mailtool, cmdtool, shelltool, and so on.
- Dropped characters when you type into applications.
In this case, include the following lines in your .Xdefaults file, as these enable non-ICCCM-compliant programs to receive input even if they forget to ask for it.
OpenWindows.FocusLenience: true
*Input: TRUE
- CUT and PASTE just do not work. Add the following either to your $HOME/.Xdefaults file or to $OPENWINHOME/lib/app-defaults/XTerm instead:
XTerm*VT100.Translations: #override \
<Key>L6:select-set(CLIPBOARD)\n\
<Key>L8:insert-selection(CLIPBOARD)
If this text is already in the app-defaults file, check that XFILESEARCHPATH is set to
/usr/openwin/lib/%T/%N%S
If it isn't, either set it or copy/merge these lines from $OPENWINHOME/lib/app-defaults/XTerm into /usr/lib/X11/app-defaults/XTerm.
This version automatically puts each xterm selection onto the Clipboard:
XTerm*VT100.translations: #override\n\
~Ctrl ~Meta<Btn2Up>: insert-selection(PRIMARY,CUT_BUFFER0)\n\
~Ctrl ~Meta<BtnUp>: select-end(PRIMARY,CUT_BUFFER0,CLIPBOARD)\n\
<KeyPress>L8: insert-selection(CLIPBOARD)
Be sure that the \n\ is at the very end of all lines in the middle.
- If you get error messages that look like the following lines,
Xlib: connection to ":0.0" refused by server
Xlib: Internal error during connection authorization check
Error: Can't Open display
try the command xhost-machine, where machine is the computer on which you ran the command that failed.
If you want to let other users run programs on the same machine as you, using your display, you have to type the command xhost +'hostname', which lets any user on 'hostname' access your display.
- Your screen flashes between applications. This is because most hardware can only display a few colors at a time. Try the following steps:
- Start all the applications with colors that you wish to reserve.
- Run cmap_compact save to create the .owcolors file.
- Put the line cmap_compact init near the start of your I start-up file (.xinitrc).
- Exit and then restart the window system.
- cmap_compact init pushes those .owcolors colors to the end of the colormap and reserves them.
- Start all the applications with colors that you wish to reserve.
Also note that Ctrl-L2 locks the colors of the current window, and Ctrl-L4 unlocks them—this is described in the olwm man page.
See the X*.faq in the /usr/docs/faq directory for detailed information on problems specific to different platforms. The FAQ file can be give you a lot of information about Linux and what problems to expect.
Environment Variables
XView for Linux uses the following environment variables:
- DISPLAY The name of the X Window display to use :0.0 (on the local machine, the one actually running X11 or xnews) :0.1 (on some machines for a second, monochrome screen) machine-running-unix:0.0 (on other machines). (You may need to do xhost
+other-machine to let programs on other machines use your display.)
- HELPPATH Where XView looks when you press the Help key (or F1): /usr/openwin/lib/locale:/usr/openwin/lib/help.
- LD_LIBRARY_PATH is set to find shared C libraries. It is usually defaulted to this value:
/usr/lib:/usr/5lib:/usr/openwin/lib:/usr/CC/'arch'
- OPENWINHOME Where OpenWindows lives (/usr/openwin).
- PATH Where the shell searches for programs to run.
- Include this line:
$(OPENWINHOME)/bin:$(OPENWINHOME)/bin/xview
- XFILESEARCHPATH Where programs look for app-defaults files (/usr/openwin/lib/%T/%N%S). This is usually set to: $OPENWINHOME/lib/%T/%N%S:/usr/lib/X11/%T/%N%S.
Special Help for Sun Workstation Users
If you work with Sun Microsystems Sun Workstations, then the olwm and olvwm managers should make life easier for you. If you want to make life even easier, you can map the function keys to reflect that of Sun workstations. To do this, you have to modify
the .Xmodmap file in your home directory. If you do not have a .Xmodmap file, you can create one with a text editor.
The best place to look is in the man pages for .Xmodmap. The man pages are full of examples, some of which I will describe briefly here. For issues specific to your setting, read the man pages.
A typical .Xmodmap file will look like this:
keysym F1 = xman

keysym F2 = F19

keysym F3 = F20

keysym F4 = F16

keysym F5 = F18
The undo button is ominously absent from the .Xmodmap entries. To get this entry, add the following line. (The text after the ! is a comment and ignored by X.)
keysym F6 = F14 ! The undo button.
For example, if you hate the location of the shift and control keys on your PC, you can swap the location. Simply put these lines in your .Xmodmap file:
remove Lock = Caps_Lock

remove Control = Control_L

keysym Control_L = Caps_Lock

keysym Caps_Lock = Control_L

add Lock = Caps_Lock

add Control = Control_L
You can also assign the meta key to a function key using this line:
keysym F9 = Meta_L
Finally, when you have made your changes, you have to tell the server to use them. It's too cumbersome to shut down the window manager and restart it. Instead, you can use the rdb command:
$ xrdb .Xdefaults.
You can also invoke specific settings from the command line using xmodmap. For example, type the following line:
$ xmodmap -e "keysym F9=Meta_L"
Modifying the .Xmodmap file is better in that the changes are preserved for future sessions.
Internet Sites for XView
XView 3.0 is available by anonymous FTP from export.lcs.mit.edu if you want to upgrade the CD-ROM version.
OpenWindows can also be obtained from Sun, or you can get the source from Interactive Systems Inc. It is also included in some vendors' System V Release 4 implementations, although that's not always the latest version.
The current release of OpenWindows from Sun for supported architectures is 3.0; for the Sun 3 series it is frozen at OpenWindows 2.0.
Sun includes OpenWindows with SunOS, and it is also included as the windowing system for Solaris.
There are said (by Sun) to be more than 35 ports of OpenWindows either available now or in progress. Unfortunately, none of them seem to be available from anywhere.
Douglas N. Arnold (dna@math.psu.edu) keeps an up-to-date FAQ on ftp.math.psu.edu (currently 146.186.131.129) in the file /pub/FAQ/open-look.
MoOLIT can be bought from AT&T in source form.
Where To Go for More Information
Nabajyoti Barkakati gives an excellent introduction to X and to OLIT programming, as well as setting up and using X and OpenWindows, in
UNIX Desktop Guide to OPEN LOOK, Sams, 1992, ISBN 0-672-30023-0
The OPEN LOOK Graphical Interface is documented in two guides:
Sun Microsystems Inc., OPEN LOOK Graphical User Interface Application Style Guidelines, Addison Wesley, 1989.
Sun Microsystems Inc., OPEN LOOK Graphical User Interface Functional Specification, Addison Wesley, 1989.
David Miller describes programming with OLIT in his guide, An OPEN LOOK At UNIX (M&T Press).
You could also try The X Window System: Programming and Applications with Xt, OPEN LOOK Edition, by Doug Young and John Pew (Prentice Hall, 1992, ISBN 0-13-982992-X).
Sun Microsystems supplies a large amount of documentation with OpenWindows, although you may have to order it separately. The following list shows what I have; each guide is 8.5´11 and vary from about 1 to 2 inches thick. Each manual says
"User's Guide" or "Programmer's Guide" on the front cover. The user manuals have a red stripe on the bottom, and the programmer versions have a green stripe:
| 800-6006-10 | OpenWindows Version 3 Release Manual |
| 800-6029-10 | OpenWindows Version 3 Installation and Start-Up Guide |
| 800-6231-10 | OpenWindows Version 3 DeskSet Reference Guide |
| 800-6618-10 | OpenWindows Version 3 User's Guide |
| 800-6323-10 | Desktop Integration Guide |
| 800-6027-10 | Programmer's Guide |
| 800-6005-10 | OpenWindows Version 3 Reference Manual (the man pages) |
| 800-6319-10 | The NeWS Toolkit 3.0 Reference Manual |
| 800-6736-10 | NeWS 3.0 Programming Guide |
| 800-6055-10 | OLIT 3.0 Widget Set Reference Manual |
| 800-6198-10 | XVTiew 3.0 Reference Manual: Converting SunView Applications |
| 800-6854-10 | F3 Font Format Specification |
Sun's Answerguide CD-ROM contains much of this documentation and can prove to be a valuable source of information if you intend to port applications to Sun Workstations.
Summary
Here is what you should remember from this chapter on OPEN LOOK:
- XView is the OPEN LOOK GUI interface for Linux and is also referred to as OpenWindows. All three terms (XView, OPEN LOOK, and OpenWindows) are used interchangeably, but really refer to the same windowing interface.
- OPEN LOOK is not Motif. Not only are the window decorations different—the terminology used to convey actions is also different. (For example, Close in Motif generally kills an application and its window, whereas Close in OPEN LOOK iconifies a
window.)
- You can use two types of OPEN LOOK window managers: olwm and olvwm. The olwm is the base OPEN LOOK window manager and the olvwm extends olwm by providing many virtual screens for your desktop.
- You can use the .Xdefaults files with the olwm keyword to set resources for your applications under olwm. See the man pages for olwm and olvwm for details on all resources for your distribution.
- You can get more information from Sun Microsystems about OPEN LOOK.
- Most OPEN LOOK menus offer a feature that enables you to pin a menu onto your desktop. You must either unpin this menu, or kill its underlying application, to get rid of it.
- On the Virtual Desktop Manager (VDM), you can stick windows on your screen regardless of your virtual desktop by using the Stick/Unstick selection on the Applications menu. All dialog boxes with that menu will stick with it too.
- XView applications enable you to have drag-and-drop capabilities. For example, with the File Manager application you can manage files and directories by dragging them around with the mouse.
- Standard Motif applications should run under XView. XView applications should also run under Motif if you have the shared libraries in your path.
- You can customize dialog box menus to include all executables files in a directory. Check the openwin-menu file for examples.

Popular Tutorials
-
 MS Access
1109
MS Access
1109
-
 C++
1222
C++
1222
-
 HTML
584
HTML
584
-
 JavaScript
616
JavaScript
616
-
 Vbscript
873
Vbscript
873
-
 Oracle
473
Oracle
473
-
 VC++
875
VC++
875
-
 SQL
2959
SQL
2959
-
 XML
514
XML
514
-
 Java
814
Java
814
-
 Perl
455
Perl
455
-
 Linux
451
Linux
451