Web based School
A VBScript Application |
Gathering Requirements for Your Application Chapter Eight
|
| <HTML> <HEAD> <META NAME="GENERATOR" CONTENT= "Internet
Assistant for Microsoft Word 2.0z"> |
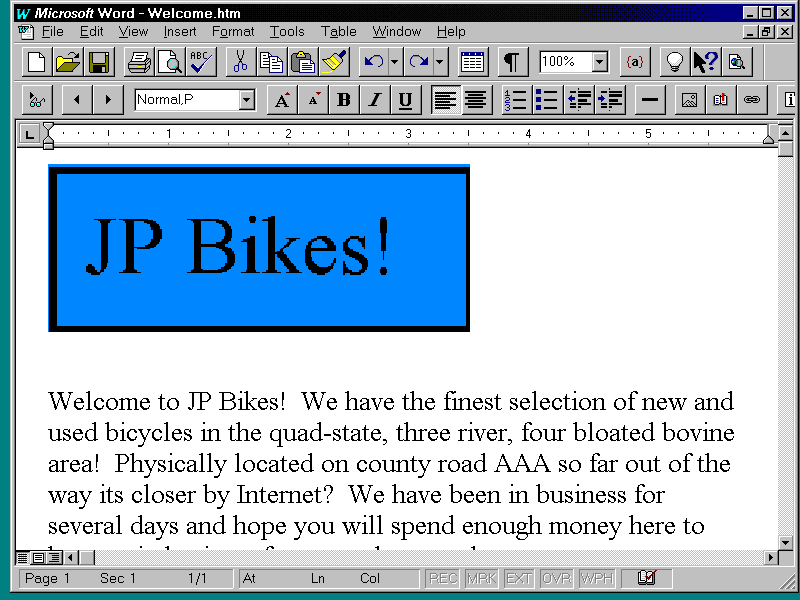
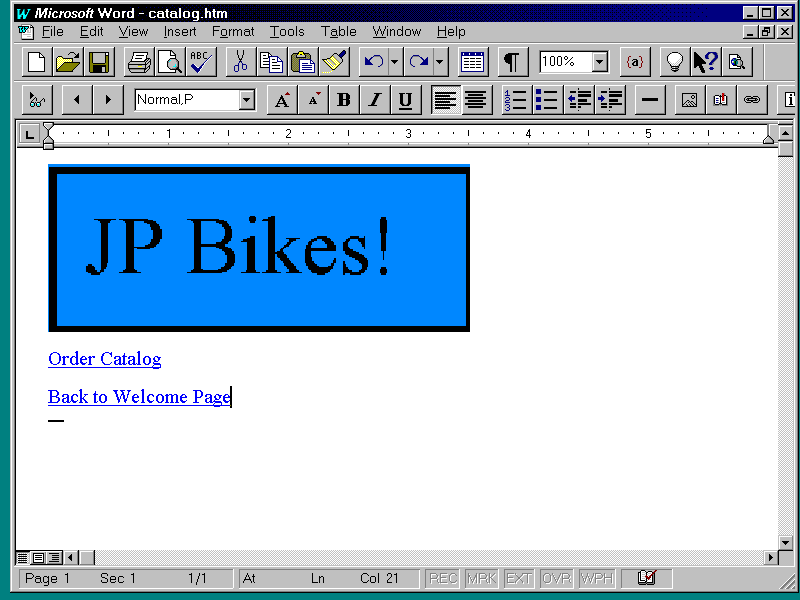
Next, open a new HTML page in Word. This will be the
Catalog page. You will be putting ActiveX controls here later. For now, you need a logo, a
return link to welcome.asp, and a link to catalog order page (catord.asp, which you will
generate with the Internet Information Server Add-In a bit later). Your page should look
like Figure 8.3.
Save your work as catalog.asp. Your HTML code should
look like Listing 8.2.
Listing 8.2. catalog.asp .
| <HTML> <HEAD> <META NAME="GENERATOR" CONTENT= "Internet
Assistant for Microsoft Word 2.0z"> |
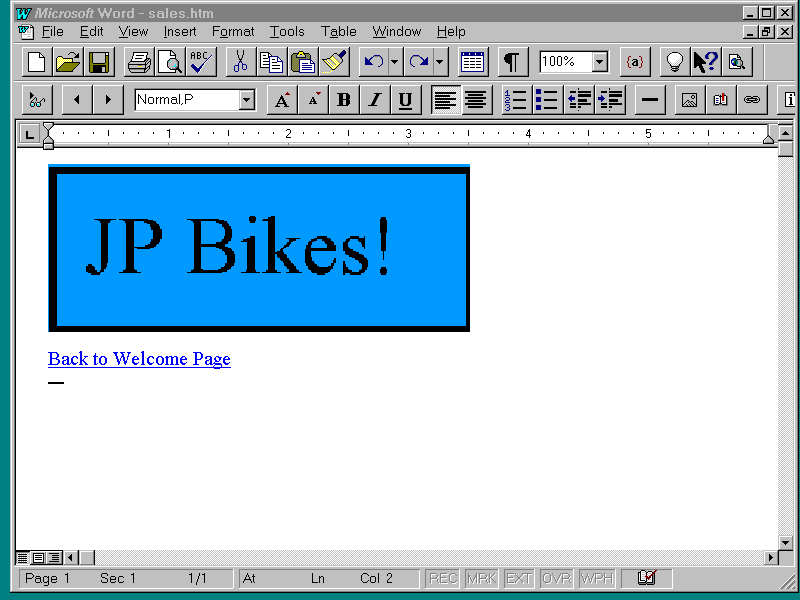
Open a new HTML page in Word. This
will be the Sales page. You will be putting ActiveX controls here to calculate the cost of
the order before the user sends it. You will also add some of the code generated by
Internet Information Server Add-In, and generate orders from this page. Place a logo and a
return link to the Welcome page (welcome.asp) on your Sales page. Your page should look
like Figure 8.4.
Save your work as sales.asp. Your HTML code should
look like Listing 8.3.
Listing 8.3. sales.asp .
| <HTML> <HEAD> <META NAME="GENERATOR" CONTENT="Internet Assistant for Microsoft Word 2.0z"> <TITLE>Untitled</TITLE> </HEAD> <BODY> <P> <IMG SRC="logo.bmp"> <P> <A HREF="welcome.asp" >Back to Welcome Page</A> </BODY> </HTML> |
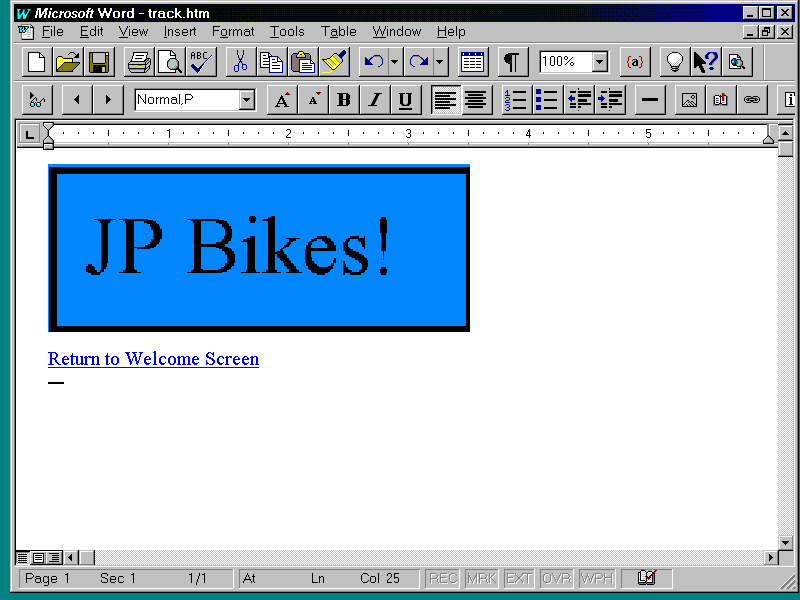
Open a new HTML page in Word. This will be the
Order-Tracking page. You will modify this page with frames and code generated by the
Internet Information Server Add-In. Again, all you need now is a logo and a return link to
the Welcome page (welcome.asp). Your page should look like Figure 8.5.
Figure 8.5. Order-Tracking
page.
Save your work as track.asp. Your HTML code should
look like Listing 8.4.
Listing 8.4. track.asp .
| <HTML> <HEAD> <META NAME="GENERATOR" CONTENT="Internet Assistant for Microsoft Word 2.0z"> <TITLE>Untitled</TITLE> </HEAD> <BODY> <P> <IMG SRC="logo.bmp"> <P> <A HREF="welcome.asp" >Return to Welcome Screen</A> </BODY> </HTML> |
This is a good place to stop and check your work.
Look at these pages and test the links in Word or in the browser. I recommend using the
browser because few of your friend's customers will be using Word to look at this site. Go
ahead and check, I will wait...
Design the Database in Access
I won't go into database theory or design philosophy
here. It would be fun, but it is beyond the scope of this guide. You will simply create the
objects you need.
Note
You don't need to use Access to build the database. You can use any database you have an ODBC driver for. To use another database, create the tables as described in this section. Add an ODBC entry to the system DSN as described in the next section. Finally, type the idc and htx files generated in the upcoming section, "Using the Internet Information Server Add-In," by hand (since this tool only works in Access). The important things are the column names in the database tables and the name you give the connection in the ODBC system DSN.
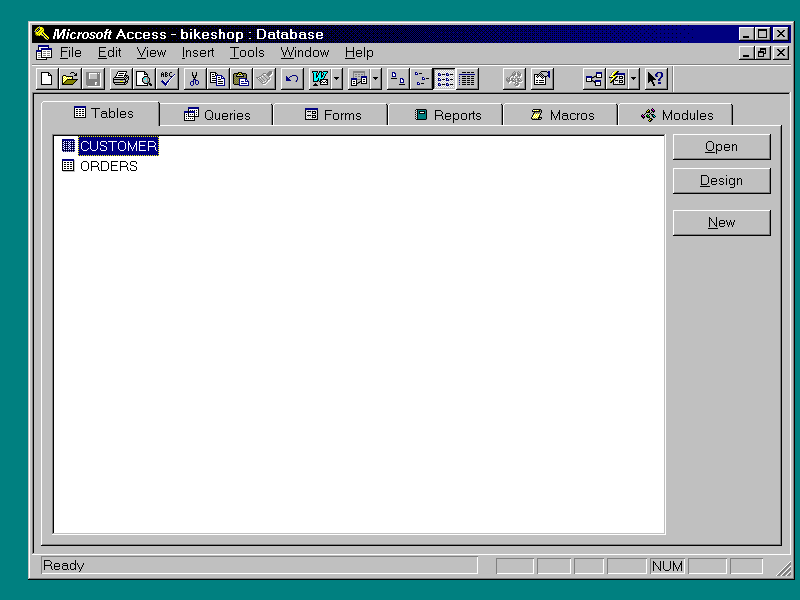
Open Access and create an new database called
bikeshop.mdb. Add two new tables, Customers and Orders, as shown in Figure 8.6.
Figure 8.6. Bike shop
database.
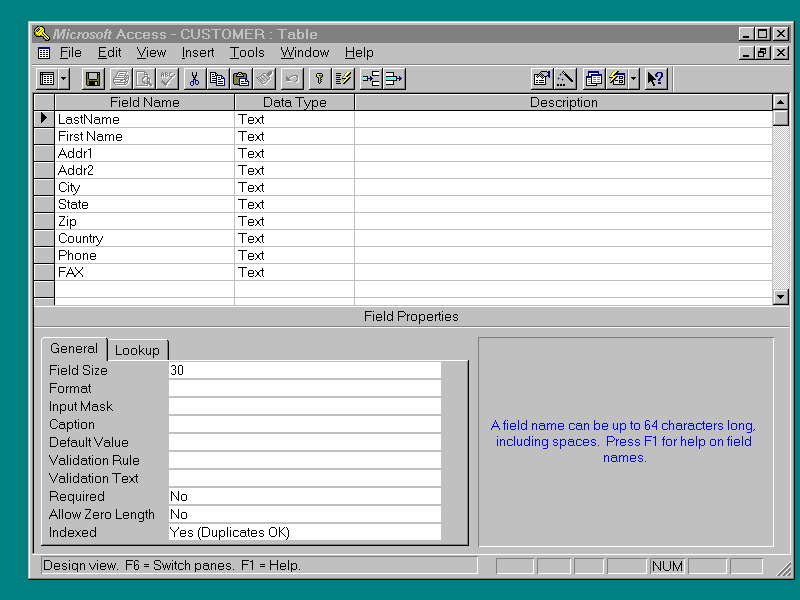
Switch to the Customers table and create the fields
shown in Figure 8.7.
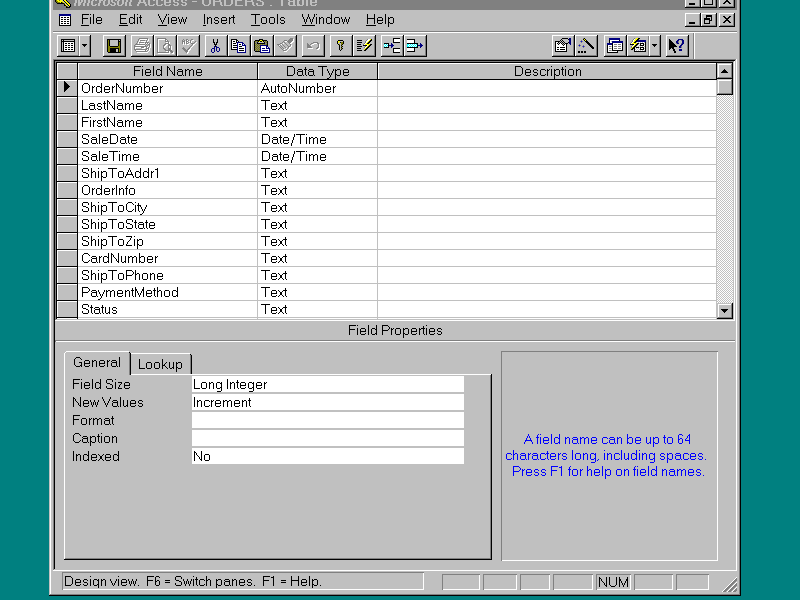
Switch to the Orders table and create the fields
shown in Figure 8.8.
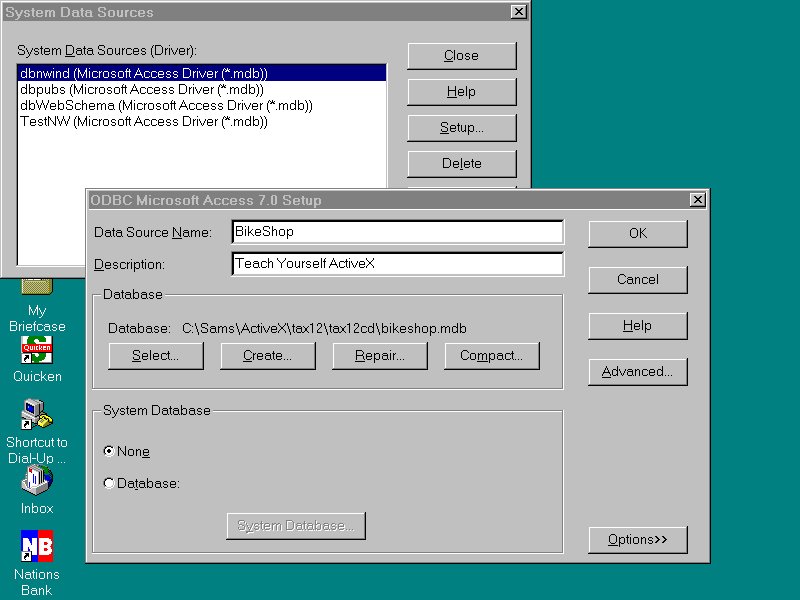
Add a Driver for the Bike Shop database to Your System's ODBC Manager
At this point, add a reference to your database to
the ODBC driver manager . Open up your ODBC administrator, click the System DSN button,
and add a new entry based on an Access driver. Fill in the entry, as shown in Figure 8.9.
Note
Those of you who have worked with ODBC before have probably never put an entry into the system DSN. The system DSN makes the data sources available to the system, or any other user that can log into the system.
Figure 8.9. ODBC
administrator.
Now you are ready to use the Internet Information
Server Add-In.
Using the Internet Information Server Add-In
Use the Internet Information Server Add-In to create
a page that will insert the customer's catalog-order information into your database. Call
it catord.asp. You must close and re-open Access for the Internet Information Server
Add-In to see the new entry you made in the ODBC administrator. Open the bike shop
database and launch the Internet Information Server Add-In by choosing it from Tools |
Add-Ins. On the first page of the Internet Information Server Add-In Wizard, choose Insert
Page Wizard. On the next screen, choose the Customers table (after all, asking customers
to order catalogs is just a sneaky way of getting their names and addresses). Proceed to
the field screen and add all the fields. Move to the final input page. You are going to
tinker with this screen, so there is no need to add anything. Click Finish; you have
created three files that resemble Listings 8.5, 8.6, and 8.7.
Note
The Access database you just set up has not been optimized to account for multiple users. See your database documentation to determine how to tune you database to handle multiple users.
Listing 8.5. catord.asp .
| <HTML> <META NAME="GENERATOR" CONTENT="IIS Add"> <HEAD><Title>HTML document for the World Wide Web</Title></HEAD> <BODY BGCOLOR="#FFFFFF"> <FORM ACTION="/scripts/catord.idc" METHOD = "POST" > <TABLE BORDER BGCOLOR="#FFFFFF"> <TR> <TD>LastName</TD> <TD><INPUT NAME="LastName"</TD></TR><P> <TR> <TD>First Name</TD> <TD><INPUT NAME="First Name"</TD></TR><P> <TR> <TD>Addr1</TD> <TD><INPUT NAME="Addr1"</TD></TR><P> <TR> <TD>Addr2</TD> <TD><INPUT NAME="Addr2"</TD></TR><P> <TR> <TD>City</TD> <TD><INPUT NAME="City"</TD></TR><P> <TR> <TD>State</TD> <TD><INPUT NAME="State"</TD></TR><P> <TR> <TD>Zip</TD> <TD><INPUT NAME="Zip"</TD></TR><P> <TR> <TD>Country</TD> <TD><INPUT NAME="Country"</TD></TR><P> <TR> <TD>Phone</TD> <TD><INPUT NAME="Phone"</TD></TR><P> <TR> <TD>FAX</TD> <TD><INPUT NAME="FAX"</TD></TR><P> </TABLE> <P><INPUT TYPE="SUBMIT" VALUE="Submit" ALIGN="MIDDLE"> <INPUT TYPE="RESET" NAME="reset" VALUE="Clear all fields" ALIGN="MIDDLE"></P></FORM> <HR=2> <CENTER>This page was produced by using the <B>IIS Add-In for Access 95</B>. <BR><I> 1996 Microsoft Corporation</I>.</CENTER> </BODY></HTML> |
The htx file is the template for the page sent back
by the Internet Information Server.
Listing 8.6. catord.htx .
| <HTML> <META NAME="GENERATOR" CONTENT="IIS Add In For Access 97"> <HEAD><Title>HTML document for the World Wide Web</Title></HEAD> <BODY BGCOLOR="#FFFFFF"> <P><B>The following information was recieved.</B><BR> <TABLE BORDER BGCOLOR="#FFFFFF"> <TR> <TD ALIGN="RIGHT"><B>LastName</B></TD> <TD><%idc.LastName%></TD></TR> <TR> <TD ALIGN="RIGHT"><B>First Name</B></TD> <TD><%idc.First Name%></TD></TR> <TR> <TD ALIGN="RIGHT"><B>Addr1</B></TD> <TD><%idc.Addr1%></TD></TR> <TR> <TD ALIGN="RIGHT"><B>Addr2</B></TD> <TD><%idc.Addr2%></TD></TR> <TR> <TD ALIGN="RIGHT"><B>City</B></TD> <TD><%idc.City%></TD></TR> <TR> <TD ALIGN="RIGHT"><B>State</B></TD> <TD><%idc.State%></TD></TR> <TR> <TD ALIGN="RIGHT"><B>Zip</B></TD> <TD><%idc.Zip%></TD></TR> <TR> <TD ALIGN="RIGHT"><B>Country</B></TD> <TD><%idc.Country%></TD></TR> <TR> <TD ALIGN="RIGHT"><B>Phone</B></TD> <TD><%idc.Phone%></TD></TR> <TR> <TD ALIGN="RIGHT"><B>FAX</B></TD> <TD><%idc.FAX%></TD></TR> </TABLE><P> <A HREF="/catord.asp">Return To Data Entry Page</A> <CENTER>This page was produced by using the <B>IIS Add-In for Access 97</B>. <BR><I> 1996 Microsoft Corporation</I>.</CENTER> </BODY></HTML> |
The idc file contains the query that will run
against the database.
Listing 8.7. catord.idc .
Datasource: BikeShop
Template: catord.htx
DefaultParameters:
SQLStatement:
+INSERT INTO "CUSTOMER" ("LastName", "First Name",
"Addr1",
"Addr2", "City", "State", "Zip",
"Country", "Phone", "FAX")
+VALUES ('%LastName%', '%First Name%', '%Addr1%', '%Addr2%',
'%City%', '%State%', '%Zip%', '%Country%', '%Phone%', '%FAX%');
#IDC-Insert FrontHTM-catord.asp ReportHTX-catord.htx
Do the same for the Orders table and save the result
as salord.asp (which will create the files files salord.htx and salord.idc). Generate
salord.asp, salord.htx, and salord.idc as shown in Listings 8.8, 8.9, 8.10.
Listing 8.8. salord.asp .
| <HTML> <META NAME="GENERATOR" CONTENT="IIS Add In For Access 97"> <HEAD><Title>HTML document for the World Wide Web</Title></HEAD> <BODY BGCOLOR="#FFFFFF"> <FORM ACTION="/scripts/salord.idc" METHOD = "POST" > <TABLE BORDER BGCOLOR="#FFFFFF"> <TR> <TD>OrderNumber</TD> <TD><INPUT NAME="OrderNumber"</TD></TR><P> <TR> <TD>LastName</TD> <TD><INPUT NAME="LastName"</TD></TR><P> <TR> <TD>FirstName</TD> <TD><INPUT NAME="FirstName"</TD></TR><P> <TR> <TD>SaleDate</TD> <TD><INPUT NAME="SaleDate"</TD></TR><P> <TR> <TD>SaleTime</TD> <TD><INPUT NAME="SaleTime"</TD></TR><P> <TR> <TD>ShipToAddr1</TD> <TD><INPUT NAME="ShipToAddr1"</TD></TR><P> <TR> <TD>OrderInfo</TD> <TD><INPUT NAME="OrderInfo"</TD></TR><P> <TR> <TD>ShipToCity</TD> <TD><INPUT NAME="ShipToCity"</TD></TR><P> <TR> <TD>ShipToState</TD> <TD><INPUT NAME="ShipToState"</TD></TR><P> <TR> <TD>ShipToZip</TD> <TD><INPUT NAME="ShipToZip"</TD></TR><P> <TR> <TD>CardNumber</TD> <TD><INPUT NAME="CardNumber"</TD></TR><P> <TR> <TD>ShipToPhone</TD> <TD><INPUT NAME="ShipToPhone"</TD></TR><P> <TR> <TD>PaymentMethod</TD> <TD><INPUT NAME="PaymentMethod"</TD></TR><P> <TR> <TD>Status</TD> <TD><INPUT NAME="Status"</TD></TR><P> </TABLE> <P><INPUT TYPE="SUBMIT" VALUE="Submit" ALIGN="MIDDLE"> <INPUT TYPE="RESET" NAME="reset" VALUE="Clear all fields" ALIGN="MIDDLE"></P></FORM> <HR=2> <CENTER>This page was produced by using the <B>IIS Add-In for Access 97</B>. <BR><I> 1996 Microsoft Corporation</I>.</CENTER> </BODY></HTML> |
Listing 8.9. salord.htx .
| <HTML> <META NAME="GENERATOR" CONTENT="IIS Add In For Access"> <HEAD> <Title>HTML document for the World Wide Web</Title> </HEAD> <BODY BGCOLOR="#FFFFFF"> <P><B>The following information was recieved.</B><BR> <TABLE BORDER BGCOLOR="#FFFFFF"> <TR> <TD ALIGN="RIGHT"><B>OrderNumber</B></TD> <%IF idc.OrderNumber EQ "NULL" %> <%else%> <%idc.OrderNumber%><%endif%></TD></TR> <TR> <TD ALIGN="RIGHT"><B>LastName</B></TD> <TD><%idc.LastName%></TD></TR> <TR> <TD ALIGN="RIGHT"><B>FirstName</B></TD> <TD><%idc.FirstName%></TD></TR> <TR> <TD ALIGN="RIGHT"><B>SaleDate</B></TD> <%IF idc.SaleDate EQ "NULL" %> <%else%><%idc.SaleDate%> <%endif%></TD></TR> <TR> <TD ALIGN="RIGHT"><B>SaleTime</B></TD> <%IF idc.SaleTime EQ "NULL" %> <%else%><%idc.SaleTime%> <%endif%></TD></TR> <TR> <TD ALIGN="RIGHT"><B>ShipToAddr1</B></TD> <TD><%idc.ShipToAddr1%></TD></TR> <TR> <TD ALIGN="RIGHT"><B>OrderInfo</B></TD> <TD><%idc.OrderInfo%></TD></TR> <TR> <TD ALIGN="RIGHT"><B>ShipToCity</B></TD> <TD><%idc.ShipToCity%></TD></TR> <TR> <TD ALIGN="RIGHT"><B>ShipToState</B></TD> <TD><%idc.ShipToState%></TD></TR> <TR> <TD ALIGN="RIGHT"><B>ShipToZip</B></TD> <TD><%idc.ShipToZip%></TD></TR> <TR> <TD ALIGN="RIGHT"><B>CardNumber</B></TD> <TD><%idc.CardNumber%></TD></TR> <TR> <TD ALIGN="RIGHT"><B>ShipToPhone</B></TD> <TD><%idc.ShipToPhone%></TD></TR> <TR> <TD ALIGN="RIGHT"><B>PaymentMethod</B></TD> <TD><%idc.PaymentMethod%></TD></TR> <TR> <TD ALIGN="RIGHT"><B>Status</B></TD> <TD><%idc.Status%></TD></TR> </TABLE><P> <A HREF="/salord.asp">Return To Data Entry Page</A> <CENTER>This page was produced by using the <B>IIS Add-In for Access 97</B>.<BR> <I> 1996 Microsoft Corporation</I>.</CENTER> </BODY></HTML> |
Listing 8.10. salord.idc .
Datasource: BikeShop
Template: salord.htx
DefaultParameters: OrderNumber=NULL,
SaleDate=NULL, SaleTime=NULL
SQLStatement:
+INSERT INTO "ORDERS" ("OrderNumber", "LastName",
"FirstName",
"SaleDate", "SaleTime", "ShipToAddr1",
"OrderInfo",
"ShipToCity", "ShipToState", "ShipToZip",
"CardNumber",
"ShipToPhone", "PaymentMethod", "Status")
+VALUES (%OrderNumber%, '%LastName%', '%FirstName%',
%SaleDate%, %SaleTime%, '%ShipToAddr1%', '%OrderInfo%',
'%ShipToCity%', '%ShipToState%', '%ShipToZip%', '%CardNumber%',
'%ShipToPhone%', '%PaymentMethod%', '%Status%');
#IDC-Insert FrontHTM-salord.asp ReportHTX-salord.htx
Use the Internet Information Server Add-In Wizard to
generate one more group of forms: the query for the Track Order page. Call up the Wizard
and choose the Query and Display option on the Wizard's first page. Then pick the Orders
table. Choose the OrderNumber field as the search field. Pick the LastName, FirstName,
SaleData, and Status fields for display on the Display Web Page. All this is shown in
Figure 8.10.
Figure 8.10. Setting up the
Search and Return pages .
Save the file as tracord.asp, which will also save
tracord.asp and tracord.idc. Your files should look like Listings 8.11, 8.12, and 8.13
Listing 8.11. tracord.asp .
| <HTML> <META NAME="GENERATOR" CONTENT="IIS Add In For Access 97"> <HEAD><Title>HTML document for the World Wide Web</Title></HEAD> <BODY BGCOLOR="#FFFFFF"> <FORM ACTION="/scripts/tracord.idc" METHOD = "POST" > <TABLE BORDER BGCOLOR="#FFFFFF"> <TR> <TD ALIGN="RIGHT">Order Number</TD> <TD><INPUT NAME="OrderNumber"</TD></TR><P> </TABLE> <P><INPUT TYPE="SUBMIT" VALUE="Search" ALIGN="MIDDLE"> <INPUT TYPE="RESET" NAME="reset" VALUE="Clear all fields" ALIGN="MIDDLE"></P></FORM> <HR=2> <CENTER>This page was produced by using the <B>IIS Add-In for Access 97</B>. <BR><I> 1996 Microsoft Corporation</I>.</CENTER> </BODY></HTML> |
Listing 8.12. tracord.htx .
| <HTML> <META NAME="GENERATOR" CONTENT="IIS Add In For Access"> <HEAD> <Title>HTML document for the World Wide Web</Title> </HEAD> <BODY BGCOLOR="#FFFFFF"> <%begindetail%> <%if CurrentRecord EQ 0 %> <TABLE BORDER BGCOLOR="#FFFFFF"> <TR> <TH><B>Last Name</B></TH> <TH><B>First Name</B></TH> <TH><B>Sale Date</B></TH> <TH><B>Status</B></TH> </TR> <%endif%> <TR> <TD Align=Right><%LastName%></TD> <TD Align=Left><%FirstName%></TD> <TD Align=Right><%SaleDate%></TD> <TD Align=Left><%Status%></TD> </TR> <%enddetail%> <%if CurrentRecord EQ 0 %> <HR=2><P> <CENTER><B>No records were selected!<B></CENTER><P> <%endif%> </TABLE> <HR=2> <CENTER>This page was produced by using the <B>IIS Add-In for Access 97</B>. <BR><I> 1996 Microsoft Corporation</I>.</CENTER> </BODY></HTML> |
Listing 8.13. tracord.idc .
Datasource: BikeShop
Template: tracord.htx
DefaultParameters: OrderNumber="OrderNumber"
SQLStatement:
+Select "LastName", "FirstName", "SaleDate",
"Status"
+From "ORDERS"
+Where "OrderNumber" = %OrderNumber%
#IDC-Search FrontHTM-tracord.asp ReportHTX-tracord.htx
Now you have what you need from the Internet
Information Server Add-In Wizard, so lets move on.
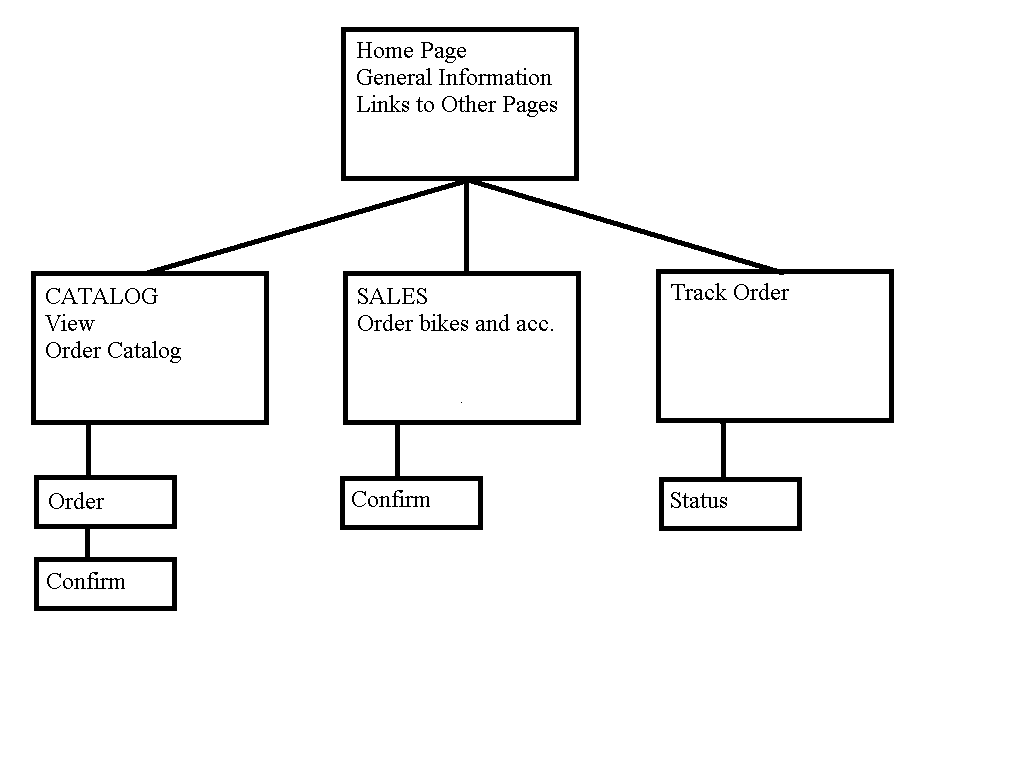
What Do You Have So Far?
All the files you have generated are in the rough
subdirectory of this chapter's entry on the CD-ROM.
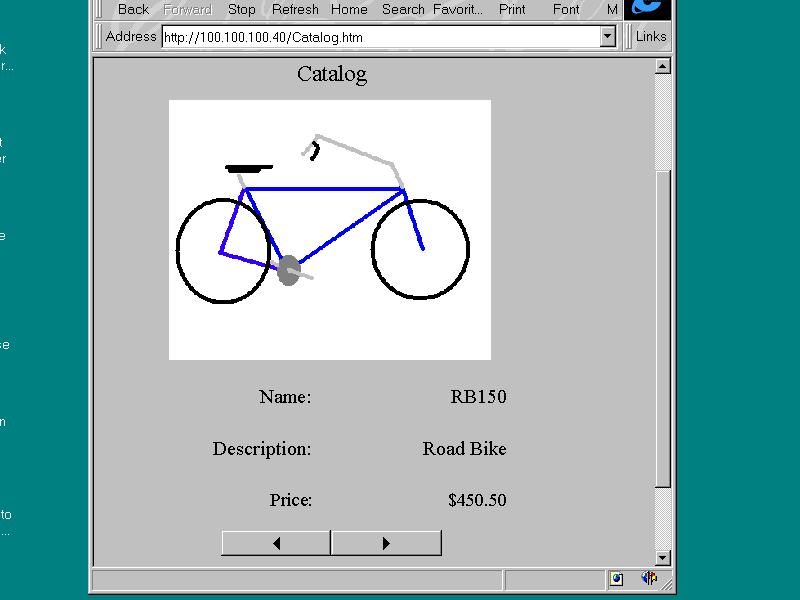
The Catalog Page
The purpose of the Catalog page is two-fold. First,
it displays your catalog online. Second, the Catalog page allows the user to order a
catalog, which allows your friend to collect the user's address. Let's build an online
catalog.
Open your ActiveX Control Pad and add an image
control, seven labels, and a spin button (as shown in Figure 8.11).
Figure 8.11. Screen setup
for catalog.alx.
Name your variables and add the subroutines, as
shown in Listing 8.14.
Listing 8.14. catalog.alx .
| <SCRIPT
LANGUAGE="VBScript"> <!-- 'Globals dim CatalogIndex dim Name(6) dim Description(6) dim Price(6) dim Picture(6) Sub LoadInfo() 'CatalogIndex = 0 Description(0) = "Road Bike" Description(1) = "Tandem Bike" Description(2) = "Racing Bike" Description(3) = "TriAthlon Bike" Description(4) = "Helmet" Description(5) = "Shorts" Name(0) = "RB150" Name(1) = "TB250" Name(2) = "RC500" Name(3) = "RR750" Name(4) = "Hard Hat 1000" Name(5) = "BunchUps" Price(0) = "$450.50" Price(1) = "$600.00" Price(2) = "$800.95" Price(3) = "$950.50" Price(4) = "$39.00" Price(5) = "$27.00" Picture(0) = "RB150.bmp" Picture(1) = "TB250.bmp" Picture(2) = "RC500.bmp" Picture(3) = "TR750.bmp" Picture(4) = "Helmet.bmp" Picture(5) = "Shorts.bmp" end sub --> </SCRIPT> <SCRIPT LANGUAGE="VBScript"> <!-- Sub sbtnNavigate_SpinUp() CatalogIndex = CatalogIndex + 1 if CatalogIndex > 5 then CatalogIndex = 0 'Start over at 0 end if 'Load Controls with new information lblDescription.Caption = Description(CatalogIndex) lblName.Caption = Name(CatalogIndex) lblPrice.Caption = Price(CatalogIndex) imgCatalog.Picturepath = Picture(CatalogIndex) end sub Sub sbtnNavigate_SpinDown() CatalogIndex = CatalogIndex - 1 if CatalogIndex < 0 then CatalogIndex = 5 'Start over at 5 end if 'Load Controls with new information lblDescription.Caption = Description(CatalogIndex) lblName.Caption = Name(CatalogIndex) lblPrice.Caption = Price(CatalogIndex) imgCatalog.Picturepath = Picture(CatalogIndex) end sub --> </SCRIPT> <SCRIPT LANGUAGE="VBScript"> <!-- Sub Layout2_OnLoad() 'initialize arrays call LoadInfo() 'initialize controls lblDescription.Caption = Description(CatalogIndex) lblName.Caption = Name(CatalogIndex) lblPrice.Caption = Price(CatalogIndex) imgCatalog.Picturepath = Picture(CatalogIndex) end sub --> </SCRIPT> <DIV id="Layout2" STYLE="LAYOUT:FIXED;WIDTH:274pt;HEIGHT:316pt;"> <OBJECT id="imgCatalog" CLASSid="CLSID:D4A97620-8E8F-11CF-93CD-00AA00C08FDF" STYLE="TOP:31pt;LEFT:39pt;WIDTH:203pt;HEIGHT:156pt;ZINDEX:0;"> <PARAM NAME="BorderStyle" VALUE="0"> <PARAM NAME="SizeMode" VALUE="3"> <PARAM NAME="Size" VALUE="7161;5503"> <PARAM NAME="PictureAlignment" VALUE="0"> <PARAM NAME="VariousPropertyBits" VALUE="19"> </OBJECT> <OBJECT id="Label1" CLASSid="CLSID:978C9E23-D4B0-11CE-BF2D-00AA003F40D0" STYLE="TOP:203pt;LEFT:39pt;WIDTH:86pt; HEIGHT:16pt;ZINDEX:1;"> HEIGHT:16pt;ZINDEX:3;"> HEIGHT:13pt;ZINDEX:4;"> HEIGHT:13pt;ZINDEX:5;"> HEIGHT:13pt;ZINDEX:6;"> HEIGHT:16pt;TABINDEX:6;ZINDEX:7;"> |
Note the font and alignment settings of the controls
inside the <OBJECT> tags. The <PARAM> tags show the differences between the
default properties and the ones you put in using the property box in the ActiveX Control
Pad. Use whatever fonts and alignment you want; they only change the appearance of the
page. catalog.alx doesn't have anything critical hidden in this section, but some of the
examples coming up take some interesting turns inside the <OBJECT> tags.
First, declare some global variables. Use
catalogindex to keep track of where you are in the catalog, and declare four arrays to
hold the names, descriptions, prices, and pictures from the catalog. Then create a
procedure called LoadInfo (to be loaded from the OnLoad event of the Layout control)to
load the arrays with the items from the catalog. The OnLoad event of the Layout control is
a good place to put things you want done at the beginning of the program.
Inside the spin_up and spin_down events of the spin
button, put code to cycle through the catalog. Notice how the numbers loop; when the user
goes below zero on the index, it is put back to 5; when the value spun is above five, it
is set back to 0. Also notice how the controls are given initial values in the OnLoad
event of the Layout control.
After you save your work as catalog.alx, insert it
into catalog.asp (as shown in Listing 8.15).
Listing 8.15. catalog.asp .
| <HTML> <HEAD> <META NAME="GENERATOR" CONTENT="Internet Assistant for Microsoft Word 2.0z"> <TITLE>Untitled</TITLE> </HEAD> <BODY> <P> <IMG SRC="logo.bmp"> <P> <OBJECT CLASSid="CLSID:812AE312-8B8E-11CF-93C8-00AA00C08FDF" id="Catalog_alx" STYLE="LEFT:0;TOP:0"> <PARAM NAME="ALXPATH" REF VALUE="file:\source\chap08\finished\Catalog.alx"> </OBJECT> <P> <P> <A HREF="Catord.asp" >Order Catalog</A> <P> <A HREF="welcome.asp" >Back to Welcome Page</A> </BODY> </HTML> |
This is not a major change from the rough draft you made at the beginning of the day (see Listing 8.3). You will not change the catord files you made earlier. The catord files demonstrate the raw material generated by the Internet Information Server Add-In, and provide a good contrast to what you will do on the next page. Launch the Welcome page(welcome.asp) and pick the catalog. Your screen should look like Figure 8.12.
Selecting the order catalog link gives you the stock
screen generated by the Internet Information Server Add-In, as shown in Figure 8.13. This
is okay for a program you can download free, but you can and will improve it on the Sales
and Order-Tracking pages it generates.
Figure 8.13. Order Catalog
page .
That will do it for the Catalog page. Let's move on
to the Sales page.
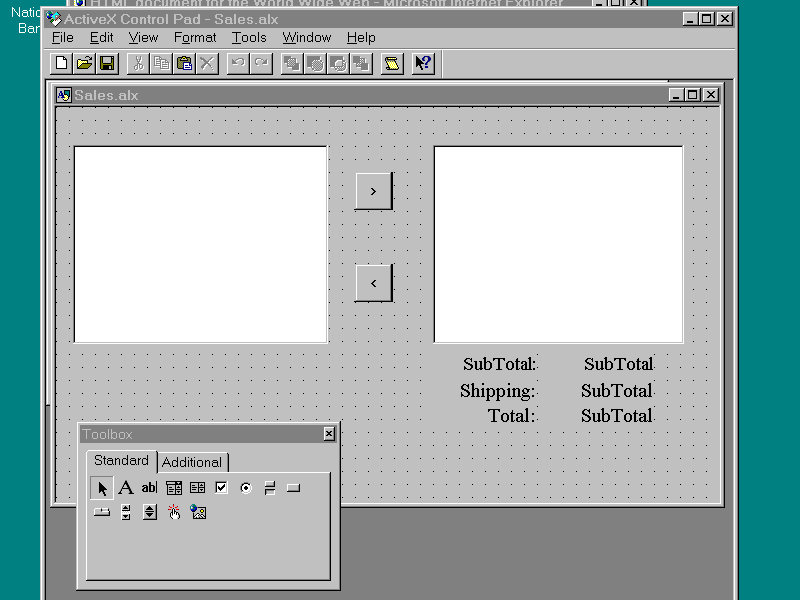
The Sales Page
The sales page has to do three things: it must allow
the user to pick items to buy, it must allow the user to fill out an order form, and
finally, it must transmit the order form back to the bike store computer. Create a
dual-list-box dialog using the ActiveX Control Pad. Use two list boxes, two buttons, and
six labels as shown in Figure 8.14.
Figure 8.14. Layout for
sales.alx.
Name and configure the controls as shown in Listing
8.16.
Listing 8.16. sales.alx .
| <SCRIPT
LANGUAGE="VBScript"> <!-- 'Globals Sub Layout1_OnLoad() LBInventory.AddItem("RB150") LBInventory.List(0,1) = ("$450.50") LBInventory.AddItem("TB250") LBInventory.List(1,1) = ("$600.00") LBInventory.AddItem("RC500") LBInventory.List(2,1) = ("$800.95") LBInventory.AddItem("RR750") LBInventory.List(3,1) = ("$950.50") LBInventory.AddItem("Hard Hat 1000") LBInventory.List(4,1) = ("$039.00") LBInventory.AddItem("BunchUps") LBInventory.List(5,1) = ("$027.00") CalcTotals() end sub --> </SCRIPT> <SCRIPT LANGUAGE="VBScript"> <!-- Sub btnInvToOrd_Click() 'Only do this if an item is selected if LBInventory.ListIndex >= 0 then index = LBInventory.ListIndex LBOrder.AddItem(LBInventory.List(index,0)) LBOrder.List(LBOrder.Listcount - 1,1) = LBInventory.List(index,1) CalcTotals() SetOrderInfo() else Alert"Item Not Selected!" end if end sub --> </SCRIPT> <SCRIPT LANGUAGE="VBScript"> <!-- Sub SetOrderInfo() 'This is a funcion for other Objects of the Form to call 'To get the Information from the Sales Object OrderInfo = "Start*" if LBOrder.ListCount > 0 then 'Read in Items and Prices For i = 0 to LBOrder.ListCount - 1 OrderInfo = OrderInfo & LBOrder.List(i,0) & "*" OrderInfo = OrderInfo & LBOrder.List(i,1) & "*" Next 'Dont really need SubTotal and Shipping, we can 'Compute those back at the factory end if OrderInfo = OrderInfo & "End*" window.document.ORDERFORM.OrderInfo.Value = OrderInfo end sub Function MakeDollar(value) dollars = int(value) cents = csng(value)- int(value) if cents = 0 then decimalpart = ".00" else decimalpart ="." & cstr(int(cents * 100)) end if MakeDollar = "$" & cstr(dollars) & decimalpart end function Sub CalcTotals() SubTotal = 0 Shipping = 0 Total = 0 if LBOrder.ListCount >= 1 then 'any items? for i = 0 To LBOrder.ListCount - 1 SubTotal = SubTotal + Csng(Right(LBOrder.List(i,1), 6)) Next Select Case LbOrder.ListCount Case 1,2 Shipping = 5 Case 3 Shipping = 4 Case Else Shipping = 2 End Select end if lblShipping.Caption = MakeDollar(Shipping) lblSubTotal.Caption = MakeDollar(SubTotal) total = subtotal + Shipping lblTotal = MakeDollar(Total) end sub Sub btnDelOrd_Click() LBOrder.RemoveItem(LBOrder.ListIndex) CalcTotals() end sub --> </SCRIPT> <DIV id="Layout1" STYLE="LAYOUT:FIXED;WIDTH:451pt;HEIGHT:239pt;"> <OBJECT id="btnInvToOrd" CLASSid="CLSID:D7053240-CE69-11CD-A777-00DD01143C57" STYLE="TOP:39pt;LEFT:179pt;WIDTH:23pt; HEIGHT:23pt;TABINDEX:2;ZINDEX:0;"> HEIGHT:23pt;TABINDEX:3;ZINDEX:1;"> HEIGHT:119pt;TABINDEX:1;ZINDEX:8;"> HEIGHT:119pt;TABINDEX:0;ZINDEX:9;"> |
Notice that the ColumnCount property on both list
boxes is set to 2. This is to provide automatic alignment in the list box for the name and
price fields. It also facilitates using the list property of the list box to add and
obtain information. The very first subroutine, the onload event of the layout control,
uses the list to load up the Lbinventory list box with the names and prices of your
inventory. The next two functions use the click events of the buttons to add to or
subtract from the lbOrder list box. The subroutine CalcTotals, called inside each button's
click event, calculates the subtotal, shipping, and grand total of the items in the
lbOrder list box. The function MakeDollar changes this number to formatted currency
strings. The most interesting function is SetOrderInfo, which writes information about the
order to a text string, then uses the line:
window.document.ORDERFORM.OrderInfo.Value = OrderInfo
to place the Orderinfo string into the variable
OrderInfo in the form named ORDERFORM. ORDERFORM exists on the page where sales.alx is
placed, as shown in Listing 8.17
Listing 8.17. sales.asp .
| <HTML> <HEAD> <META NAME="GENERATOR" CONTENT="Internet Assistant"> <TITLE>Untitled</TITLE> </HEAD> <BODY> <P> <IMG SRC="logo.bmp"> <HR=2><P> <OBJECT CLASSid="CLSID:812AE312-8B8E-11CF-93C8-00AA00C08FDF" id="Sales_alx" STYLE="LEFT:0;TOP:0"> <PARAM NAME="ALXPATH" REF VALUE="file:\source\chap08\finished\Sales.alx""> </OBJECT> <HR=2><P> <OBJECT CLASSid="CLSID:812AE312-8B8E-11CF-93C8-00AA00C08FDF" id="Order_alx" STYLE="LEFT:0;TOP:0"> <PARAM NAME="ALXPATH" REF VALUE="file:\source\chap08\finished\Order.alx""> </OBJECT> <HR=2><P> <FORM ACTION="/scripts/salord.idc" METHOD="POST" NAME="ORDERFORM"> <INPUT TYPE=Hidden NAME="LastName"> <INPUT TYPE=Hidden NAME="FirstName"> <INPUT TYPE=Hidden NAME="SaleDate"> <INPUT TYPE=Hidden NAME="SaleTime"> <INPUT TYPE=Hidden NAME="ShipToAddr1"> <INPUT TYPE=Hidden NAME="ShipToCity"> <INPUT TYPE=Hidden NAME="ShipToState"> <INPUT TYPE=Hidden NAME="ShipToZip"> <INPUT TYPE=Hidden NAME="CardNumber"> <INPUT TYPE=Hidden NAME="ShipToPhone"> <INPUT TYPE=Hidden NAME="ShipVIA"> <INPUT TYPE=Hidden NAME="OrderInfo"> <INPUT TYPE=Hidden NAME="PaymentMethod"> <INPUT TYPE=Hidden NAME="Status"> </FORM> <A HREF="welcome.asp" >Back to Welcome Page</A> </BODY> </HTML> |
This new sales.asp evolves from the sales.asp you
did earlier (see Listing 8.3) combined with salord.asp, which you generated with the
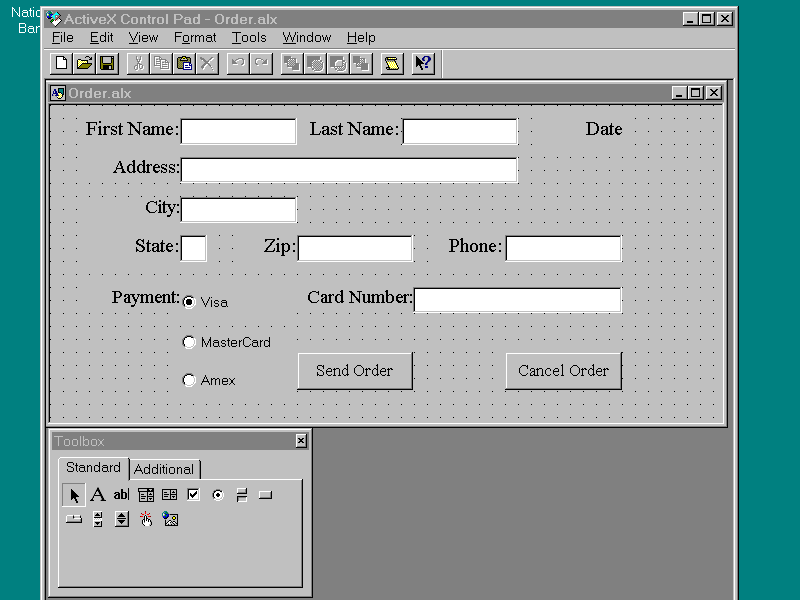
Internet Information Service Add-In (see Listing 8.8). Access the <FORM> section
from the second alx file on this page, order.alx. Use eight text boxes, ten labels, two
buttons, and three radio buttons (as shown in Figure 8.15).
Figure 8.15. Layout for
order.alx.
Write the code and configure the controls as a shown
in Listing 8.18.
Listing 8.18. order.alx .
| <SCRIPT
LANGUAGE="VBScript"> <!-- Sub LoadFORM() if window.document.forms.count > 0 then 'only if page contains forms For I = 0 to window.document.ORDERFORM.elements.count -1 Select Case window.document.ORDERFORM.elements(i).name Case "LastName" window.document.ORDERFORM.LastName.Value = LastName.Text Case "FirstName" window.document.ORDERFORM.FirstName.Value = FirstName.Text Case "ShipToAddr1" window.document.ORDERFORM.ShipToAddr1.Value = ShipToAddr1.Text Case "ShipToCity" window.document.ORDERFORM.ShipToCity.Value = ShipToCity.Text Case "ShipToState" window.document.ORDERFORM.ShipToState.Value = ShipToState.Text Case "ShipToZip" window.document.ORDERFORM.ShipToZip.Value = ShipToZip.Text Case "ShipToPhone" window.document.ORDERFORM.ShipToPhone.Value = ShipToPhone.Text Case "PaymentMethod" window.document.ORDERFORM.PaymentMethod.Value = payment Case "SaleDate" window.document.ORDERFORM.SaleDate.Value = date Case "SaleTime" window.document.ORDERFORM.SaleTime.Value = time Case "CardNumber" window.document.ORDERFORM.CardNumber.Value = CardNumber.Text Case Else End Select Next end if end sub --> </SCRIPT> <SCRIPT LANGUAGE="VBScript"> <!-- dim Payment Sub btnSend_Click() if checkfields() then LoadFORM() window.document.Forms(0).submit end if end sub --> </SCRIPT> <SCRIPT LANGUAGE="VBScript"> <!-- Sub visa_Click() payment = "Visa" end sub --> </SCRIPT> <SCRIPT LANGUAGE="VBScript"> <!-- Sub amex_Click() payment = "American Express" end sub --> </SCRIPT> <SCRIPT LANGUAGE="VBScript"> <!-- Sub mc_Click() payment = "MasterCard" end sub --> </SCRIPT> <SCRIPT LANGUAGE="VBScript"> <!-- Function CheckFields() 'Rotate through all the fields to 'make sure the user has filled them in AllOK = True ListOProblems = "" if len(firstname.text)= 0 then AllOK = False ListOProblems = ListOProblems & "First Name, " end if if len(lastname.text)= 0 then AllOK = False ListOProblems = ListOProblems & "Last Name, " end if if len(shiptoaddr1.text)= 0 then AllOK = False ListOProblems = ListOProblems & "Address, " end if if len(shiptocity.text)= 0 then AllOK = False ListOProblems = ListOProblems & "City, " end if if len(shiptostate.text)= 0 then AllOK = False ListOProblems = ListOProblems & "State, " end if if len(shiptoPhone.text)= 0 then AllOK = False ListOProblems = ListOProblems & "Phone, " end if if len(shiptozip.text)= 0 then AllOK = False ListOProblems = ListOProblems & "Zip, " end if if len(cardnumber.text)= 0 then AllOK = False ListOProblems = ListOProblems & "CardNumber, " end if if len(window.document.ORDERFORM.OrderInfo.Value)= 0 then AllOK = False ListOProblems = ListOProblems & "No Orders, " end if if AllOK = True then CheckFields = True else CheckFields = False Alert("The following fields need to be filled in: " & ListOProblems) end if end function Sub Layout1_OnLoad() SaleDate.Caption = CStr(date) payment = "VISA" end sub --> </SCRIPT> <SCRIPT LANGUAGE="VBScript"> <!-- Sub btnCancel_Click() firstname.text = "" lastname.text = "" shiptoaddr1.text = "" shiptocity.text = "" shiptostate.text = "" shiptoPhone.text = "" shiptozip.text = "" cardnumber.text = "" end sub --> </SCRIPT> <DIV id="Layout1" STYLE="LAYOUT:FIXED;WIDTH:403pt;HEIGHT:190pt;"> <OBJECT id="Label1" CLASSid="CLSID:978C9E23-D4B0-11CE-BF2D-00AA003F40D0" STYLE="TOP:8pt;LEFT:16pt;WIDTH:62pt; HEIGHT:16pt;ZINDEX:0;"> <PARAM NAME="Caption" VALUE="First Name:"> <PARAM NAME="Size" VALUE="2187;564"> <PARAM NAME="FontName" VALUE="Times New Roman"> <PARAM NAME="FontHeight" VALUE="240"> <PARAM NAME="FontCharSet" VALUE="0"> <PARAM NAME="FontPitchAndFamily" VALUE="2"> <PARAM NAME="ParagraphAlign" VALUE="2"> </OBJECT> <OBJECT id="Label2" CLASSid="CLSID:978C9E23-D4B0-11CE-BF2D-00AA003F40D0" STYLE="TOP:31pt;LEFT:16pt;WIDTH:62pt; HEIGHT:16pt;ZINDEX:1;"> <PARAM NAME="Caption" VALUE="Address:"> <PARAM NAME="Size" VALUE="2187;564"> <PARAM NAME="FontName" VALUE="Times New Roman"> <PARAM NAME="FontHeight" VALUE="240"> <PARAM NAME="FontCharSet" VALUE="0"> <PARAM NAME="FontPitchAndFamily" VALUE="2"> <PARAM NAME="ParagraphAlign" VALUE="2"> </OBJECT> <OBJECT id="Label3" CLASSid="CLSID:978C9E23-D4B0-11CE-BF2D-00AA003F40D0" STYLE="TOP:55pt;LEFT:16pt;WIDTH:62pt;HEIGHT:16pt;ZINDEX:2;"> <PARAM NAME="Caption" VALUE="City:"> <PARAM NAME="Size" VALUE="2187;564"> <PARAM NAME="FontName" VALUE="Times New Roman"> <PARAM NAME="FontHeight" VALUE="240"> <PARAM NAME="FontCharSet" VALUE="0"> <PARAM NAME="FontPitchAndFamily" VALUE="2"> <PARAM NAME="ParagraphAlign" VALUE="2"> </OBJECT> <OBJECT id="Label4" CLASSid="CLSID:978C9E23-D4B0-11CE-BF2D-00AA003F40D0" STYLE="TOP:78pt;LEFT:16pt;WIDTH:62pt; HEIGHT:16pt;ZINDEX:3;"> <PARAM NAME="Caption" VALUE="State:"> <PARAM NAME="Size" VALUE="2187;564"> <PARAM NAME="FontName" VALUE="Times New Roman"> <PARAM NAME="FontHeight" VALUE="240"> <PARAM NAME="FontCharSet" VALUE="0"> <PARAM NAME="FontPitchAndFamily" VALUE="2"> <PARAM NAME="ParagraphAlign" VALUE="2"> </OBJECT> <OBJECT id="Label5" CLASSid="CLSID:978C9E23-D4B0-11CE-BF2D-00AA003F40D0" STYLE="TOP:8pt;LEFT:148pt;WIDTH:62pt; HEIGHT:16pt;ZINDEX:4;"> <PARAM NAME="Caption" VALUE="Last Name:"> <PARAM NAME="Size" VALUE="2187;564"> <PARAM NAME="FontName" VALUE="Times New Roman"> <PARAM NAME="FontHeight" VALUE="240"> <PARAM NAME="FontCharSet" VALUE="0"> <PARAM NAME="FontPitchAndFamily" VALUE="2"> <PARAM NAME="ParagraphAlign" VALUE="2"> </OBJECT> <OBJECT id="Label6" CLASSid="CLSID:978C9E23-D4B0-11CE-BF2D-00AA003F40D0" STYLE="TOP:78pt;LEFT:117pt;WIDTH:31pt; HEIGHT:16pt;ZINDEX:5;"> <PARAM NAME="Caption" VALUE="Zip:"> <PARAM NAME="Size" VALUE="1094;564"> <PARAM NAME="FontName" VALUE="Times New Roman"> <PARAM NAME="FontHeight" VALUE="240"> <PARAM NAME="FontCharSet" VALUE="0"> <PARAM NAME="FontPitchAndFamily" VALUE="2"> <PARAM NAME="ParagraphAlign" VALUE="2"> </OBJECT> <OBJECT id="Label7" CLASSid="CLSID:978C9E23-D4B0-11CE-BF2D-00AA003F40D0" STYLE="TOP:78pt;LEFT:234pt;WIDTH:38pt; HEIGHT:16pt;ZINDEX:6;"> <PARAM NAME="Caption" VALUE="Phone:"> <PARAM NAME="Size" VALUE="1341;564"> <PARAM NAME="FontName" VALUE="Times New Roman"> <PARAM NAME="FontHeight" VALUE="240"> <PARAM NAME="FontCharSet" VALUE="0"> <PARAM NAME="FontPitchAndFamily" VALUE="2"> <PARAM NAME="ParagraphAlign" VALUE="2"> </OBJECT> <OBJECT id="FirstName" CLASSid="CLSID:8BD21D10-EC42-11CE-9E0D-00AA006002F3" STYLE="TOP:8pt;LEFT:78pt;WIDTH:70pt; HEIGHT:16pt;TABINDEX:7;ZINDEX:7;"> <PARAM NAME="VariousPropertyBits" VALUE="746604571"> <PARAM NAME="Size" VALUE="2469;564"> <PARAM NAME="FontCharSet" VALUE="0"> <PARAM NAME="FontPitchAndFamily" VALUE="2"> </OBJECT> <OBJECT id="LastName" CLASSid="CLSID:8BD21D10-EC42-11CE-9E0D-00AA006002F3" STYLE="TOP:8pt;LEFT:211pt;WIDTH:70pt; HEIGHT:16pt;TABINDEX:8;ZINDEX:8;"> <PARAM NAME="VariousPropertyBits" VALUE="746604571"> <PARAM NAME="Size" VALUE="2469;564"> <PARAM NAME="FontCharSet" VALUE="0"> <PARAM NAME="FontPitchAndFamily" VALUE="2"> </OBJECT> <OBJECT id="ShipToAddr1" CLASSid="CLSID:8BD21D10-EC42-11CE-9E0D-00AA006002F3" STYLE="TOP:31pt;LEFT:78pt;WIDTH:203pt; HEIGHT:16pt;TABINDEX:9;ZINDEX:9;"> <PARAM NAME="VariousPropertyBits" VALUE="746604571"> <PARAM NAME="Size" VALUE="7161;564"> <PARAM NAME="FontCharSet" VALUE="0"> <PARAM NAME="FontPitchAndFamily" VALUE="2"> </OBJECT> <OBJECT id="ShipToCity" CLASSid="CLSID:8BD21D10-EC42-11CE-9E0D-00AA006002F3" STYLE="TOP:55pt;LEFT:78pt;WIDTH:70pt; HEIGHT:16pt;TABINDEX:10;ZINDEX:10;"> <PARAM NAME="VariousPropertyBits" VALUE="746604571"> <PARAM NAME="Size" VALUE="2469;564"> <PARAM NAME="FontCharSet" VALUE="0"> <PARAM NAME="FontPitchAndFamily" VALUE="2"> </OBJECT> <OBJECT id="ShipToState" CLASSid="CLSID:8BD21D10-EC42-11CE-9E0D-00AA006002F3" STYLE="TOP:78pt;LEFT:78pt;WIDTH:16pt; HEIGHT:16pt;TABINDEX:11;ZINDEX:11;"> <PARAM NAME="VariousPropertyBits" VALUE="746604571"> <PARAM NAME="Size" VALUE="564;564"> <PARAM NAME="FontCharSet" VALUE="0"> <PARAM NAME="FontPitchAndFamily" VALUE="2"> </OBJECT> <OBJECT id="ShipToZip" CLASSid="CLSID:8BD21D10-EC42-11CE-9E0D-00AA006002F3" STYLE="TOP:78pt;LEFT:148pt;WIDTH:70pt; HEIGHT:16pt;TABINDEX:12;ZINDEX:12;"> <PARAM NAME="VariousPropertyBits" VALUE="746604571"> <PARAM NAME="Size" VALUE="2469;564"> <PARAM NAME="FontCharSet" VALUE="0"> <PARAM NAME="FontPitchAndFamily" VALUE="2"> </OBJECT> <OBJECT id="ShipToPhone" CLASSid="CLSID:8BD21D10-EC42-11CE-9E0D-00AA006002F3" STYLE="TOP:78pt;LEFT:273pt;WIDTH:70pt; HEIGHT:16pt;TABINDEX:13;ZINDEX:13;"> <PARAM NAME="VariousPropertyBits" VALUE="746604571"> <PARAM NAME="Size" VALUE="2469;564"> <PARAM NAME="FontCharSet" VALUE="0"> <PARAM NAME="FontPitchAndFamily" VALUE="2"> </OBJECT> <OBJECT id="visa" CLASSid="CLSID:8BD21D50-EC42-11CE-9E0D-00AA006002F3" STYLE="TOP:109pt;LEFT:78pt;WIDTH:66pt; HEIGHT:18pt;TABINDEX:14;ZINDEX:14;"> HEIGHT:18pt;TABINDEX:16;ZINDEX:16;"> |
This code starts with a load form function that
transfers the data in the controls contained in order.alx to the hidden controls in
sales.asp (Listing 8.16). Notice the use of the select case structure and how the
variables in the <FORM> section are accessed using the elements property. The rest
of the functions are straightforward. They include a function for clearing all the text,
btnCancel_Click(), and another for ensuring that all the fields have been filled in,
CheckFields(). The next notable code is the click event of the btnSend button. The click
event for the btnSend button submits the data in the <FORM> tags to salord.idc using
window.document.Forms(0).submit. This allows you to have the Submit button inside the alx
object rather than on the page with the <FORM> section. salord.idc is shown in
Listing 8.19.
Listing 8.19. salord.idc .
Datasource: BikeShop
Template: salord.htx
DefaultParameters: Status = "Ordered"
SQLStatement:
+INSERT INTO "ORDERS" ("LastName",
"FirstName","ShipToAddr1",
"ShipToCity", "ShipToState", "ShipToZip",
"ShipToPhone",
"PaymentMethod", "SaleDate", "SaleTime",
"OrderInfo", "Status", "CardNumber")
+VALUES ('%LastName%','%FirstName%',
'%ShipToAddr1%','%ShipToCity%',
'%ShipToState%', '%ShipToZip%', '%ShipToPhone%',
'%PaymentMethod%',#%SaleDate%#,
#%SaleTime%#, '%OrderInfo%','%Status%', '%CardNumber%');
#IDC-Insert FrontHTM-step2.asp ReportHTX-salord.htx
salord.idc is only slightly changed from what you
saw in Listing 8.9. The real magic in this section comes in the template file, salord.htx,
shown in Listing 8.20.
Listing 8.20. salord.htx .
| <HTML> <HEAD><Title>InterMedia</Title> <%IF idc.LastName EQ "NULL" %> <BODY BGCOLOR="#FFFFFF"> Nothing Happened </BODY></HTML> <%else%> <SCRIPT LANGUAGE="VBScript"> <!-- Sub LoadMe() window.ORDERNUM.LastName.Value = "<%idc.LastName%>" window.ORDERNUM.SaleDate.Value = "<%idc.SaleDate%>" window.ORDERNUM.SaleTime.Value = "<%idc.SaleTime%>" window.document.Forms(0).submit end sub --> </SCRIPT> </HEAD> <BODY BGCOLOR="#FFFFFF" Language ="VBScript" onLoad = Loadme> <FORM ACTION="/scripts/ordernum.idc" METHOD="POST" NAME="ORDERNUM"> <INPUT TYPE=Hidden NAME="LastName"> <INPUT TYPE=Hidden NAME="SaleDate"> <INPUT TYPE=Hidden NAME="SaleTime"> </FORM> </BODY></HTML> <%end if%> |
This is nothing like the salord.asp (Listing 8.10)
you generated at the beginning of the day. The new salord.asp generates a form, which in
turn generates yet another form that returns an order number to the user. The Loadme
subroutine, which is set to the form's onload event, loads and submits the <FORM>
ORDERNUM as soon as the form is loaded, which calls ordernum.idc, shown in Listing 8.21.
Listing 8.21. ordernum.idc .
Datasource: BikeShop
Template: ordernum.htx
DefaultParameters:
SQLStatement:
+Select "OrderNumber"
+From "ORDERS"
+Where "LastName" Like '%LastName%'
+And "SaleTime" = #%SaleTime%#
+And "SaleDate" = #%SaleDate%#
#IDC-Insert FrontHTM-step2.asp ReportHTX-ordernum.htx
This code gets the order number from the database
after the data is inserted by salord.idc. The order number is an auto-number data type.
Access assigns a unique number to the auto-number type for every new record so it makes a
good order number. The order number is presented in a straightforward way by ordernum.htx,
as shown in Listing 8.22.
Listing 8.22. ordernum.htx .
| <HTML> <HEAD><Title>Order Number</Title></HEAD> <BODY BGCOLOR="#FFFFFF"> <CENTER><IMG SRC="/logo.bmp"><BR></CENTER> <%begindetail%> <P> <P> <CENTER> <P><B>Thank You For Shopping At JPBikes!</B><BR> <P><B>Order Received from <%idc.LastName%></B><BR> <P><B>On <%idc.SaleDate%> at <%idc.SaleTime%></B><BR> <P><B>This is your Order Number</B><BR> <P><B><%OrderNumber%></B><BR> <P><B>Keep it for your records</B><BR> </CENTER> <%enddetail%> <%if CurrentRecord EQ 0 %> <HR=2><P> <CENTER><B>Can't Find Order for %LastName%<B></CENTER><P> <CENTER><B>Call us at 904 555 1010 for assistance!<B></CENTER><P> <%endif%> <CENTER><A HREF="/sales.asp">Return To Data Entry Page</A></CENTER> <HR=2> <CENTER>I Made this Page By Hand</B></CENTER> </BODY></HTML> |
Notice how this form uses the JPBikes! logo that you
used on the other main forms. The logo is another chance to advertise your company on the
order confirmation form. This form, shown in Figure 8.16, also gives the user a tracking
number and shows that the order has been placed successfully in the database.
Figure 8.16. The
order-tracking number.
Now that you have manipulated a <FORM> section
from inside an ActiveX Control Pad built alx object and generated a file with code that
enabled it to launch another job, lets finish the project.
The Order-Tracking Page
This page has a simple purpose: to let the user find
out the status of an order by entering the order number you worked so hard to provide in
the last section. To do this, place three buttons and a text box on an HTML insert, as
shown in Figure 8.17.
Figure 8.17. Screen layout
for track.alx.
Configure and name the controls using Listing 8.23.
Listing 8.23. track.alx .
| <SCRIPT
LANGUAGE="VBScript"> <!-- Sub btnGetOrder_Click() 'Build form in Second frame parent.secondframe.document.TRACKFORM.Ordernumber.Value = edtOrderNumber.Text parent.secondframe.document.TRACKFORM.submit btnGetOrder.Enabled = False end sub --> </SCRIPT> <SCRIPT LANGUAGE="VBScript"> <!-- Sub btnRefresh_Click() parent.secondframe.location.href = "/target.asp" btnGetOrder.Enabled = True end sub --> </SCRIPT> <SCRIPT LANGUAGE="VBScript"> <!-- Sub btnBacktoMain_Click() parent.location.href = "/welcome.asp" end sub --> </SCRIPT> <DIV id="Layout1" STYLE="LAYOUT:FIXED; WIDTH:419pt;HEIGHT:38pt;"> <OBJECT id="btnGetOrder" CLASSid="CLSID:D7053240-CE69-11CD-A777-00DD01143C57" CODEBASE="PE" STYLE="TOP:8pt;LEFT:172pt;WIDTH:62pt; HEIGHT:16pt;TABINDEX:0;ZINDEX:0;"> <PARAM NAME="Caption" VALUE="Get Order Info"> <PARAM NAME="Size" VALUE="2187;564"> <PARAM NAME="FontCharSet" VALUE="0"> <PARAM NAME="FontPitchAndFamily" VALUE="2"> <PARAM NAME="ParagraphAlign" VALUE="3"> </OBJECT> <OBJECT id="edtOrderNumber" CLASSid="CLSID:8BD21D10-EC42-11CE-9E0D-00AA006002F3" CODEBASE="PE" STYLE="TOP:8pt;LEFT:94pt;WIDTH:62pt; HEIGHT:14pt;TABINDEX:1;ZINDEX:1;"> <PARAM NAME="VariousPropertyBits" VALUE="746604571"> <PARAM NAME="Size" VALUE="2187;494"> <PARAM NAME="FontCharSet" VALUE="0"> <PARAM NAME="FontPitchAndFamily" VALUE="2"> </OBJECT> <OBJECT id="Label1" CLASSid="CLSID:978C9E23-D4B0-11CE-BF2D-00AA003F40D0" CODEBASE="PE" STYLE="TOP:8pt;LEFT:8pt; WIDTH:72pt;HEIGHT:18pt;ZINDEX:2;"> <PARAM NAME="Caption" VALUE="Order Number ->"> <PARAM NAME="Size" VALUE="2540;635"> <PARAM NAME="FontCharSet" VALUE="0"> <PARAM NAME="FontPitchAndFamily" VALUE="2"> <PARAM NAME="ParagraphAlign" VALUE="2"> </OBJECT> <OBJECT id="btnRefresh" CLASSid="CLSID:D7053240-CE69-11CD-A777-00DD01143C57" CODEBASE="PE" STYLE="TOP:8pt;LEFT:250pt;WIDTH:62pt; HEIGHT:16pt;TABINDEX:3;ZINDEX:3;"> <PARAM NAME="Caption" VALUE="Refresh"> <PARAM NAME="Size" VALUE="2187;564"> <PARAM NAME="FontCharSet" VALUE="0"> <PARAM NAME="FontPitchAndFamily" VALUE="2"> <PARAM NAME="ParagraphAlign" VALUE="3"> </OBJECT> <OBJECT id="btnBacktoMain" CLASSid="CLSID:D7053240-CE69-11CD-A777-00DD01143C57" CODEBASE="PE" STYLE="TOP:8pt;LEFT:328pt;WIDTH:62pt; HEIGHT:16pt;TABINDEX:4;ZINDEX:4;"> <PARAM NAME="Caption" VALUE="Back to Main"> <PARAM NAME="Size" VALUE="2187;564"> <PARAM NAME="FontCharSet" VALUE="0"> <PARAM NAME="FontPitchAndFamily" VALUE="2"> <PARAM NAME="ParagraphAlign" VALUE="3"> </OBJECT> </DIV> |
To explain the few lines of code in this form, let's
put track.alx in context. track.alx is placed on a simple form, trakpt1.asp, shown in
Listing 8.24.
Listing 8.24. trakpt1.asp .
<HTML>
<HEAD>
<TITLE>New Page</TITLE>
</HEAD>
<BODY>
<OBJECT CLASSid="CLSID:812AE312-8B8E-11CF
-93C8-00AA00C08FDF"
id="Track_alx" STYLE="LEFT:0;TOP:0">
<PARAM NAME="ALXPATH" REF
VALUE="file:\source\chap08\finished\Track.alx">
</OBJECT>
</BODY>
</HTML>
trackpt1.asp is, in turn, placed in a frame called
tkodfrm.asp, shown in Listing 8.25.
Listing 8.25. tkodfrm.asp .
<HTML>
<FRAMESET ROWS="10%, *">
<FRAME NAME="firstframe" SRC="trackpt1.asp">
<FRAME NAME="secondframe" SRC ="target.asp" >
</FRAMESET>
</HTML>
From here, track.alx manipulates the other form in
the frame, target.asp, shown in Listing 8.26.
Listing 8.26. target.asp .
<HTML>
<PRE>
<BODY>
<FORM ACTION="/scripts/tracord.idc" METHOD="POST"
 NAME="TRACKFORM">
<INPUT TYPE=Hidden NAME="OrderNumber">
</FORM>
</BODY>
</PRE>
</HTML>
Target.asp sets up a <FORM> section that
communicates with the tracord.idc/tracord.htx tandem that you generated earlier(Listings
8.11 and 8.12). This whole setup allows track.alx to remain visible in the top frame while
the response shows up in the bottom. Notice how the click event for the getorder button
disables the button, and the click event for refresh re-enables it. If the user can press
the getorder button while the returned order information is displayed, there will be
errors because track.alx relies on target.asp being in the bottom frame. The button is
re-enabled after the bottom frame is refreshed with target.asp. The BacktoMain button is
another way of navigating back to the main screen. The results of the quest for order
information is shown in Figure 8.18.
Figure 8.18. The quest for
the order number.
Odds and Ends
Before you implement this form on your Web site,
there are a few things to consider. The first is security. The information passed in this
example is plain text. You might want to implement an encryption system or keep your eyes
open for an ActiveX component that encrypts for you. Second, adjust the paths on the alx
objects. Note the following code:
<OBJECT CLASSid="CLSID:812AE312-
8B8E-11CF-93C8-00AA00C08FDF"
id="Sales_alx" STYLE="LEFT:0;TOP:0">
<PARAM NAME="ALXPATH" REF
VALUE="file:C:\Sams\ActiveX\tax08\tax08cd\Sales.alx"">
</OBJECT>
The ALXPATH is set to file:C:\Sams\... (now you know
where I keep all my Sams stuff. I'll have to move it). Unless these files are installed in
exactly the same place on the client machine, these files won't run. Instead, move them to
the root directory of your Web site and change the reference to /Sales.alx, which will
cause the client to look for the data on your Web site. On the other hand, if you are
setting up an intranet or selling the components in the alx file, you might want to put
this code on the client machine
Summary
You have covered lots of ground today. Those of you
who grew up with Visual Basic are probably getting pretty comfortable, while those of you
who come from a C or C++ background are hoping there is an alternative in sight. Rest
easy; you do spend a day building a different project in Javascript, and the lessons
learned there will expand your knowledge of and abilities with scripting and ActiveX
components.
Q&A
- Q Where can I find more information on how the idc
and htx files work?
- A http://www.microsoft.com/accessdev/accwhite/jobforpa.asp#Idc
leads to a good discussion of these files. They are also covered in the Internet
Information Server documentation
- Q What are the pros and cons of using alx files on
Web pages?
- A On the plus side, an alx file allows you to
build modules that can be plugged into many different pages. An alx file, if it is
installed on the server and not the client, allows you to hide the code inside. The
biggest negative is that alx files and the Layout control that reads them only work (as of
this writing) on the PC platform.
- Q How will alx files be used?
- A I think the scripting and ActiveX components
in alx files will be used to build Internet and intranet pages that look and function more
like programs. I also think that as more programmers move into Internet and intranet
programming, they will learn important things about layout and composition from
Webmasters.
Workshop
Rewrite the Catalog order form to make it look and
work like the Sales order form.
- On a Web site, where do the idx, htx, and htm files
go?
- Where can I put code that I want executed when my alx
file starts up?
- How do you name a <FORM> section of a Web page? How do you manipulate the <FORM> section after you have named it?
Popular Tutorials
-
 MS Access
1109
MS Access
1109
-
 C++
1222
C++
1222
-
 HTML
584
HTML
584
-
 JavaScript
616
JavaScript
616
-
 Vbscript
873
Vbscript
873
-
 Oracle
473
Oracle
473
-
 VC++
875
VC++
875
-
 SQL
2959
SQL
2959
-
 XML
514
XML
514
-
 Java
814
Java
814
-
 Perl
455
Perl
455
-
 Linux
451
Linux
451


