Web based School


- 30 — Source Control with SCCS and RCS
- Basic Source Control Concepts
- Interacting with Source Control
- Locks—Mediating Conflict
- Revising the Trunk—Straight up the Tree
- Branches—Complicating the Tree
- Revision Numbers
- Merges—Controlling Parallel Changes
- Symbolic Names, Baselines, and Releases
- Introduction to RCS
- Interacting with RCS
- Initial Revisions
- RCS files
- Checking Out a File
- Checking In a File
- Examining Revision Details and History
- rcsdiff
- Keywords
- Locks—Mediating Conflict
- Branches—Complicating the Tree
- Merges—Controlling Parallel Changes
- Symbolic Names, Baselines, and Releases
- Introduction to SCCS
- Interacting with SCCS
- Initial Revisions
- SCCS files
- Checking Out a File
- Checking In a File
- Examining Revision Details and History
- Keywords
- Locks—Mediating Conflict
- Branches—Complicating the Tree
- Merges—Controlling Parallel Changes
- Extra SCCS Features
- Using Source Control for Backups
- A Simple Example
- Starting to Use Source Control
- Creating an Empty Source Control File and Adding the Initial Revision
- Creating a Full Source Control File with Manually Supplied Comments
- Creating a Full Source Control File with Command Line Comments
- Modifying Files
- Shipping a Prerelease
- Release 1
- A Complex Example
- Beginning Changes for Release 2
- Creating Patches for Release 1 and Alpha
- Merging Patches into the Trunk
- Receiving Patches from Others and Merging Them
- Requiring Proper Authorization for Changes (SCCS Only)
- Shutting Down Development on Release 1 (SCCS Only)
- Using make with Source Control
- Summary
-
What Is Source Control?
30 — Source Control with SCCS and RCS
30 — Source Control with SCCS and RCS
By Rachel and Robert Startin
This chapter covers the basic concepts of source control. These concepts apply to almost any system that does source control and should help you even if you use a system for source control other than the ones described here. You will learn the specific
structure and commands used by two widely available source control systems: Revision Control System (RCS) and Source Code Control System (SCCS).
You will also learn, through examples, how source control can be used. One example covers the use of source control on a simple software project that has only a single active version. Another covers the complexity added when you continue to make
revisions to a prior release while still doing development. Yet another example covers how you can use source control to work on documents. Finally, you will learn how to use source control to perform simple backups of critical files.
What Is Source Control?
Source control refers to controlling the process of modifying software by mediating changes. It lets you control who can make changes and when. It helps to prevent conflict that could arise when many people edit the same file. It lets you save multiple
versions of a file and choose the one you would like to use. It lets you review the history of changes made to a file. It lets you save configurations, or baselines, which are lists of collections of files and revisions that are part of a common release.
This section introduces some of the functions of source control and the need for those functions. It helps answer the question What are the advantages of source control?
Normally, you want to use the most recent version of a file, but using source control gives you flexibility and the ability to examine the history of changes that went into a file. There are some important advantages to this.
If you are using UNIX to do software development, you may need to support older releases of your product. Using source control, you can recall the exact sources that were used to build the older release and use those files to track down and fix the
problem. After you fix the problem in the old release, you can merge the changes, as appropriate, into the current release.
Source control also gives you the ability to review the history of changes to a file. This is useful for almost any evolving file, be it source code or the files used to create a guide.
You can also use source control to perform a limited personalized backup of critical files. If your system is backed up once a week and you write daily progress notes, you can check the notes into a source control system and have a safe copy in case you
accidentally erase or damage the file. This is not a replacement for doing system backups because you will still be vulnerable to system or disk problems, but it does give you finer control over recovering from your own mistakes.
By saving the history of revisions to a file, you give yourself the ability to analyze that history later. This can be invaluable for software projects because it gives you the ability to see the logic of each incremental change that led from the
original source to the current source.
The ability to recreate old versions of a single file or a group of files allows you to use source control as a simple backup system and to recover and modify earlier releases of a product or document.
Source control systems usually allow some form of branching (see the section "Basic Source Control Concepts") that gives you the ability to produce variants of a file. This gives you the capability to perform parallel development of two
different variants of the same file. For example, while working on the 2.0 release of your product you can produce a maintenance update to the 1.0 release of your product by modifying one or more of the source files from the 1.0 release. You can merge the
changes to the 1.0 release into the 2.0 release if you desire.
Source control systems are good tools for controlling all sorts of files, not just source code. This chapter was edited and produced using source control with one file containing each section. The final copy of the chapter was produced using make
to merge the sections together and reformat them to meet the publisher's submission guidelines. This allowed both authors to work independently to a certain extent and to merge changes after reviews.
Basic Source Control Concepts
Source control systems store files as a series of revisions (in SCCS they're called deltas), a set of documents that evolved from each other, as a tree. See Figure 30.1 for a generic example. Refer to this figure as you read this section on source
control concepts. Each node in the tree represents a revision of the same file.
Figure 30.1. A tree of revisions.
The tree has a root, which is the original text of the file. In Figure 30.1, the node labeled root is the root. The trunk of the revision tree is the main sequence of revisions of the file that were derived from the root. In Figure 30.1, the node root
and all of the nodes in a straight line above it (branch_start, a_revision, and head) are the trunk of the tree. The simplest form of revision control will have only a root and a trunk. For example, if you are developing a single document and want to save
the development history, you are likely to only use the trunk for storing edits.
A branch occurs where a single revision has two or more revisions derived from it. In Figure 30.1, the node labeled branch_start is a trunk node that has a descendent on the trunk and a branch starting at node branch_node. Each branch and the trunk have
a head, which is the latest revision on the branch. In Figure 30.1, the nodes head and branch_head are the respective heads of the trunk and a branch. Branches are useful when you need to split into parallel development paths for your file. You will learn
more about branches in the section "Branches—Complicating the Tree."
Interacting with Source Control
There are several common interactions with a source control system that everyone who uses source control needs to understand.
In order to use a copy of a file, you need to check out (in SCCS, get) the file, or ask the source control system for a copy of a particular revision of a file. You will need to check out a file if you want to read its contents, print it out, or use it
as part of a make.
In order to modify a copy of a file, you need to check out with a lock (in SCCS, get for edit) to tell the source control system that you intend to make a modification to the file. See the section "Locks—Mediating Conflict" for more
information on how and why locks are useful.
In order to register your changes with the source control system, you need to check in (in SCCS, delta) the file. This registers your changes with the source control system and makes them available for anyone else using the source control system.
Locks—Mediating Conflict
Source control systems enable you to place a lock on a revision, which indicates that you intend to modify the file. This helps to prevent loss of changes when two people attempt to modify a file at the same time. For other possible solutions to this
problem, see the sections "Branches—Complicating the Tree" and "Merges—Controlling Parallel Changes."
Although both RCS and SCCS use locks, some source control systems do not explicitly use locks. Notably (and perhaps confusingly), the free CVS, which uses RCS for managing revisions, does not use locks; many commercial source control or configuration
management systems also do not use locks. Instead they include tools that allow you to deal with problems after the fact. This usually includes some form of automatic merging with a manual review of conflicts. The section "Merges—Controlling
Parallel Changes" describes this alternative in greater detail.
See Figures 30.2 and Figure 30.3 for the progression of a typical conflict.
Figure 30.2. Unresolved conflicting changes.
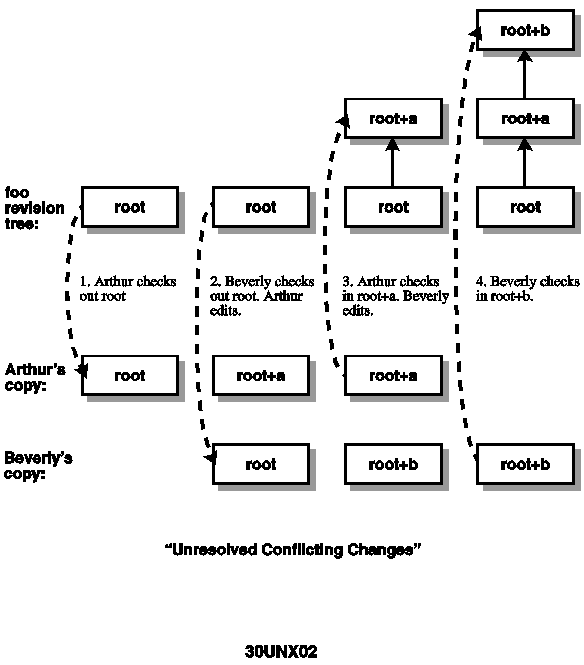
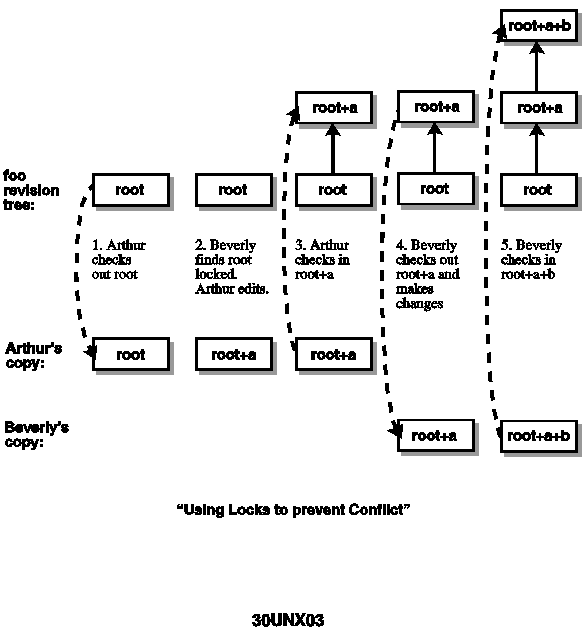
Figure 30.3. Using locks to prevent conflicts.
In the first time line (Figure 30.2) there is no revision locking. Arthur grabs a copy of revision root of foo and begins editing it. While he is making changes, Beverly also grabs a copy of revision root of foo and begins making her changes,
independently of Arthur. Arthur checks in his changes as revision root+a, reports to his manager that the changes are complete, and confidently flies to Belize for his two-week scuba diving vacation. Beverly checks in her changes as revision root+b, which
now contains none of Arthur's changes! Charlie, their manager, discovers that Arthur's changes are not in the weekly release and calls Arthur to find out why, completely ruining Arthur's vacation. Note that even though revision root+b is the descendent of
root+a, it doesn't contain the changes Arthur made.
Compare this with the second time line (Figure 30.3). Arthur grabs a copy of revision root of foo, setting a lock on that revision, and begins editing it. While he is making changes, Beverly tries to grab a copy of revision root of foo, but the source
control system informs her that the revision is locked and that she is not allowed to check it out. Beverly waits for Arthur to finish, or if her changes are urgent, she contacts Arthur to work out a way to get her changes done quickly. Arthur checks in
his changes as revision root+a, reports to his manager that the changes are complete, and blissfully flies to Australia for his four-week scuba diving vacation, on which he is spending the bonus he received for implementing a source control system for the
company. Beverly learns that foo is no longer locked and checks out revision root+a with lock. Beverly checks in her changes as revision root+a+b, which contains both her modifications and Arthur's. Charlie notices that Arthur's changes are in the weekly
release and remembers what a great thing it was that they finally implemented that source control system after Arthur's previous vacation.
Revising the Trunk—Straight up the Tree
Many efforts that use source control require only the use of modifications to the trunk. If your needs do not require parallel efforts (see the section "Branches—Complicating the Tree") you should be able to manage your revisions without
any of the complications introduced by branches. If you develop on the trunk, you will create an initial root revision of your file and then each time you change the file, you will check in a new trunk revision of the file.
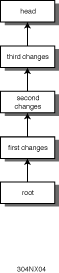
See Figure 30.4 for a sample tree that uses modifications to the trunk only. In the sample tree, each revision was created by modifying the previous revision, and all modifications were done serially; there was no overlap between edits on the file.
Figure 30.4. Straight up the tree.
Branches—Complicating the Tree
As you have learned, branches are used when you need to split into parallel modification paths for your file. Often this happens when you need to produce patches for a released version of the file (or product built using the file). It can also happen
when you wish to create a parallel track for doing a major long-term effort. For example, if you are creating an internationalized version of your application while doing development on the application itself, you might want to make the
internationalization changes on a stable base and check them in as branches. You would then merge them into the trunk development. See the section on "Merges—Controlling Parallel Changes" for information on how to merge changes from branches
back into the main trunk.
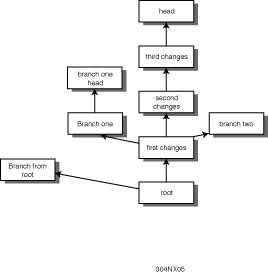
See Figure 30.5 for an example of a revision tree that has branches. For this project, there is a main line of development that is targeting the next product release and a branch on product development that is producing patches to the previous release.
The previous release patches are made as a branch based on the revision of the file that was released. Often, you will want to merge changes from a branch back into the trunk. See the section "Merges—Controlling Parallel Changes" for more
information on how this works. (This example will be given in greater detail in the section "A Complex Example.")
Figure 30.5. A revision tree with branches.
RCS actually supports an even more flexible branching scheme. See "Introduction to RCS" for more information.
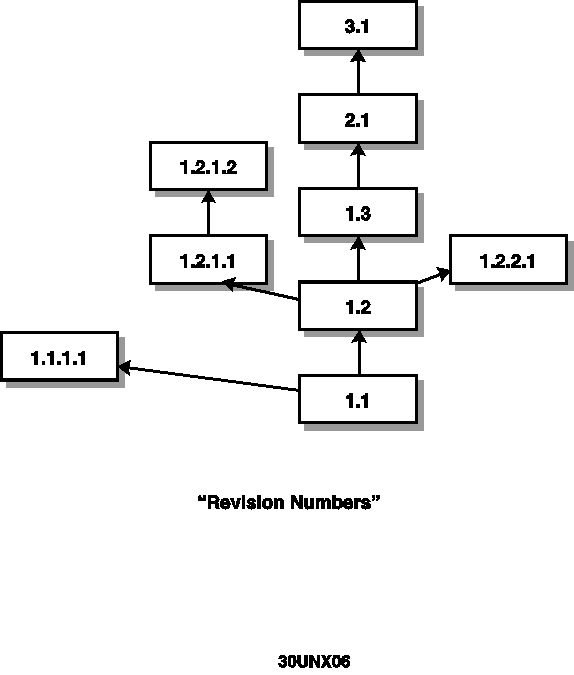
Revision Numbers
Most source control systems, including both RCS and SCCS, name revisions using revision numbers, which describe where the revision is in the tree of revisions. See Figure 30.6 for an example of how both RCS and SCCS number a revision tree. Notice that
this figure is the same tree as Figure 30.5, with revision numbers replacing the earlier names. A revision on the main trunk is identified by a pair of numbers. The release number is often used to specify an internal release number for the product. The
level number specifies which revision within a release is being referenced. The release and level numbers are there to allow a structure that has the release number incremented each time the product is released.
Figure 30.6. Revision numbers.
Branches extend this naming structure using the same release and level as the branchpoint, the revision on which the branch is based (nodes 1.1 and 1.2 in the figure). Branches add a branch number to identify the particular branch and a sequence number
to identify the revision within the branch. The first branch from revision R.L is numbered R.L.1.1.
Merges—Controlling Parallel Changes
You may also be effectively performing parallel development by releasing your files (rather than access to the source control system) to other people. This can happen when you send out preliminary versions of a document for review or when you do a
release of the source code for a project or product. After you have made your own postrelease changes, you may find that people with access to the released files suggest changes to you. One way to deal with this is to use merge facilities of your source
control system, which support merging sets of changes that have a common base.
See Figure 30.7 for an example of parallel revisions and merging them. In this example, instead of using a source control system you use the merge command. Many source control systems use merge or a similar program to perform the merging task. If your
source control system does not explicitly support merges, you can use the merge command to perform merges manually.
Figure 30.7. Merging parallel changes.
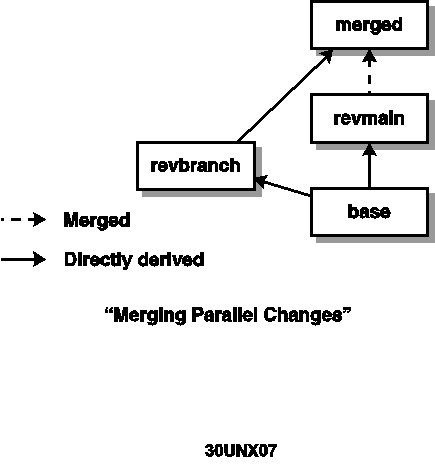
For this example, you should create three files, called base, revmain, and revbranch. The first is the base from which both of the others are created. The common ancestor revision is needed so the merge program can determine the changes from base to
revbase and from base to revmain and merge the changes together. The file base should contain the following:
A line in the base file

Another line in the base file

A third line in the base file

The final line of the base file
The file revmain should contain the following:
A line in the base file

A line added in revmain

Another line in the base file

A third line in the base file

The final line of the base file
The file revbranch should contain the following:
A line in the base file

Another line in the base file

A third line in the base file

A line added in revbranch

The final line of the base file
After you create these three files, type merge -p revmain base revbranch > merged.
When you look at the resulting file merged, you should see the following:
A line in the base file

A line added in revmain

Another line in the base file

A third line in the base file

A line added in revbranch

The final line of the base file
Because the merge process is automated and not intelligent, it can run into problems trying to merge changes that are in conflict. Try rerunning the merge command after changing the contents of revbranch to the following:
A line in the base file

A line added in revbranch

Another line in the base file

A third line in the base file

The final line of the base file
This time you should wind up with significantly different results. First, you should get a warning message from merge that says something like this: merge warning: overlaps or other problems during merge. Second, the file merged should look something
like this:
A line in the base file

<<<<<<< revmain

A line added in revmain

=======

A line added in revbranch

>>>>>>> revbranch

Another line in the base file

A third line in the base file

The final line of the base file
When you try to merge files that have overlaps of the changed areas of the file, you will need to resolve the conflicts. You will need to manually review the merged file for all of the conflict areas marked. Some commercial source control systems and
other products include graphical tools to help perform and verify merges.
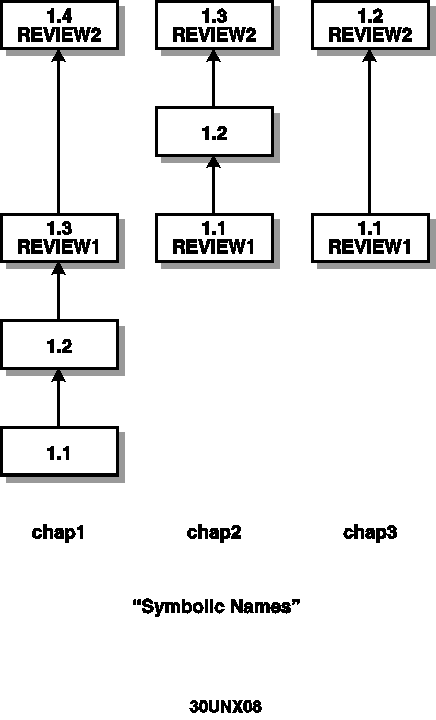
Symbolic Names, Baselines, and Releases
A symbolic name is a name that is attached to a particular revision of a file and that you can use to check out the desired revision of a file without having to know the exact revision number. For example, if you send out for review copies of your great
American novel, you might want to attach symbolic names to the revisions of the chapters you sent out so you can effectively use any editorial comments you get back.
See Figure 30.8 for an example of how you might use symbolic names to record reviews of your novel. Your novel in this example has three chapters. For the first review, you sent revision 1.3 of Chapter 1 and only had the original outlines for Chapters 2
and 3 (both revision 1.1). You used the name REVIEW1 for this review. For the second review, you had made minor changes to Chapter 1 (in revision 1.4) and had written Chapter 2 (revision 1.3) and drafted Chapter 3 (revision 1.2). This review was marked
REVIEW2. You can now use the REVIEW1 and REVIEW2 names to refer to the correct versions of the novel to remember which revision of which chapter that meant. Revision names are a powerful tool for performing baselines and releases.
Figure 30.8. Symbolic names.
A baseline is a captured set of revisions that have some special property. That property might be "sent out for review," "compiles successfully," "passes lint successfully," "released for alpha testing," or
anything that you find useful. In the example on symbolic names, the files of REVIEW1 and REVIEW2 were baselines. A release is really a special kind of baseline with the property "released," and you can decide exactly what you mean by released.
Often, when you declare a release, you will check in new trunk revisions of all of your files so that you can use release numbers on source control commands.
Using Releases to Replace Symbolic Names
Without symbolic names you can achieve a similar effect using release numbers. Every time you ship out your novel for review, you increase the revision number of all files after the release. This allows you to use checkout commands that name the
release, which in both RCS and SCCS check out the highest level within a release. In this example, after shipping release, you check in the next revision of the file as release 2, level 1. Therefore, instead of REVIEW1, you use release 1, which includes
chap1 revision 1.3, chap2 revision 1.1, and chap3 revision 1.1. When you make you minor revisions to chap1, you check them in as revision 2.1. When you write and then rewrite chap2, you check it in as revision 2.1 and then as 2.2. When you draft chap3 you
check it in as revision 2.1. Instead of REVIEW2, you use release 2, which includes chap1 revision 2.1, chap2 revision 2.2, and chap3 revision 2.1. This achieves the same effect (but with slightly more effort) as using symbolic names. Unfortunately, this
approach is not always able to replace symbolic names. If you have checked in a new revision of a file using the old release number before deciding that you want to release the files, you may face some difficulties using this method.
Introduction to RCS
RCS was originally designed and developed by Walter Tichy of Purdue University as a version control system intended primarily for source code, documents, and test cases. Since its original release, the system has evolved somewhat over the years, but it
maintains a great deal of backward compatibility with the initial release. The most popular current version is probably GNU RCS 5.6. RCS addresses several areas that are not well covered by SCCS, such as merging branches and marking baselines and
configurations.
RCS is not available by default on all platforms, and only old versions are available on others. The 5.6.0.1 version of GNU RCS is included on the CD-ROM in case you need (a newer version of) RCS on your system.
Interacting with RCS
The basics of RCS are simply checking in a version of your file (ci), and checking out a version of your file (co). If you are a first-time user working alone, you may never need to do more. Viewing the history (rlog) and comparing changes from one
revision to another (rcsdiff) may be useful to you. As your needs grow, you can start using branches and merging. If you are in a multiperson project, you should start using locking. Depending on the level of detail you need, RCS can be peripheral or
central to your development environment.
Initial Revisions
In order to start using RCS to control revisions of a particular file, you need to create an initial revision, which is the root of the revision tree for this file. Maybe you have already created and edited a file. Now you realize that your development
will be enhanced by using RCS. Or you may be planning ahead, just trying to get a project started, and you have no file contents yet. You would like to create an RCS file and you will check in an initial revision later.
In the first case, you have a file with contents. In RCS terminology, this is your working file. You can create an initial revision by using the RCS check-in command, ci. RCS will save the working file as the initial revision and prompt for a
description of the revision group. Your working file is then removed from your directory.
In the second case, you have a file name but no contents. You can create an RCS file with the command rcs -i. RCS will prompt for the revision group description. Later, when you have some file contents, you can do an initial check in using ci. For now,
there is no initial revision.
RCS files
RCS views your file as a pair of files. The file that you have named and to which you make changes is called the working file. You create this file in a directory of your choosing. When you check in this file, RCS creates an RCS file (if this is the
first check in) or adds to an existing RCS file. The RCS filename is simply your working filename with a suffix added to the end. The default suffix on UNIX systems is usually v. You can control the suffix of a file via the -x option during check in. This
option lets you specify a list of possible suffixes that will be tried, in order, during check in and check out.
RCS commands enable you to specify one of or both the working file and the RCS file. It is common to specify only the working file and let RCS handle the placement of the RCS file. If the RCS file is not specified, RCS first tries to deposit the
revision in a subdirectory, RCS. If no such directory exists, the revision is placed in the current working directory. Creating a directory called RCS in your working directory helps to organize your work. All the RCS files are kept in this directory, out
of sight.
Checking Out a File
To use a file you have under RCS control, you must check it out via the RCS command co, which causes RCS to copy the revision of the specified file into a working file. Then you can use the file, for example, for printing or compiling. But if you want
to make changes to this file, you must obtain a lock for the file. You can check out a file with a lock via co -l. See the section "Locks—Mediating Conflict" for details of using locks.
Checking In a File
To save a version of your working file after making changes, use the ci command. If you want to keep a copy of the working file around to use, you can add the -u option. This is just like doing a ci, followed by a co. Whenever you do a ci, you will be
asked to enter a log message, a description of the changes you have made. This is for your (and your co-workers') use. Keep in mind that a short phrase might be very meaningful now, but these logs may be perused down the road. The more specific you are
now, the easier it will be to figure out revision contents later.
It is common to check in several files at once, perhaps ones that are related to one another. For example, you are fixing a defect in your product, and several files must be modified to solve the problem. You check out the files as needed and work in
your working directory until the product defect is fixed. You test your solution. When you are convinced that everything works, you want to check in the changes. It could be tedious to enter a log message for each file as it's checked in. When you check in
more than one file at once, after the first file, RCS asks if you want to use the same log as the previous file. This speeds things up a bit. To totally automate the check in, you can specify the log message via the check in command's -m option. So if the
log message is to be the same for each file, using the -m option to specify the log message, along with shell metacharacters to specify all the working files, can shorten a huge job so that it takes only a single command.
Examining Revision Details and History
If you need to examine the history and status of an RCS file, you can use the rlog command. This displays each revision log, ordered from highest number to lowest. This can help you see the progress of changes that have been made during development
history. These logs can be very helpful for locating a specific revision of the file that you want to examine in complete detail.
The rlog command shows you other details besides just the log messages. The first several lines are called the header and contain details about the revision group. Included in this header is the RCS pathname, the working pathname, the head revision, the
default branch, the access list, locks, symbolic names, the suffix, and a few other items. If you are interested in header information only, and no log messages, use the -h option to limit the output to only the header. rlog has other useful options to
limit the data it displays. Refer to the man page for details.
If you do find a particular revision that you would like to examine or use, you can check out the revision by specifying the revision number on the co command line. Keep in mind, though, that performing co will overwrite your existing working file. This
may be okay with you. If not, you can ask RCS to check out a file to standard out. Then you can use UNIX redirection of standard output to place the old revision contents wherever you would like. Using the command
co -r2.4 -p the_file > the_file.2.4
will put (old) revision 2.4 into a file called the_file.2.4.
rcsdiff
If you are familiar with the UNIX diff command, the RCS command rcsdiff will be familiar to you. rcsdiff compares two revisions of the same file and displays the differences between the two versions. RCS manages the retrieval of the versions while
rcsdiff uses the UNIX diff to perform the actual comparison. The two versions are compared line-by-line, and if any character in the line is different between the two files, a message is displayed to standard out describing the place where the difference
occurs.
To use the rcsdiff command, you need to specify the two revisions that are to be compared. You can explicitly specify each with two instances of the -r option. If you specify only one revision on the command line, this revision is compared against your
working file. If you omit both revisions from the command line, your working file is compared against the head revision on the default branch (usually the trunk). Here are some examples:
rcsdiff -r2.3 -r2.6 the_file
compares revisions 2.3 and 2.6 of the_file.
rcsdiff -r2.3 the_file
compares revision 2.3 of the_file with the working file the_file.
rcsdiff the_file
compares the head of the default branch of the_file with the working file the_file.
Keywords
RCS allows the user to imbed certain words into the working file. These words, keywords, have special meaning to RCS. Each keyword is initially inserted into the working file, then later the current value is placed after the keyword, with a colon
separator. When keywords are in the file during a check out, the co command updates the value of each keyword.
There are many keywords available. You should check which will be most useful to you by examining the co man page. The $Header:$ 30unxor2.adj,v 1.7 94/04/05 18:24:08 sartin Exp $ keyword contains a composite of most of the individual keywords. If you
include the $Header:$ 30unxor2.adj,v 1.7 94/04/05 18:24:08 sartin Exp $ keyword, the value that is inserted will contain the RCS file, the revision number, the date, the author, the state, and the locker (if the file is locked).
Locks—Mediating Conflict
RCS has two kinds of locking mechanisms: strict and nonstrict. If you are the only person who will be modifying this file, you can turn off strict locking via rcs -U. This will allow you, the file owner, to make changes without obtaining a lock. Anyone
else must obtain a lock in order to modify the file.
If you are one of several people who can modify this file, you should set the locking to strict. This is done via rcs -L. In this case, anyone wanting to modify the file should obtain a lock before making changes. This should be done during the check
out with the -l option. This way, the revision is copied to your working file and the revision is locked, all at the same time.
Sometimes you will find yourself in the situation of modifying a file without first obtaining a lock. You usually find this out when you go to check in your changes and you get a ci error message saying that your user name does not have a lock set. If
this happens, all is not lost, but you need to do a little investigation before you can resolve the situation.
First, you need to find out if anyone else has checked in any revisions since you last checked out this file. Look at the revision number at the top of your working file to find the revision that is the basis of your changes. If you have the keyword
$Revision:$ in your file, RCS will substitute the revision number after this keyword. If you do not have this keyword in your file, it is much more difficult to figure out what revision you started editing. You can try looking at the RCS logs, using the
rcsdiff command to examine changes between revisions, or use the rcs -P command to obtain temporary copies of old revisions. Hopefully you will be able to recognize the revision you started with! If someone has made changes and checked them in since the
version you started with, you should check in your changes as a branch off your basis revision. Then do a merge of your file at the top of the other changes. See the sections "Merges—Controlling Parallel Changes" and
"Branches—Complicating the Tree" for details.
If nobody has checked in any changes since your version was checked out, all you need to do is lock the file and check it in. Be careful here. Do not use co -l to obtain the lock. This will overwrite your working file and you'll lose all your changes.
Instead, use the rcs -l command. This simply manipulates the file lock—no copying is involved. After obtaining the lock, check in the file as usual.
In either of these possible scenarios, someone else could have the file locked. You can always check on the status of a file lock with the rlog -h command. This shows the header information for the specified file. If someone holds the lock, the header
will contain a message stating which user has it locked. If this is the case, you can work out with that person a strategy to deal with the conflict. Once again, using the RCS merging facility can help this resolution. In an emergency, or if the user
holding the lock is no longer available, you may break the lock with the rcs command. You first use the rcs -u command to unlock the revision. When you unlock someone else's lock, you are asked to enter a comment about breaking the lock that is forwarded
to the user via electronic mail. After breaking the lock, you can then obtain the lock for yourself via rcs -l.
Branches—Complicating the Tree
RCS has a very flexible branching scheme. It allows you to make branches off the main trunk. You can also make branches that branch off an existing branch. For example, main trunk file revision 2.3 has a branch. This branch is 2.3.1 and has revisions
2.3.1.1, 2.3.1.2, and so on. At some point during this branch's development, say at 2.3.1.7, you need to branch off again. You create branch 2.3.1.7.1, which has revisions 2.3.1.7.1.1, 2.3.1.7.1.2, and so on. You get the idea. As you can see, the revision
numbers get long quite quickly. For this reason it is probably good to limit the branching as much as is reasonable.
In order to create and refer to files on a branch, you need to explicitly reference the revision of the file. Look at how this works. Start with trunk revisions including 2.3 already checked in. Now you want to create branch 2.3.1. First check out with
a lock revision 2.3. Next do your edits. Now when you go to check in your changes, specify the branch revision number. This creates revision number 2.3.1.1. Similar commands will create the next branch.
Merges—Controlling Parallel Changes
If you have parallel development of a single file, for whatever reason, and you need to roll all the changes together into a single revision, you should use the rcsmerge command. Say you have branched off the main trunk of development at revision 2.3.
Revisions 2.4 through 2.7 represent your main development efforts, whereas 2.3.1.1 through 2.3.1.4 represent defect fixes to your released (2.3) product. Now you would like to merge your changes together and check them in as revision 2.8.
Using rcsmerge to do this, you must specify the common base revision, in this case 2.3, via option -r. One set of the changes can be specified with a second -r option. If you do not specify this option, the default revision (usually the top of the main
trunk) is assumed. In this example, 2.7 is one of the revisions that holds changes. You can either let this be the default or explicitly specify -r2.7. Alternatively, you could specify -r2.3.1.4 to denote the branch revision. The other set of changes that
should be merged in are taken from the working file specified. Therefore, you must be aware of the contents of this file. It is also important to remember that this file is overwritten with the merged file. Use the -p option to make the output go to
standard out, which you can redirect to a file if you don't want your working file modified.
Now look at a couple of ways to put together all the options with rcsmerge. If you are developing on the main branch, check out revision 2.7 with a lock:
co -l2.7 the_file
merge together the changes:
rcsmerge -r2.3 -r2.3.1.4 the_file
and check in the changes to the main trunk:
ci -u the_file
The command in step 2 could be changed to
rcsmerge -p -r2.3 -r2.3.1.4 the_file > the_file.merged
to preserve the contents of file the_file. If you are working on the branched releases
obtain a lock on the main trunk (to check in the merge results):
rcs -l2.7 the_file
check out a copy of revision 2.3.1.4 without a lock:
co -u2.3.1.4 the_file
merge together the changes:
rcsmerge -p -r2.3 -r2.7 the_file > the_file.merged
when you wish to check in the changes, move the merged file into the working file:
mv the_file.merged the_file
and check in your changes as revision 2.8:
ci -u the_file
These are only two variations of many possible ways to use the rcsmerge command to merge together two set of changes. These are the basic things you need to remember: The first revision specified is the common base. The second revision specified is one
setof changes and can be implied. The working file specified includes the other changes. The working file will be overwritten with the merged file unless -p is specified.
There is a second way to merge together changes. The co command has an option, -j, that specifies pairs of files whose changes should be merged (joined) to the specified revision during the check out. Repeating the merge example with the co command
gives the following possible solution:
co -l2.7 -j2.3:2.3.1.4 the_file
The first revision specified (-l2.7) is checked out. The changes that occurred between the two revisions specified in the join list, 2.3 and 2.3.1.4, are merged into revision 2.7. The resulting merged file is placed in the working file the_file. Then
you may check in the changes using the following command:
ci -u the_file
The merging/joining abilities of RCS are quite flexible. You have seen several possible methods of combining your parallel development using the rcsmerge command and the co command. Each of these commands may not be able to resolve all types of merges.
During the merge process, if RCS has conflicts you will be notified and must examine the resulting file. The conflicts will be denoted and you must choose the desired solution. See the man page for merge for details on conflicts.
Symbolic Names, Baselines, and Releases
So far, this section on RCS has used numeric revision numbers. However, RCS enables you to use symbolic revision numbers as well as symbolic branches. Two commands, rcs and ci, allow you to set these symbolic names. After you have created these names,
you can use them in place of numeric revision numbers in all of the RCS commands. First look at how you set up symbolic names.
During check in, you can set or change the symbolic name associated with that revision number. If you have just added a new bit of functionality to your product, you may want to associate a symbolic name that you can advertise to your co-workers. Say
you call it ERR-MUSIC, because your product plays a little music when the user makes an error. When you check in your changes, use the -n option to add this symbolic name:
ci -u -nERR-MUSIC the_file
If you later need to fix a defect in your new music routines, make the change and check it in. However, this time you must use a capital -N as the option. This will override the previous value of the ERR-MUSIC symbol.
The rcs command can also be used to manipulate symbolic names. To add a symbolic name initially, use -n followed by : and then a revision number. The revision number is optional, and if left unspecified, the default revision will be used. Be careful,
because if you omit the : the symbolic name will be deleted. The -N option has the same behavior except that it will override an existing symbol.
The rcs command is also used to create and manipulate the symbolic branch names. Say you are using a branch off revision 3.4 to do patches for an internal release. You have created branch 3.4.1 and checked in revision 3.4.1.1 as the first patch changes.
To make interacting with this branch easier, you can name the branch (not a particular revision, but the branch as a whole) via rcs -nPATCH:3.4.1. Now when you want to check in and out off the head of the PATCH branch, simply use the symbolic name PATCH.
Here are some specific examples:
rcs -nERR-MUSIC: the_file creates a new symbolic name, ERR-MUSIC, for the default revision of the_file.
rcs -NERR-MUSIC: the_file moves the symbolic name, ERR-MUSIC, to the default revision of the_file.
rcs -nERR-MUSIC:2.3 the_file creates a new symbolic name, ERR-MUSIC, for the 2.3 revision of the_file.
rcs -NERR-MUSIC:2.5 the_file moves the symbolic name, ERR-MUSIC, to the 2.5 revision of the_file.
rcs -NERR-MUSIC:RELEASE1 the_file moves the symbolic name, ERR-MUSIC, to the RELEASE1 revision of the_file.
rcs -nERR-MUSIC the_file deletes the symbolic name, ERR-MUSIC, from the_file.
co -lPATCH the_file checks out and locks the head of branch PATCH.
Now that you have created symbolic version numbers and branches, you can use these names in any places where you would use their numeric equivalents.
Introduction to SCCS
SCCS was developed by AT&T as a system to control source code development. It has features in it that help support a production environment, including freezing of released code and hooks for integration of a problem-tracking system. This section
includes a brief introduction to SCCS, primarily as a contrast to RCS. Refer to the sections "A Simple Example" and "A Complex Example" for detailed samples of SCCS command usage.
Some systems ship with SCCS, but without the sccs command that was introduced by BSD. This guide's CD-ROM includes a version of the sccs command as available on the free source from BSD.
Interacting with SCCS
SCCS includes the admin command for interacting with the source control system. It can be used to create source control files, control availability of revisions, and change the rules about requirements for submitting a revision. SCCS also uses several
temporary files to indicate internal state and temporary locks. SCCS files are named s.filename. All SCCS commands take the name of the SCCS file itself rather than allowing a working filename as RCS commands do. It also has get and delta, which are
similar in function to the RCS commands co and ci.
Initial Revisions
SCCS files require explicit initialization using the admin command before you can perform any other action. There are two different ways to initialize an SCCS file. First, you can create an SCCS file with an empty initial revision by executing admin -n
s.filename. This will create s.filename with the appropriate SCCS file structure and an empty revision 1.1. You can then use the get and delta commands to add text; unlike in RCS, the empty revision 1.1 will always remain. Second, you can
create an SCCS file with initial contents from another file using admin -i filename s.filename. The two occurrences of filename are not required to be the same, but it is generally useful to do so because other SCCS commands assume
that the working file for s.filename is filename.
SCCS files
Like RCS, SCCS has an implicit notion of working files, but SCCS always requires the command line to use the s-file, which is the s.filename source control file. SCCS uses a file format completely different from that of RCS.
This note is brought to you courtesy of RCS—A System for Version Control by Tichy, which includes descriptions of RCS and the algorithms used by RCS and SCCS. A postscript version of this paper is on this guide's CD-ROM.
Checking Out a File
SCCS enables you to get a read-only copy of a revision with the get command. Using get -p will output the revision contents to the standard output. You can also supply a revision number using the -r option. Partial revision numbers for the -r option
will usually do what is desired. See the get man page entry for more details. You can specify a cutoff date (get the last delta before the cutoff) with -cYY[MM[DD[HH[MM[SS]]]]].
You can use the get command to set a lock, by doing a get for edit, or get -e, which locks the SCCS file and disables keyword expansion.
Checking In a File
SCCS uses the delta command to submit changed revisions, which is also called creating a delta.
Examining Revision Details and History
The prs command enables you to print reports on the SCCS file. It has somewhat more flexibility than the rlog command in RCS. It enables you to supply a format specification using the -d option that will control the printing of information about the
SCCS file. This can be used to created customized reports. prs shows you other details besides just the log messages.
Keywords
SCCS has a keyword substitution method that's different from that of RCS. SCCS keywords are of the form %x% and are expanded when you do a get with the -k (or -e) option. See the get man page entry for a full list of keywords. Expanded keyboards
have advantages and disadvantages. Expanded keywords need no processing to be easily human readable (for example, printf("Revision %I%\n"); in C code will print out as Revision 1.1 for revision 1.1 checked out with the keywords expanded).
Expanded keywords are difficult to recover. If someone sends you a modified version of one of your sources, you will need to find all of the expanded keywords and replace them with the actual keyword (for example, replace printf("Revision
1.1\n"); with printf("Revision %I%\n"); in C code); this can be very difficult if you don't localize keyword usage.
char sccsid[] = "%W%";
To take advantage of this, make sure you perform your build with no files out for editing (remember that when you perform get -e the keyword is not expanded). If you do this, you will be able to use the what command to identify what revision(s) of what file(s) went into creating the executable.
You can also use the %I% keyword to identify your revision(s) for printing version messages.
Locks—Mediating Conflict
SCCS locks are strict in that they will not allow a delta without a get -e. You can use the admin -fj command to allow concurrent get -e commands on the same revision.
Branches—Complicating the Tree
SCCS supports branches as described in the section "Basic Source Control Concepts." Using get -b -e will cause SCCS to create a branch from the specified revision. SCCS does not support branches on branches the way RCS does.
Merges—Controlling Parallel Changes
SCCS has no built-in support for performing merges. You can use the merge program as described in "Basic Source Control Concepts" to merge revisions of SCCS files if your version of UNIX has it.
Extra SCCS Features
SCCS includes extra software configuration management support hooks that are not in RCS. The admin -f x and admin -d x commands can be used to do the following:
|
|
|
|
|
|
|
|
|
|
|
|
|
|
|
|
|
|
|
|
|
|
|
|
|
|
|
|
|
|
See the admin man page entry for more details on these options.
Using Source Control for Backups
Both RCS and SCCS can also be used as a simple personal backup system. To do this, you periodically check in copies of the files that are to be backed up. This will give you a revision history of the files, and you can use this history to recover from
errors you may make (for example, accidentally removing a file or deleting some text you meant to keep).
Do not use source control as your only backup system. Use it to enhance an existing system. For example, if your system is backed up weekly, but you would like to protect your daily edits, you may want to run a cron job that performs your source control
backups. (See Chapter 20, "Scheduling Processes" for more information on adding cron jobs.) Your script might look something like this:
#!/bin/ksh

# (/usr/bin/ksh on some systems)

# This script will use RCS to do a checkpoint of

# all files listed in the file BACKUP_LIST.

# Make sure non-strict locking (rcs -U) is set on

# the RCS files.

#

# Algorithm

# For each file in the backup list

#   if the file has changed

#     check it in to RCS

#

# Assumptions:

# This script assumes that strict locking has been turned

# off in the corresponding RCS file since the purpose of

# the script is for personal backup. This script assumes

# the head is the right place to put the new revision.

# This script assumes the RCS file is in one of the default

# locations for RCS. For GNU RCS, use the RCSINIT variable

# to change this.

BACKUP_LIST=${HOME:-/u/sartin}/backup/rcs_backup_list

# Uses POSIX mktemp!!!

ERR_FILE='mktemp -p rcsbk'

# Remove the scratch error file on exit

trap "rm -f ${ERR_FILE}" 0

exit_code=0

# For each file in the backup list

for file in 'cat ${BACKUP_LIST}'

do

     # Check if the file has changed (old rcsdiff doesn't take -q)

     rcsdiff -q ${file} >/dev/null 2>${ERR_FILE}

     rcs_res=$?

# WARNING: Some versions of rcsdiff don't return error code

# that match these. These error codes agree with GNU RCS 5.6.0.1

     if [ ${rcs_res} -eq 0 ]

     then

          # no change in file

          # echo "No changes to $file"

          # The ":" is an empty command.

          :

     elif [ ${rcs_res} -eq 1 ]

     then

          # rcsdiff found differences, checkpoint the file

          # echo "Backing up changes to $file"

          ci -m"Backup on 'date'" -q -u $file 2>${ERR_FILE} </dev/null

          if [ $? -ne 0 ]

          then

               echo "Could not check in changes for $file"

               echo "Contents of stderr from ci -u $file:"

               cat ${ERR_FILE}

               echo "End of stderr from ci -u $file."

               exit_code=1

          fi

     else

          # Got an error, log it for mail

          echo "Could not get RCS differences for $file"

          echo "Contents of stderr from rcsdiff $file:"

               cat ${ERR_FILE}

          echo "End of stderr from rcsdiff $file."

          exit_code=1

     fi

     {ERR_FILE}

done

# Exit code should be 0 or 1, exit 2 if it's not set

exit ${exit_code:-2}
The example script will use the file named in the BACKUP_LIST shell variable. For each file in the list, it uses rcsdiff to check for differences. Note that it currently depends on the GNU RCS 5.6.0.1 rcsdiff exit codes, which agree well with most
implementations (however, this script does not work on HP-UX 9.0 RCS, where rcsdiff appears to return 0 unless there is an error). If you need to replace the exit code check, you might try saving the stdout of rcsdiff and checking the sizes or contents of
the stdout and the ERR_FILE. If there was an error in performing the rcsdiff, the script prints an error message and sets the shell variable exit_code so that on exit it will indicate an error. If the rcsdiff indicated changes, the script attempts a ci and
logs an error and sets exit_code if the ci fails. Here it is assuming nonstrict locking. You could add rcs -l to lock the file if strict locking is enabled, but this is potentially error prone (for example, if the file is locked). This backup system is
intended for personal use only, which is where nonstrict locking is usually safe.
For specific needs you might develop a more complex system. Here are some suggested directions for improvement:
- Allow strict locking. This would make the backup workable with strict locks and possibly even allow it to be used for project checkpoints rather than just for personal checkpoints.
- Keep all the RCS files in a different location. This might require listing pairs of names in the BACKUP_LIST or creating a directory tree especially for RCS files. This could help make a project-style backup work better (one set of RCS files
only for backup). This could also be used to put the RCS files on a file system different from the original files, which would improve your protection from a disaster.
- Perform a check in only if the changes exceed a certain minimum size. This will decrease the number of revisions at some cost in backup currency.
- Use rcs -o automatically to make obsolete old backups at some point. This will decrease the size of the RCS files and improve performance.
Although performing backup using a source control system is certainly not a panacea, it can be used as additional protection for your personal files. It allows a finer grain of control of the backup than most system backups give.
A Simple Example
This section and the next section give a rather simple example of source control in action. The example shows how either RCS or SCCS can be used to solve a source control problem. To keep the example simple, it involved only three files—enough to
show some of the benefits of source control, but not so many that the example becomes buried in detail. To prepare for this example, you should create a new directory for the example. In that new directory, create three files: file1, file2, and file3. If
you like, you may create a directory named RCS for storing the RCS files. You should be able to perform this example using RCS and SCCS simultaneously.
The contents of file1 should be
This is file1
The contents of file2 should be
This is file2
The contents of file3 should be
This is file3
Starting to Use Source Control
Both RCS and SCCS have several ways to initialize the source control files. You will use three different methods here to illustrate the possibilities. Normally, you would choose one method for an entire project. In the first method you will initialize
an empty source control file and then manually check in the current version of the file. In the second method you will initialize the source control file to contain the current contents of the source file and manually enter descriptive information. In the
third method you will initialize the source control file to contain the current contents of the source file, and all descriptive information and comments will be supplied on the command line. The third method is probably the most desirable for starting a
large project.
If you are truly adventurous, you might even want to view the source control files themselves (file,v for RCS and s.file for SCCS) to see how they change. Check your online documentation (rcsfile or sccsfile man page entries might be on your system) for information on the file formats.
Creating an Empty Source Control File and Adding the Initial Revision
First, initialize an empty RCS file for file1 and check in the initial revision:
$ Brcs -i file1

RCS file: RCS/file1,v

enter description, terminated with single '.' or end of file:

NOTE: This is NOT the log message!

>> Contents of file1 for source control example

>> .

done

$ ci -u file1

RCS/file1,v  <—  file1

initial revision: 1.1

done

$ co -l file1

RCS/file1,v  —>  file1

revision 1.1 (locked)

done

$ ci -f -q file1

enter log message, terminated with single '.' or end of file:

>> To keep revision numbers in sync with SCCS.

>> .

$
The rcs -i file1 command creates RCS/file1,v with your description, with no revisions. When you do ci -u file1, RCS automatically creates revision 1.1 with the comment initial revision. The last two commands are there simply to keep the revision numbers
in sync with the numbers you will have in the SCCS files.
Next initialize an empty SCCS file and check in file1:
$ admin -n s.file1

$ get -e -p s.file1

Retrieved:

1.1

new delta 1.2

0 lines

$ delta s.file1

comments? Initial revision

No id keywords (cm7)

1.2

1 inserted

0 deleted

0 unchanged

$ get s.file1

Retrieved:

1.2

1 lines

No id keywords (cm7)

$
The admin command creates an empty initial revision. To lock the SCCS file, you need to perform a get for edit using get -e. In this example, you use get -e -p s.file1, which prints the file to standard output and locks it. Because you already have the
contents of file1 you do not need and do not want to overwrite file1 with the empty revision 1.1. The delta command checks in the initial revision of the file as revision 1.2, leaving an empty revision 1.1 as an artifact. The final get command ensures that
you have a current, read-only copy of file1.
Creating a Full Source Control File with Manually Supplied Comments
Now create the source control file with all of the correct original text. In RCS, you can do this using ci:
$ ci -u file2

RCS/file2,v  <—  file2

enter description, terminated with single '.' or end of file:

NOTE: This is NOT the log message!

>> Contents of file2 for source control example

>> .

initial revision: 1.1

done

$
This command causes a check in of the initial revision. RCS requests a description of the file, which you type after seeing the request. The -u option causes RCS to leave a read-only copy of file2 in your directory. Notice that RCS can initialize the
RCS file without use of the rcs command. It can be very convenient (and is necessary for this example) to keep available a current copy of the head revision.
To initialize an SCCS file with the current contents of file2 use the admin command:
$ admin -ifile2 s.file2

No id keywords (cm7)

$ get s.file2

Retrieved:

1.1

1 lines

No id keywords (cm7)

$
The admin command creates s.file2 with the current contents of file2 as revision 1.1. The get command is to keep available a current copy of the head revision of file2.
Creating a Full Source Control File with Command Line Comments
This method supplies all the possible descriptive comments on the command line used to create the full source control file. In RCS, it takes extra commands to do this completely:
$ echo "Contents of file3 for source control example" > desc

$ ci -u -m"Original source for file3" -tdesc file3

RCS/file3,v  <—  file3

initial revision: 1.1

done

$
The echo command saves the description to a file. The ci command supplies the initial revision but replaces the default message Initial revision that RCS normally uses for the first revision with the message Original source for file3. It also uses the
-t option to supply a description from the desc file. Although this method may seem more awkward when you use it interactively for a single file, it can be much more efficient if you are checking in many files and can write a script to generate
descriptions and messages.
For SCCS, the command sequence to create the following:
$ echo "Contents of file3 for source control example" > desc

$ admin -tdesc -ifile3 -y"Original source for file3" s.file3

No id keywords (cm7)

$ get s.file3

Retrieved:

1.1

1 lines

No id keywords (cm7)

$
The admin command sets up the SCCS file completely using the source from file3, the description from desc, and the comment supplied with the -y option. Once again, this presents a good opportunity for writing scripts to do large initializations of
source control hierarchies.
Modifying Files
In RCS and SCCS, you need to set a lock to edit a file. The normal way to do that is to set the lock before you begin editing. You will now make changes to file2 and file3 to prepare for the alpha test. An alpha test is a preliminary release of a
possibly incomplete software product that is likely to have new features added and many defects repaired before it is released. These changes will be simple and will involve locking the file, editing the file, and checking in the change to source control.
You will perform these in two different ways so you can see what to do when you forget to set a lock on a source control file.
A common area of contention in source control systems is the subject of when a revised version of a file should be checked in to source control. The two extreme positions are these:
- Whenever the file is edited, it should be checked in to source control. Check in as early and as often as possible.
- Whenever the product is released, the files should be checked in to source control. Check in as late and as infrequently as possible.
Of course, neither of these is particularly appealing in practice. The first is unappealing because it results in large source control files, many versions that have had no review or testing (if they are source code, they may not even compile!), and
revision logs that are difficult to follow because the changes are all so small. The second is unappealing because it results in little, if any, log of the logic behind the series of changes made to a file and gives no alternative for phased review and
release of project files.
The best alternative is somewhere in the middle, and you should think carefully about the correct balance for your projects.
Lock, Modify, Check In
First you will make changes in the most desirable way. You will lock the file, then modify it, and finally check it back in to source control. For this example, you will change file2 to have the following text:
This is file2

Added line 1

Added line 2

Added line 3

Added line 4

Added line 5

Added line 6

Added line 7
In RCS, you should run this:
$ co -l file2

RCS/file2,v  —>  file2

revision 1.1 (locked)

done

$ # Edit file2

$ ci -u -m"Changes for alpha" file2

RCS/file2,v  <—  file2

new revision: 1.2; previous revision: 1.1

done

$
This will create revision 1.2 with the changes you made. For SCCS, you should run this:
$ get -e s.file2

Retrieved:

1.1

new delta 1.2

1 lines

$ # Edit file2 (cheaters using RCS and SCCS can run co -p file2 > file2)

$ delta -y"Changes for alpha" s.file2

No id keywords (cm7)

1.2

7 inserted

0 deleted

1 unchanged

$ get s.file2

Retrieved:

1.2

8 lines

No id keywords (cm7)

$
This creates revision 1.2 with the changes you made. Notice that the delta command tells you how many lines were inserted, deleted, and unchanged. You can get the same information from RCS using rlog. The final get keeps a read-only copy of the head.
Modify (Oops!), Lock, Check In—Recovering from a Mistake
If you change a file without locking the source control file, it is still possible to lock the source control file and check in the changes.
For this example, you will change the text of file3 to the following:
This is file3

A line called A

A line called B

A line called C

A line called D
Using RCS, execute these commands:
$ co file3

RCS/file3,v  —>  file3

revision 1.1

done

$ chmod u+w file3

$ # Edit file3

$ rcs -l file3

RCS file: RCS/file3,v

1.1 locked

done

$ ci -u -m"Dangerous changes to file3" file3

RCS/file3,v  <—  file3

new revision: 1.2; previous revision: 1.1

done

$
The co command makes sure you have the contents of file3, but it does not set a lock. The chmod should be a red flag that you are doing something dangerous; RCS and SCCS both leave files with write enabled when they have set a lock for you. The rcs -l
command sets a lock on the head revision of file3. The ci command checks the changes into RCS.
Using SCCS, execute these commands:
$ get s.file3

Retrieved:

1.1

1 lines

No id keywords (cm7)

$ chmod u+w file3

$ # Edit file3 (cheaters using RCS and SCCS can run co -p file3 > file3)

$ get -e -p s.file3 >/dev/null

Retrieved:

1.1

new delta 1.2

1 lines

$ delta -y"Dangerous changes to file3" s.file3

No id keywords (cm7)

1.2

4 inserted

0 deleted

1 unchanged

$ get s.file3

Retrieved:

1.2

5 lines

No id keywords (cm7)

$
The first get command is to make sure you have the correct contents for file3, but does not set a lock. The chmod should be a red flag that you are doing something dangerous; RCS and SCCS both leave files with write enabled when they have set a lock for
you. The get -e -p command sets a lock on the head revision of file3 (and copies the text of the head revision of file3 to /dev/null). This trick does the same as rcs -l in RCS. The delta command checks the changes into SCCS. The final get command is to
get a read-only copy of the head.
To see the risk of losing SCCS keywords, try this example. First create a file called badsccskw with the following text:
This is %F% revision %I%, created on %D%, %T%
Load SCCS with the contents of the file, using admin -ibadsccskw s.badsccskw. Next do a get s.badsccskw and chmod u+w badsccskw to get the current contents of the file (notice that if you use cat badsccskw the keywords are expanded. Now do get -e -p
s.badsccskw; notice how the keywords look when you request an editable copy. Now do delta -y"Lose keywords" s.badsccskw; notice the warning No id keywords (cm7). Now look at what happened to the file, using get -e s.badsccskw, and then cat
badsccskw and notice the lack of keywords. By performing the "modify, lock, check in" style of modification, you have lost the SCCS keywords completely. Look at what happens:
$ admin -ibadsccskw s.badsccskw

$ rm badsccskw

$ get s.badsccskw

Retrieved:

1.1

1 lines

$ chmod u+w badsccskw

$ cat badsccskw

This is s.badsccskw revision 1.1, created on 94/04/04, 12:26:47

$ get -e -p s.badsccskw

Retrieved:

1.1

new delta 1.2

This is %F% revision %I%, created on %D%, %T%

1 lines

$ delta -y"Lose keywords" s.badsccskw

No id keywords (cm7)

1.2

1 inserted

1 deleted

0 unchanged

$ get -e s.badsccskw

Retrieved:

1.2

new delta 1.3

1 lines

$ cat badsccskw

This is s.badsccskw revision 1.1, created on 94/04/04, 12:26:47

$
Shipping a Prerelease
After all of your hard work, it's time to ship a prerelease alpha version of your files for testing and review. Ideally you would like to collect a list of which revisions of which files you sent out for the alpha. This will give you the ability to look
at the correct revisions anytime there is an error to be fixed or a question to be answered.
Recording a Configuration with RCS
RCS offers a number of ways to recall files:
- By head of trunk (default)
- By exact revision number (-r rel.level[.branch.seq])
- By author (-w author)
- By highest revision in a release (-r rel)
- By highest revision in a branch (-r rel.level.branch)\
- By date (-ddate)
- By state (-sstate)
- By symbolic name (-rNAME)
The fist three alternatives are not very useful for recalling a particular release. The second two can be useful, but you need to arrange to increment the release number of all RCS files each time you ship out a release and keep all release numbers in
all RCS files synchronized. Retrieving by date can be reasonably appealing if you know the date of the release and on what branch it occurred, but it will break down if you wish to save and retrieve patches for a release (because the patch dates will be
different from the release date). For example, if your release occurred on April 3, 1994, you might try this:
$ co -d"1994/04/03 23:59" RCS/*,v

RCS/file1,v  —>  file1

revision 1.2

done

RCS/file2,v  —>  file2

revision 1.2

done

RCS/file3,v  —>  file3

revision 1.2

done

$
Notice that the correct revisions for the alpha release are retrieved.
Retrieving by state can be useful for release. Call the alpha release stable and set the RCS state of the head revisions to stab.
$ rcs -sStab RCS/*,v

RCS file: RCS/file1,v

done

RCS file: RCS/file2,v

done

RCS file: RCS/file3,v

done

$ rlog file1

RCS file: RCS/file1,v

Working file: file1

head: 1.2

branch:

locks: strict

access list:

symbolic names:

comment leader: "# "

keyword substitution: kv

total revisions: 2;     selected revisions: 2

description:

Contents of file1 for source control example.

——————————————

revision 1.2

date: 1994/04/04 03:04:47;  author: sartin;  state: Stab;  lines: +0 -0

To keep revision numbers in sync with SCCS.

——————————————

revision 1.1

date: 1994/04/04 02:05:47;  author: sartin;  state: Exp;

Initial revision

=============================================================================

$ co -sStab RCS/*,v

RCS/file1,v  —>  file1

revision 1.2

done

RCS/file2,v  —>  file2

revision 1.2

done

RCS/file3,v  —>  file3

revision 1.2

done

$
Notice that the state field for revision 1.2 of file1 is Stab and that the co command gets the correct revisions.
The best alternative is probably to use a symbolic name to mark all the revisions used in the release. Use rcs to apply a symbolic name to the release:
$ rcs -nRel_1_Alpha: RCS/*,v

RCS file: RCS/file1,v

done

RCS file: RCS/file2,v

done

RCS file: RCS/file3,v

done

$ rlog file1

RCS file: RCS/file1,v

Working file: file1

head: 1.2

branch:

locks: strict

access list:

symbolic names:

        Rel_1_Alpha: 1.2

comment leader: "# "

keyword substitution: kv

total revisions: 2;     selected revisions: 2

description:

Contents of file1 for source control example.

——————————————

revision 1.2

date: 1994/04/04 03:04:47;  author: sartin;  state: Stab;  lines: +0 -0

To keep revision numbers in sync with SCCS.

——————————————

revision 1.1

date: 1994/04/04 02:05:47;  author: sartin;  state: Exp;

Initial revision

=============================================================================

$
The command rcs -nRel_1_Alpha: RCS/*,v associates the current head revision (use -nname:revision_number to choose a different revision) with the name Rel_1_Alpha. Notice the symbolic names list in the rlog output. You can use symbolic
names for revisions in any RCS command or option that takes a revision number. GNU RCS includes a script called rcsfreeze to help do this:
$ rcsfreeze Rel_1_Alpha

rcsfreeze: symbolic revision number computed: "C_1"

rcsfreeze: symbolic revision number used:     "Rel_1_Alpha"

rcsfreeze: the two differ only when rcsfreeze invoked with argument

rcsfreeze: give log message, summarizing changes (end with EOF or single '.')

Alpha release to partners and QA

.

rcsfreeze: 1.2 RCS/file1,v

rcsfreeze: 1.2 RCS/file2,v

rcsfreeze: 1.2 RCS/file3,v

$ cat RCS/.rcsfreeze.log

Version: Rel_1_Alpha(C_1), Date: Mon Apr 04 13:55:01 1994

—————

        Alpha release to partners and QA

—————

$ rcs -q -nRel_1_Alpha_Orig:Rel_1_Alpha RCS/*,v

$
The rcsfreeze command works on all RCS files for the current directory (either in the current directory or in a directory called RCS). It saves the log message in a file called .rcsfreeze.log (in the RCS directory, if there is one), which allows you to
read the description of the frozen configurations. If you do not supply a symbolic name on the rcsfreeze command line, rcsfreeze uses C_number, where number is decided by rcsfreeze from the .rcsfreeze.ver file (in the RCS directory if there
is one). The final rcs command is to assign an extra symbolic name Rel_1_Alpha_Orig to the alpha revisions. This name will be useful later in performing merges.
Using SCCS for a Prerelease
Unlike RCS, SCCS does not offer symbolic names. It does offer several similar options for getting particular revisions, highest delta in a release, or head of a branch or the trunk. See the get man page entry for more details. SCCS can use a cutoff date
for a get; it will get the most recent delta before the cutoff date. For this example, you would use the release date and time as the cutoff (the cutoff time you use will be different!). The following shows how to retrieve an SCCS file by date:
$ get -c9404032359 s.*

s.file1:

Retrieved:

1.2

1 lines

No id keywords (cm7)

s.file2:

Retrieved:

1.2

8 lines

No id keywords (cm7)

s.file3:

Retrieved:

1.2

5 lines

No id keywords (cm7)

$
Release 1
After the alpha release, make some changes to the system before release 1. Change file2 to contain the following:
This is file2

Added line 1

Added line 2

Added line 3

A change added after the alpha release

Added line 4

Added line 5

Added line 6

Added line 7
To edit file2 and update it in RCS, do the following:
$ co -l -q file2

$ # Edit file2

$ ci -u -m"Post alpha changes" -q file2

$
Note the use of -q to eliminate the RCS output. With -q only errors are reported.
To edit file2 and update it in SCCS, do the following:
$ get -e -s s.file2

$ # Edit file2 (cheaters using RCS and SCCS can run co -p file2 > file2)

$ delta -s -y"Post alpha changes" s.file2

$
Note the use of -q to eliminate the RCS output. With -q only errors are reported.
Performing release 1 is just like performing the alpha release, with one exception. It may be a good idea to increase the release number of future file revisions to 2. This will make release tracking much easier in SCCS and may help in RCS (although
symbolic name gives you most of the advantages).
RCS doesn't offer an easy way to set the release for the next change checked in, but you can force a revision 2.1 even without changes by running a co -l and then ci -r2 -f. You will not do this in this example, but keep it in mind for the future. Run
the command rcs -q -nRel_1: -nRel_1_orig: RCS/*,v to set the symbolic names Rel_1 and Rel_1_orig for the head revision of all files. The first name will be used to track release 1 and any patches. The second name will be used to save the original release 1
source and will help in performing merges. Remember to use release 2 for future revisions.
SCCS offers a simple way to set the release for the next delta. To perform your release in SCCS, run the command admin -fd2 s.*. This sets the default SID to 2 for all of your SCCS files. Because of the way get works for nonexistent releases, get will
retrieve the highest revision from release 1 and delta will submit the change as revision 2.1.
A Complex Example
Now it's time to make the example a bit more complicated. This section includes making changes for release 2, creating patches for release 1, merging the patches into the trunk, receiving patches from others (and merging them) and (for SCCS only)
requiring proper authorization to make changes.
Beginning Changes for Release 2
After release 1, make changes to all three files that add a single line at the end of the file that says Line added for release 2. Check the changes in at release 2 (this will be the default for SCCS). After changes, the files should look like this:
$ cat file1

This is file1

Line added for release 2

$ cat file2

This is file2

Added line 1

Added line 2

Added line 3

A change added after the alpha release

Added line 4

Added line 5

Added line 6

Added line 7

Line added for release 2

$ cat file3

This is file3

A line called A

A line called B

A line called C

A line called D

Line added for release 2
To create changes for release 2 in RCS, do the following:
$ co -l -q file1 file2 file3

$ # Edit the files

$ ci -u -m"Line added for release 2" -r2 file1 file2 file3

RCS/file1,v  <—  file1

new revision: 2.1; previous revision: 1.2

done

RCS/file2,v  <—  file2

new revision: 2.1; previous revision: 1.3

done

RCS/file3,v  <—  file3

new revision: 2.1; previous revision: 1.2

done

$
Notice that for RCS to increment the release number, you need to tell it on the ci command line.
For SCCS, you already ran admin -fd2 s.*, so the change to release 2 will occur automatically:
$ get -e s.*

s.file1:

Retrieved:

1.2

new delta 2.1

1 lines

s.file2:

Retrieved:

1.3

new delta 2.1

9 lines

s.file3:

Retrieved:

1.2

new delta 2.1

5 lines

$ # Edit files

$ delta -s -y"Line added for release 2" s.*

$ get -s s.*

$
Notice that the get -e command retrieves the proper revisions and informs you that the delta will be submitted as revision 2.1.
Creating Patches for Release 1 and Alpha
After release 1, you discover some errors. To fix these in the release 1 source code you will need to check out the correct source and create a branch in the source control system for the change. You will now change the text of file2 to add a new first
line:
Line added for patch to release 1

This is file2

Added line 1

Added line 2

Added line 3

A change added after the alpha release

Added line 4

Added line 5

Added line 6

Added line 7
For the RCS example, you will move the Rel_1 symbolic name to track the release with all patches. To do this in RCS, you check out the revision by the symbolic name Rel_1 (should be revision 1.3), perform the edit, and check in the new branch (changing
the symbolic name Rel_1 with the -N option, which replaces an existing symbolic name):
$ co -q -lRel_1 file2

$ # Edit file

$ ci -u -m"Patch to release 1" -NRel_1 file2

RCS/file2,v  <—  file2

new revision: 1.3.1.1; previous revision: 1.3

done

$
Notice that ci automatically creates the branch for you. If you do rlog file2 you will see that the name Rel_1 now refers to revision 1.3.1.1.
To do this in SCCS, you use get -e -b with a cutoff date, perform the edit, and then check in the delta:
$ get -e -b -c9404041430 s.file2

Retrieved:

1.3

new delta 1.3.1.1

9 lines

$ delta -y"Patch to release 1" s.file2

No id keywords (cm7)

1.3.1.1

1 inserted

0 deleted

9 unchanged

$
Note that the -b option causes get to set up a branch, and that delta automatically uses the branch. The cutoff time you use will be different from the example because you will be executing the example and creating new revisions at a different time than
we did! You will need to remember that branch 1.3.1 is the branch for release 1 patches.
Now do the same thing for file3, changing the contents to the following:
Line added for patch to release 1

This is file3

A line called A

A line called B

A line called C

A line called D
To create the patch in RCS, do the following:
$ co -q -lRel_1 file3

$ # Edit file

$ ci -q -NRel_1 -m"Patch to release 1" -u file3

$
In addition, the -n (and -N) option to ci always assigns the new revision number to the symbol. The -n (and -N) option to rcs has three forms. First, -n symbol will delete an existing symbol completely. Second, -n symbol: will assign the head revision to symbol. Finally, -n symbol:revision will assign the specific revision to symbol.
This will create revision 1.2.1.1 with the changed contents, and change the Rel_1 name to be revision 1.2.1.1.
To create the patch in SCCS, do the following:
$ get -s -b -e -c9404041430 s.file3

$ # Edit file

$ delta -s -y"Patch to release 1" s.file3

$
This will create revision 1.2.1.1 with the changed contents. You will need to remember that branch 1.2.1 is the branch for release 1 patches.
Merging Patches into the Trunk
It's all well and good to use branches to create patches to the old release 1, but what do you do if you want to add those patches to the next release? The answer is to use some sort of merging facility to combine the changes for the patch with the
changes since the release. You will now merge the patch to file2 into the trunk.
Merging with rcsmerge
RCS includes a program called rcsmerge, which performs some merging. When you assigned symbolic names for Rel_1_orig, you laid the groundwork for making merges easy. The Rel_1_orig name gives a common ancestor for performing merges (remember that merges
require a common ancestor and two variants).
$ co -rRel_1 file2

RCS/file2,v  —>  file2

revision 1.3.1.1

done

$ chmod u+w file2

$ rcs -l -q file2

$ rcsmerge -rRel_1_orig file2

RCS file: RCS/file2,v

retrieving revision 1.3

retrieving revision 2.1

Merging differences between 1.3 and 2.1 into file2

$ cat file2

Line added for patch to release 1

This is file2

Added line 1

Added line 2

Added line 3

A change added after the alpha release

Added line 4

Added line 5

Added line 6

Added line 7

Line added for release 2

$ ci -u -q -m"Merge changes from release 1 patch" file2

$
The key command is the rcsmerge command, which tells RCS to merge changes between revision Rel_1_orig (1.3) and the current head (2.1) into the current contents of file2 (which contains the patch to release 1).
Merging with SCCS and merge
SCCS has no built-in merge facility, but if you have the merge program you can perform merges by hand and check in the results. Notice that getting the correct revisions checked out of SCCS is a little bit more challenging.
$ rm -f file2

$ get -s -p -r1.3 s.file2 > base

$ get -s -p -r1.3.1.1 s.file2 > branch

$ get -s -e -p s.file2 > head

$ merge -p head base branch > file2

$ cat file2

Line added for patch to release 1

This is file2

Added line 1

Added line 2

Added line 3

A change added after the alpha release

Added line 4

Added line 5

Added line 6

Added line 7

Line added for release 2

$ delta -s -y"Merge changes from release 1 patch" s.file2

$
The use of merge is similar to that in the example in the section "Merges—Controlling Parallel Changes" and performs the same task as the rcsmerge in the previous example, but uses manual setup from source control of the files to be
merged.
Receiving Patches from Others and Merging Them
You may be faced with situations in which you receive suggested patches from outside sources. In this example, you receive a suggested patch based on the source of release 1. The submitter suggests that file3 should read as follows:
This is file3

A line called A

A line called B

Outside patch to release 1

A line called C

A line called D
This is the same as the release 1 version of file3, with a line added in the middle. The best way to handle such a patch is to check it in as a branch from the released version of the file and then merge the change into the head of the trunk. You have
not yet merged the release 1 patch to file3 to the trunk head, so you will perform that merge as well.
Merging with co
The RCS co command includes merging capability. To use it you will need to check in the modified version of file3 as a branch to the Rel_1_orig revision and then use co -l -j to merge the changes. Most of this example should be familiar. First, you set
a lock on revision Rel_1_orig of file3 (you could use co to check out the lock, but you would just overwrite file3 right away with the patched version you received). Next, you put the text you received into file3 and then check in the changes, which will
automatically create a new branch 1.2.2.1. Now comes the new part: Execute co -l -jRel_1_orig:Rel_1,Rel_1_orig:1.2.2.1 file3. The -l tells RCS to lock the head revision. The -jRel_1_orig:Rel_1,Rel_1_orig:1.2.2.1 tells RCS to merge two sets of changes into
file3; first the changes made between Rel_1_orig (revision 1.2) and Rel_1 (revision 1.2.1.1) will be merged; next the changes made between Rel_1_orig (revision 1.2) and revision 1.2.2.1 will be made. This will merge all of the patch changes into file3.
Finally, perform a ci to create revision 2.2 with the merged changes:
$ rcs -lRel_1_orig file3

RCS file: RCS/file3,v

1.2 locked

done

$ # Edit file3

$ ci -m"Patch from outside" file3

RCS/file3,v  <—  file3

new revision: 1.2.2.1; previous revision: 1.2

done

$ co -l -jRel_1_orig:Rel_1,Rel_1_orig:1.2.2.1 file3

RCS/file3,v  —>  file3

revision 2.1 (locked)

revision 1.2

revision 1.2.1.1

merging...

revision 1.2

revision 1.2.2.1

merging...

done

$ cat file3

Line added for patch to release 1

This is file3

A line called A

A line called B

Outside patch to release 1

A line called C

A line called D

Line added for release 2

$ ci -q -u -m"Merge patches to release 1 (internal and outside)" file3

$
Notice that both sets of patches were merged. In real life, you might find that the merges encountered an overlap. In that case, you would need to edit the resulting file before performing a check in.
Using SCCS and merge
SCCS does not include a merge facility, so you will use the merge program repeatedly to perform the merges for this example if your version of UNIX has it. First, you do a get -e of the released file and add the changes. Then you use delta to submit the
changes.
After the changes are submitted, you will use a series of get commands to retrieve the various revisions to be merged. Copy revision 1.2 of file3 into file3_base (get -p -s -r1.2 s.file3 > file3_base). Copy revision 1.2.1.1 of file3 into file3_p1.
Copy revision 1.2.2.1 of file3 into file3_p2. Get the head revision of file3 for edit into file3_head (get -p -s -e s.file3 > file3_head). Then execute a pair of merge commands, first merging the changes from the first patch (merge -p file3_p1
file3_base file3_head > file3_tmp) and then merging the result of that with the changes from the second patch (merge -p file3_p2 file3_base file3_tmp > file3). Finally, use delta to commit the change.
Perform the SCCS merge by executing the commands:
$ get -e -b -r1.2 -s s.file3

$ delta -s -y"Patch from outside" s.file3

$ get -p -s -r1.2 s.file3 > file3_base

$ get -p -s -r1.2.1.1 s.file3 > file3_p1

$ get -p -s -r1.2.2.1 s.file3 > file3_p2

$ get -p -s -e s.file3 > file3_head

$ merge -p file3_p1 file3_base file3_head > file3_tmp

$ cat file3_tmp

Line added for patch to release 1

This is file3

A line called A

A line called B

A line called C

A line called D

Line added for release 2

$ merge -p file3_p2 file3_base file3_tmp > file3

$ cat file3

Line added for patch to release 1

This is file3

A line called A

A line called B

Outside patch to release 1

A line called C

A line called D

Line added for release 2

$ delta -s -y"Merge patches to release 1 (internal and outside)" s.file3

$
You may want to review these examples several times to be sure you understand what is happening. The RCS example performed the same series of merging, but the co command handled all of the temporary files and extra guidekeeping work.
Requiring Proper Authorization for Changes (SCCS Only)
SCCS offers the option of having delta require verified modification request numbers, which identifies a particular report or enhancement request that required a change. This can be useful if you need a more completely controlled
configuration-management environment. SCCS implements this by allowing you to set the name of a verification program using admin. If you set the verification program, it will be used by delta to verify that the modification request number(s) supplied on
the command line (with -m) or interactively (with verification enabled, delta will ask for modification requests if none were given on the command line). Modification requests are separated by blanks, tabs, or new lines.
delta -m'01011 01012 01014' s.file2.
If the verification script exits successfully (exit code 0), then delta will allow the change and record the modification requests in the SCCS file. Here is a sample script that verifies that the modification request is a five-digit number:
#!/bin/ksh

exit_code=0

filename=$1

shift

for mr in $*

do

        case $mr in

        [0-9][0-9][0-9][0-9][0-9])

                ;;

        *)

                echo Invalid MR: $mr

                exit_code=1

                ;;

        esac

done

exit ${exit_code}
To try out this script, put the script in mr_verify and make it executable:
$ touch foo

$ admin -mxyzzy -ifoo -fv./mr_verify s.foo

Invalid MR: xyzzy

ERROR [s.foo]: invalid MRs (de9)

$ admin -m00000 -ifoo -fv./mr_verify s.foo

No id keywords (cm7)

$
For a production system, you could write the verification script to check with the problem-tracking database to make sure the modification requests are current and open. You could also have the script log the delta with the problem-tracking system.
Shutting Down Development on Release 1 (SCCS Only)
SCCS allows you to disable further delta changes to a list of releases or to prohibit get -e on a range of releases.
To disable delta change to release 1 of this example, run admin -fl1 s.file1 s.file2 s.file3. If you then attempt to perform an action that would cause a release 1 delta, you will get an error message:
$ admin -fl1 s.file1 s.file2 s.file3

$ get -e -r1.2 s.file1

Retrieved:

1.2

ERROR [s.file1]: release '1' locked against editing (co23)

$
The example given in this and the preceding sections is quite long and complex. You may want to review parts of the example several times to help your understanding.
Using make with Source Control
To create an integrated development environment, you may want make to perform automatic check outs from the source control system. This can be very useful as a default rule for make so that it attempts to get from source control any file it is unable to
find or create using existing rules. You may also want to write make rules that will perform time stamp—based check outs.
Default Rules
The easiest way to use source control with make is as a fallback. By setting the default target in make so that it attempts to get the head revision from a source control system, you will usually get the desired behavior for development. Try adding this
rule to your Makefile:
.DEFAULT:

     co -q $<
For SCCS, try adding this rule to Makefile:
.DEFAULT:

     get -s s.$<
Both of these rules will be activated only if make has no explicit or implicit rules on how to construct the file, so the rule will not interfere with modifications to your Makefile.
Rules Using Time Stamps
There are some pitfalls to using make rules that check out files based on time stamps. The first problem is the difficulty in creating reliable rules that will work with anything other than head revision (or at least the top of a branch). It is possible
to write a rule that does a check out based on an RCS tag or an SCCS cutoff date, but getting it to work in practice is fairly difficult. The second problem is one of false execution of the rule. Because make bases its update rules entirely on time stamps,
it can be fooled by certain kinds of changes to a source control file. If you use the rcs or admin command to change a source control file without changing the head revision, your rule will detect that the working file is out of date with the source
control file and check out the latest copy from source control. The third, and most serious, problem is one of false failure to execute a make rule. This can happen if you are not careful about what is in the working file. This is best illustrated by an
example. Say you have an RCS-controlled file named file1 that has two revisions, 1.1 and 1.2, and you check out revision 1.1. If you then run your make (which is intended to build from the head revision), make will decide that file1 is up-to-date (because
you wrote to file1, not to file1,v, the working file is newer) and will not replace revision 1.1 with revision 1.2.
Knowing that lengthy warning, you can write simple rules that will perform time stamp—based check out. Review this Makefile:
catfile:  file1 file2

     cat file1 file2 > catfile

file1:    file1,v

     co -q file1

file2:    s.file2

     get -s s.file2
These rules will get the head revision from the source control system any time the working file is older than the source control file. If you only use the directory for builds this should work rather reliably (with occasional false builds when you use
admin or rcs to modify the source control file).
Summary
In this chapter you have learned basic principles of source control and how to apply them to using RCS and SCCS.
Concepts covered include the following:
|
|
|
|
|
|
|
|
|
|
These topics give a good foundation in the basics of UNIX source control and how to use it to be more effective at using UNIX to develop any controlled document or product. Remember that source control isn't just for source code.
initialize registers with one-character names.
Error Messages
Error messages are largely self explanatory. They can be generated by the system (if you type torff instead of troff), by nroff or troff, by the macro package, or by the preprocessors. (Chapter 23, Formatting Tables with tbl," Chapter 24,
"Formatting Equations with eqn," Chapter 25, "Drawing Pictures with pic," and Chapter 26, "Creating Graphs with grap" contain information about error messages generated by the proprocessors.
It doesn't really matter whether troff or mm generates a message; you have to correct the error. Errors usually fall into one of the following categories:
- Order: Memo type macros for mm or ms are in the wrong order.
- Missing one of bracketed pair: You have a .TS but no .TE (or vice versa).
- (mm only) No list active: You have a .LI, but no .BL.
- Bad or no argument: You've omitted an argument after a .VL or you've specified an impossible number as an argument (5 for .SA, for example).
The one thing to remember is that the line number, helpfully supplied by troff, is the troff output line number. So it's not uncommon to be told that you have an error in line 1500 when your text file is 600 lines long. mm attempts to give you the
source file line number. Don't wager a large amount on its accuracy.
Deroffing, or Removing All Traces of nroff/troff
Sometimes documentation customers want electronic files as well as hard copy. If they can't handle troff, they may request ASCII files from you. There's a simple way of complying with this request—use deroff.
deroff removes all troff requests, macros, and backslash constructs. It also removes tbl commands (that is, everything between the .TS and the .TE), equation commands (everything between the .EQ and the .EN or between the defined eqn delimiters). It can
follow a chain of included files, so if you've sourced in a file with .so or .nx, deroff operates on those files, too. This feature can be suppressed with the -i option, which simply removes the .so and .nx lines from your file.
Other options are -mm and -ml. -mm completely deletes any line that starts with a macro. This means all your headings will be gone. The -ml option invokes -mm and removes all lists.
This may be just as well. deroff doesn't do well with nested lists.
deroff, like nroff and troff, can process multiple files.
To use deroff, enter the following:
$ deroff options inputfilename > outputfilename
Don't forget to redirect the output to a file. You don't really want to see your denuded, deroffed file streaking across your screen, do you?
Summary
Printing is no easier than anything else within the UNIX system, but there are powerful tools to enable you to print just about anything you can imagine. From the simplest print command (lp) to the complexities of preprocessors, troff, and postprocessors, you can control the process and achieve outstanding results.
- Make sure that you're in the draft3 directory—that is, the directory for the new file.
- List the files in draft3:
$ ls > difflist
- 3. Create the following shell script:
for i in 'cat difflist'
do
diffmk ../draft2/$i $i ../diffdir/d$i
done
- 4. Make the script executable:
$ chmod +x diffscript
- 5. Put diffscript in your bin:
$ mv diffscript $HOME/bin
- 6. Execute diffscript:
$ diffscript
The man Command
The man command consults a database of stored UNIX system commands—basically everything that is in the system reference manuals—and nroffs it to your screen. If you don't have all that documentation on a shelf in your office, the man command
can save the day.
man is simple to use:
man commandname
The output is far from beautiful, and it's slow. It's paged to your screen, so you press Enter when you're ready to go on to the next page. You can't backtrack, though. Once you leave the first screen—that is, the one with the command syntax on
it—the only way you can see it again is to run the man command a second time.
If your terminal has windowing or layering capabilities, man can is more useful, because you can look at it and type on your command line at the same time.
You can also print the output from man, but you may not know which printer the output is going to. If you work in a multi-printer environment, this can be a nuisance. Check with your system administrator.
Using SCCS to Control Documentation
Although the Source Code Control System—SCCS for short—was written to keep track of program code, it also makes a good archiving tool for documentation. It saves each version of a text file—code, troff input, and so on—and
essentially enables only the owner to change the contents of the file. SCCS is described in detail in Chapter 30, "SCCS Version Control." You can use SCCS to control versions of a document that you often revise. You can also use SCCS on drafts of
a document. If you work with a publications group and your group doesn't have a good archiving and document control system, look into SCCS.
Popular Tutorials
-
 MS Access
1109
MS Access
1109
-
 C++
1222
C++
1222
-
 HTML
584
HTML
584
-
 JavaScript
616
JavaScript
616
-
 Vbscript
873
Vbscript
873
-
 Oracle
473
Oracle
473
-
 VC++
875
VC++
875
-
 SQL
2959
SQL
2959
-
 XML
514
XML
514
-
 Java
814
Java
814
-
 Perl
455
Perl
455
-
 Linux
451
Linux
451