Web based School
Red Hat Linux rhl27


27
Programming in C
Linux is distributed with a wide range of software-development tools. Many of these tools support the development of C and C++ applications. This chapter describes the tools that can be used to develop and debug C applications under Linux. It is not
intended to be a tutorial on the C programming language, but rather to describe how to use the C compiler and some of the other C programming tools that are included with Linux. In this chapter you will learn about the following:
- What C is
- The GNU C compiler
- Debugging GCC applications with gdb
You also will look at some of the useful C tools that are included with the Linux distribution. These tools include pretty print programs, additional debugging tools, and automatic function prototypers.
Pretty print programs are programs that automatically reformat code so that it has consistent indenting.
What Is C?
C is a general-purpose programming language that has been around since the early days of the UNIX operating system. It was originally created by Dennis Ritchie at Bell Laboratories to aid in the development of UNIX. The first versions of UNIX were
written using assembly language and a language called B. C was developed to overcome some of the shortcomings of B. Since that time, C has become one of the most widely used computer languages in the world.
Why did C gain so much support in the programming world? Some of the reasons that C is so commonly used include the following:
- It is a very portable language. Almost any computer that you can think of has at least one C compiler available for it, and the language syntax and function libraries are standardized across platforms. This is a very attractive feature for developers.
- Executable programs written in C are fast.
- C is the system language with all versions of UNIX.
C has evolved quite a bit over the last 20 years. In the late 1980s, the American National Standards Institute published a standard for the C language known as ANSI C. This further helped to secure C's future by making it even more consistent between
platforms. The 1980s also saw an object-oriented extension to C called C++. C++ will be described in the next chapter, "Programming in C++."
The C compiler that is available for Linux is the GNU C compiler, abbreviated GCC. This compiler was created under the Free Software Foundation's programming license and is therefore freely distributable. You will find it on the guide's companion CD-ROM.
The GNU C Compiler
The GNU C Compiler (GCC) that is packaged with the Red Hat Linux distribution is a fully functional, ANSI C compatible compiler. If you are familiar with a C compiler on a different operating system or hardware platform, you will be able to learn GCC
very quickly. This section describes how to invoke GCC and introduces some of the commonly used GCC compiler options.
Invoking GCC
The GCC compiler is invoked by passing it a number of options and a number of filenames. The basic syntax for invoking gcc is this:
gcc [options] [filenames]
The operations specified by the command-line options will be performed on each of the files that are specified on the command line. The next section describes the options that you will use most often.
GCC Options
There are more than 100 compiler options that can be passed to GCC. You will probably never use many of these options, but you will use some of them on a regular basis. Many of the GCC options consist of more than one character. For this reason you must
specify each option with its own hyphen, and you cannot group options after a single hyphen as you can with most Linux commands. For example, the following two commands are not the same:
gcc -p -g test.c

gcc -pg test.c
The first command tells GCC to compile test.c with profile information for the prof command and also to store debugging information within the executable. The second command just tells GCC to compile test.c with profile information for the gprof
command.
When you compile a program using gcc without any command-line options, it will create an executable file (assuming that the compile was successful) and call it a.out. For example, the following command would create a file named a.out in the current
directory.
gcc test.c
To specify a name other than a.out for the executable file, you can use the -o compiler option. For example, to compile a C program file named count.c into an executable file named count, you would type the following command.
gcc -o count count.c
When you are using the -o option, the executable filename must occur directly after the -o on the command line.
There are also compiler options that allow you to specify how far you want the compile to proceed. The -c option tells GCC to compile the code into object code and to skip the assembly and linking stages of the compile. This option is used quite often
because it makes the compilation of multifile C programs faster and easier to manage. Object code files that are created by GCC have a .o extension by default.
The -s compiler option tells GCC to stop the compile after it has generated the assembler files for the C code. Assembler files that are generated by GCC have a .s extension by default. The -E option instructs the compiler to perform only the
preprocessing compiler stage on the input files. When this option is used, the output from the preprocessor is sent to the standard output rather than being stored in a file.
The following file extensions are assumed to be used when using the language compilers, including gcc:
| Extension | Type of File |
| .a | Archive file |
| .c | C program file |
| .C, .cc, or .cxx | C++ program file |
| .h | A preprocessor (include) file |
| .i | An already preprocessed C file only needing compiling and assembling |
| .ii | An already preprocessed C++ file only needing compiling and assembling |
| .m | Objective-C program file |
| .o | Compiled object file |
| .s | Assembler source that had been preprocessed |
| .S | Assembler source which requires preprocessing |
Optimization Options
When you compile C code with GCC, it tries to compile the code in the least amount of time and also tries to create compiled code that is easy to debug. Making the code easy to debug means that the sequence of the compiled code is the same as the
sequence of the source code, and no code gets optimized out of the compile. There are many options that you can use to tell GCC to create smaller, faster executable programs at the cost of compile time and ease of debugging. Of these options the two that
you will typically use are the -o and the -O2 options.
The -o option tells GCC to perform basic optimizations on the source code. These optimizations will in most cases make the code run faster. The -O2 option tells GCC to make the code as fast and small as it can. The -O2 option will cause the compilation
speed to be slower than it is when using the -o option, but will typically result in code that executes more quickly.
In addition to the -o and -O2 optimization options, there are a number of lower-level options that can be used to make the code faster. These options are very specific and should only be used if you fully understand the consequences that using these
options will have on the compiled code. For a detailed description of these options, refer to the GCC manual page by typing man gcc on the command line.
Debugging and Profiling Options
GCC supports several debugging and profiling options. Of these options, the two that you are most likely to use are the -g option and the -pg option.
The -g option tells GCC to produce debugging information that the GNU debugger (gdb) can use to help you to debug your program. GCC provides a feature that many other C compilers do not have. With GCC you can use the -g option in conjunction with the -o
option (which generates optimized code). This can be very useful if you are trying to debug code that is as close as possible to what will exist in the final product. When you are using these two options together you should be aware that some of the code
that you have written will probably be changed by GCC when it optimizes it. For more information on debugging your C programs, refer to the "Debugging GCC Programs with gdb" section in this chapter.
The -pg option tells GCC to add extra code to your program that will, when executed, generate profile information that can be used by the gprof program to display timing information about your program. For more information on gprof, refer to the
"gprof" section in this chapter.
Debugging GCC Programs with gdb
Linux includes the GNU debugging program called gdb. gdb is a very powerful debugger that can be used to debug C and C++ programs. It enables you to see the internal structure or the memory that is being used by a program while it is executing. Some of
the functions that gdb provides for you are these:
- It enables you to monitor the value of variables that are contained in your program.
- It enables you to set breakpoints that will stop the program at a specific line of code.
- It enables you to step through the code, line by line.
You can run gdb by typing gdb on the command line and pressing Enter. If your system is configured properly, gdb should start and you will see a screen that resembles the following:
GDB is free software and you are welcome to distribute copies of it

under certain conditions; type "show copying" to see the conditions.

There is absolutely no warranty for GDB; type "show warranty" for details.

GDB 4.15 (i586-unknown-linux), Copy 1995 Free Software Foundation, Inc.

 (gdb)
When you start gdb, there are a number of options that you can specify on the command line. You will probably run gdb in the following way:
gdb <fname>
When you invoke gdb in this way, you are specifying the executable file that you want to debug. This tells gdb to load the executable file with the name fname. There are also ways of starting gdb that tell it to inspect a core file that was created by
the executable file being examined, or to attach gdb to a currently running process. To get a listing and brief description of each of these other options, you can refer to the gdb man page or type gdb -h at the command line.
Compiling Code for Debugging
To get gdb to work properly, you must compile your programs so that debugging information will be generated by the compiler. The debugging information that is generated contains the types for each of the variables in your program as well as the mapping
between the addresses in the executable program and the line numbers in the source code. gdb uses this information to relate the executable code to the source code.
To compile a program with the debugging information turned on, use the -g compiler option.
gdb Basic Commands
The gdb supports many commands that enable you to perform different debugging operations. These commands range in complexity from very simple file-loading commands to complicated commands that allow you to examine the contents of the call stack. Table
27.1 describes the commands that you will need to get up and debugging with gdb. To get a description of all of the gdb commands, refer to the gdb manual page.
| Command | Description |
| file | Loads the executable file that is to be debugged |
| kill | Terminates the program that you are currently debugging |
| list | Lists sections of the source code that was used to generate the executable file |
| next | Advances one line of source code in the current function, without stepping into other functions |
| step | Advances one line of source code in the current function, and does step into other functions |
| run | Executes the program that is currently being debugged |
| quit | Terminates gdb |
| watch | Enables you to examine the value of a program variable whenever the value changes |
| break | Sets a breakpoint in the code; this causes the execution of the program to be suspended whenever this point is reached |
| make | Enables you to remake the executable program without quitting out of gdb or using another window |
| shell | Enables you to execute UNIX shell commands without leaving gdb |
The gdb environment supports many of the same command-editing features as do the UNIX shell programs. You can tell gdb to complete unique commands by pressing the Tab key just as you do when you are using bash or tcsh. If what you have typed in
is not unique, you can make gdb print a list of all the commands that match what you have typed in so far by pressing the Tab key again. You can also scroll up and down through the commands that you have entered previously by pressing the up and down arrow
keys.
Sample gdb Session
This section takes you step by step through a sample gdb session. The sample program that is being debugged is quite simple, but it is sufficient to illustrate how gdb is typically used.
We will start by showing a listing of the program that is to be debugged. The program is called greeting and is supposed to display a simple greeting followed by the greeting printed in reverse order.
#include <stdio.h>

main ()

{

void my_print(char *);

void my_print2(char *);

char my_string[] = "hello there";

my_print (my_string);

my_print2 (my_string);

}

void my_print (char *string)

{

printf ("The string is %s\n", string);

}

void my_print2 (char *string)

{

char *string2;

int size, i;

size = strlen (string);

string2 = (char *) malloc (size + 1);

for (i = 0; i < size; i++)

string2[size - i] = string[i];

string2[size+1] = '\0';

printf ("The string printed backward is %s\n", string2);

}
You should compile the preceding program using the gcc command followed by the filename. To rename the generated binary (instead of using the default a.out filename), use the -o option followed by the binary name:
gcc -o greeting greeting.c
The program, when executed, displays the following output:
The string is hello there

The string printed backward is
The first line of output comes out correctly, but the second line prints something that was unexpected. We intended the second line of output to be
The string printed backward is ereht olleh
For some reason the my_print2 function is not working properly. Let's take a look at the problem using gdb. First you need to start gdb, specifying the greeting program as the one to debug. You do this by typing the following command:
gdb greeting
Remember that you must compile the greeting program with the compiler debug options turned on, by typing gcc -q -o greeting greeting.c.
If you forget to pass the program to debug as a parameter to gdb, you can load it in after gdb is started by using the file command at the gdb prompt:
(gdb) file greeting
This command will load the greeting executable just as if you had told gdb to load it on the command line.
You can now run greeting by entering the run command from the gdb prompt. When the program is executed from within gdb, the result should resemble the following:
 (gdb) run

Starting program: /root/greeting

The string is hello there

The string printed backward is

Program exited with code 040
The output of the greeting program is the same as when we executed the program outside of gdb. The question is, why is the backward print not working? To find the problem we can set a breakpoint at the line after the for statement in the my_print2
function. To do this, list the source file by entering the list command at the gdb prompt:
(gdb) list
Pressing Enter by itself at the gdb prompt will repeat the last command that was entered.
The first time you enter the list command, you get output that resembles the following:
1 #include <stdio.h>

2

3 void main ()

4 {

5 void my_print(char *);

6 void my_print2(char *);

7

8 char my_string[] = "hello there";

9

10 my_print (my string)
If you press Enter, gdb will execute the list command again, giving you the following output:
11 my_print2 (my string);

12 {

13

14 void my_print (char *string)

15 {

16 printf ("The string is %s\n", string);

17 }

18

19 void my_print2 (char *string)

20 {
Pressing Enter one more time will list the rest of the greeting program:
21 char *string2;

22 int size, i;

23

24 size = strlen (string);

25 string2 = (char *) malloc (size + 1);

26 for (i = 0; i < size; i++)

27 string2[size - i] = string[i];

28 string2[size+1] = '\0';

29 printf ("The string printed backward is %s\n", string2);

30 }
By listing the file you can see that the place where you want to set the breakpoint is line 27. Now, to set the breakpoint, type the following command at the gdb command prompt:
(gdb) break 27
gdb should now print a response resembling the following:
Breakpoint 1 at 0x8000570: file greeting.c, line 27

 (gdb)
Now you can run the program again by typing the run command. This command will generate the following output:
Starting program: /root/greeting

The string is hello there

Breakpoint 1, my_print2 (string = 0xbffffe14 "hello there") at greeting.c:27

27 string2[size - i]=string[i]
You can see what is actually going wrong with your program by setting a watch to tell you the value of the string2[size - i] variable expression.
To do this, type
(gdb) watch string2[size - i]
gdb will return the following acknowledgment:
Hardware watchpoint 2: string2[size - i]
Now that a watch has been set, gdb will halt the program and display the new value of variable string2[size - i] each time it changes. But because we already have a breakpoint established at the line where string2[size - i] will be updated, two breaks
for each pass through the loop will actually be generated: once for the breakpoint and again for the watch. To eliminate this redundancy, eliminate the breakpoint by typing disable 1 at the gdb prompt.
Breakpoints are reset by disabling the number of the breakpoint assigned to the code line. For example, when we previously typed break 27, breakpoint 1 was assigned to that line of code. So to clear the breakpoint, we disable breakpoint number 1 by typing disable 1.
Now you can step through the execution of the for loop using the cont (short for "continue") command:
(gdb) cont
After the first time through the loop, gdb tells us that string2[size - i] is 'h'. gdb informs you of this by writing the following message on the screen:
Hardware watchpoint 2, string2[size - i]

Old value = 0 '\000'

New value = 104 'h'

my_print2(string = 0xbffffe14 "hello there") at greeting.c:26

26 for (i=0; i<size; i++)
This is the value that you expected. Continuing through the loop several more times reveals similar results. Everything appears to be functioning normally. When you get to the point where i=10, the value of the string2[size - i] expression is equal to
'e', the value of the size - i expression is equal to 1, and the program is at the last character that is to be copied over into the new string.
You can see the current value of a variable or expression at any time from the gdb prompt by using the print EXP command. For example, try print i or print (size - i) while continuing through the loop.
If you continue through the loop one more time, you see that there was not a value assigned to string2[0], which is the first character of the string. Because the malloc function initializes the memory it assigns to null, the first character in string2
is the null character. This explains why nothing was being printed when you tried to print string2.
Now that you have found the problem, it should be quite easy to fix. You must write the code so that the first character going into string2 is being put into string2 at offset size - 1 instead of string2 at offset size. This is because the size of
string2 is 12, but it starts numbering at offset zero. The characters in the string should start at offset 0 and go to offset 10, with offset 11 being reserved for the null character.
There are many ways to modify this code so that it will work. One way is to keep a separate size variable that is one smaller than the real size of the original string. This solution is shown in the following code:
#include <stdio.h>

void main ()

{

void my_print(char *);

void my_print2(char *);

 char my_string[] = "hello there";

my_print (my_string);

my_print2 (my_string);

}

void my_print (char *string)

{

printf ("The string is %s\n", string);

}

void my_print2 (char *string)

{

char *string2;

int size, size2, i;

size = strlen (string);

size2 = size -1;

string2 = (char *) malloc (size + 1);

for (i = 0; i < size; i++)

string2[size2 - i] = string[i];

string2[size] = '\0';

printf ("The string printed backward is %s\n", string2);

}
Additional C Programming Tools
The Red Hat Linux distribution includes a number of C development tools that have not yet been described. This section describes many of these additional tools and their typical uses.
xxgdb
xxgdb is an X Window system—based graphical user interface to gdb. All of the features that exist in the command-line version of gdb are present in xxgdb. xxgdb enables you to perform many of the most commonly used gdb commands by pressing buttons
instead of typing in commands. It also graphically represents where you have placed breakpoints.
You can start xxgdb by typing the following into an Xterm window.
xxgdb
When you initiate xxgdb you can specify any of the command-line options that were available with gdb. xxgdb also has some of its own command-line options. These are described in Table 27.2.
| Option | Description |
| =db_name | Specifies the name of the debugger to be used. The default is gdb. |
| =db_prompt | Specifies the debugger prompt. The default is gdb. |
| =gdbinit | Specifies the filename of the initial gdb command file. The default is .gdbinit. |
| =nx | Tells xxgdb not to execute the .gdbinit file. |
| =bigicon | Uses a large icon size for the xxgdb icon. |
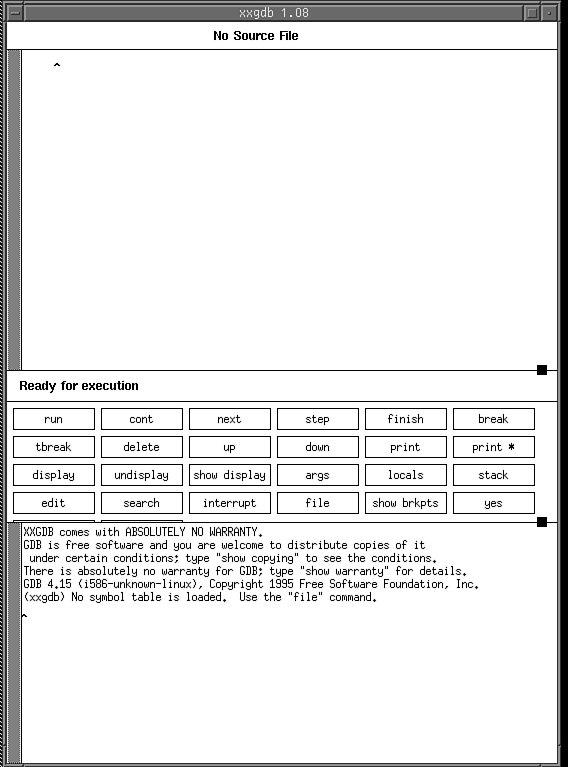
When you start xxgdb, a window, depicted in Figure 27.1, opens on your screen.
Figure 27.1. The xxgdb debugging window.
The bottom pane of the window contains a message that is similar to the one displayed on the screen when you started the command-line version of gdb. Use this pane to enter commands to the xxgdb debugger just as you would in gdb. To give the pane focus,
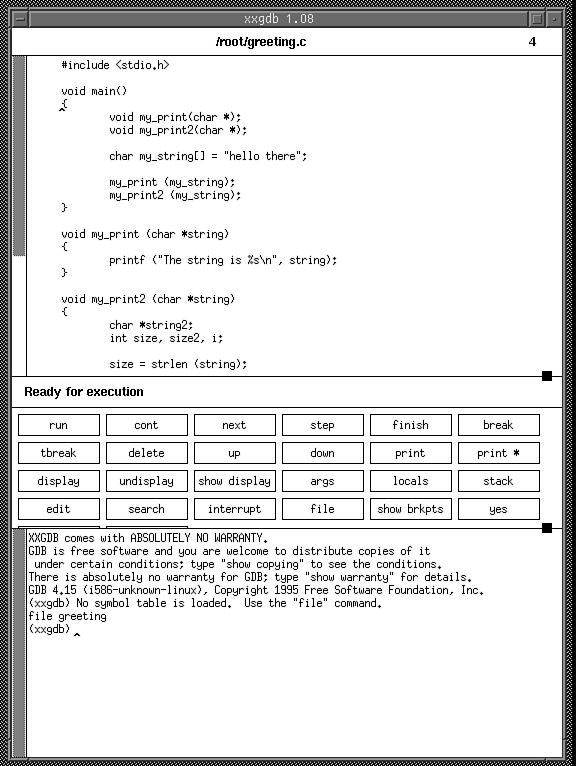
left-click anywhere in its region and type:
file greeting
This should open the file for debugging and display its source code in the upper pane of the window, as shown in Figure 27.2.
Figure 27.2. The xxgdb window with debug source open.
You could have accomplished the same thing by using the File button shown in the center of the window. In addition, you can use the run, break, and cont buttons much in the same way that we have used them before in gdb, only now graphically. To watch a
variable (as long as it is within context) you can use the display button.
Try experimenting with the different features that this program provides and refer to the xxgdb and gdb manual pages for information on additional capabilities these tools provide.
calls
calls is a program that is not included on the Linux CD-ROM accompanying this guide, but you can obtain a copy from the sunsite FTP site under the directory /pub/Linux/devel/lang/c/calls.tar.Z. Some older CD-ROM distributions of Linux include this file.
Because it is a useful tool, we will cover it here. If you think it will be of use to you, obtain a copy from an FTP or BBS site or another CD-ROM. calls runs the GCC preprocessor on the files that are passed to it on the command line, and displays a
function call tree for the functions that are in those files.
To install calls on your system, perform the following steps while you are logged in as root:
- FTP the file sunsite.unc.edu/pub/Linux/devel/lang/c/calls.tar.z.
- Uncompress and untar the file.
- cd into the calls subdirectory that was created by untarring the file.
- Move the file named calls to the /usr/bin directory.
- Move the file named calls.1 to the /usr/man/man1 directory.
This will install the calls program and man page on your system.
When calls prints out the call trace, it includes the filename in which the function was found in brackets after the function name:
main [program.c]
If the function was not in one of the files that was passed to calls, it does not know where that function lives and prints only the function name:
printf
calls also makes note of recursive and static functions in its output. Recursive functions are represented in the following way:
fact <<< recursive in factorial.c >>>
Static functions are represented as follows:
total [static in calculate.c]
As an example, assume that you executed calls with the following program as input:
##include <stdio.h>

void main ()

{

void my_print(char *);

void my_print2(char *);

char my_string[] = "hello there";

my_print (my_string);

my_print2(my_string);

}

void my_print (char *string)

{

printf ("The string is %s\n", string);

}

void my_print2 (char *string)

{

char *string2;

int size, size2, i;

size = strlen (string);

size2 = size -1;

string2 = (char *) malloc (size + 1);

for (i = 0; i < size; i++)

string2[size2 - i] = string[i];

string2[size] = '\0';

printf ("The string printed backward is %s\n", string2);

}
This would generate the following output:
1 main [greeting.c]

2 my_print [greeting.c]

3 printf

4 my_print2 [greeting.c]

5 strlen

6 malloc

7 printf
calls recognizes a number of command-line options that enable you to specify the appearance of the output and what function calls get displayed. For more information on these command-line options, refer to the calls manual page or type calls -h at the
command line.
cproto
cproto is a program included on this guide's CD-ROM. cproto reads in C source files and automatically generates function prototypes for all of the functions. Using cproto saves you from having to type in a function definition for all of the functions
that you have written in your programs.
If you ran the following code through the cproto program
#include <stdio.h>

void main ()

{

char my_string[] = "hello there";

my_print (my_string);

my_print2(my_string);

}

void my_print (char *string)

{

printf ("The string is %s\n", *string);

}

void my_print2 (char *string)

{

char *string2;

int size, size2, i;

size = strlen (string);

size2 = size -1;

string2 = (char *) malloc (size + 1);

for (i = 0; i < size; i++)

string2[size2 - i] = string[i];

string2[size] = '\0';

printf ("The string printed backward is %s\n", string2);

}
you would get the following output:
/* greeting.c */

void main(void);

void my_print(char *string);

void my_print2(char *string);
This output could be redirected to an include file and used to define the prototypes for all of the functions.
indent
The indent utility is another programming utility that is included with Linux. This program, in its simplest form, reformats or pretty prints your C code so that it is consistently indented and all opening and closing braces are represented
consistently. There are numerous options that enable you to specify how you want indent to format your code. For information on these options, refer to the indent manual page or type indent -h at the command line.
The following example shows the default output of the indent program.
C code before running indent:
#include <stdio.h>

void main () {

void my_print(char *);

void my_print2(char *);

char my_string[] = "hello there";

my_print (my_string);

my_print2(my_string); }

void my_print (char *string)

{

printf ("The string is %s\n", *string);

}

void my_print2 (char *string) {

char *string2;

int size, size2, i;

size = strlen (string);

size2 = size -1;

string2 = (char *) malloc (size + 1);

for (i = 0; i < size; i++)

string2[size2 - i] = string[i];

string2[size] = '\0';

printf ("The string printed backward is %s\n", string2);

}
C code after running indent:
#include <stdio.h>

void main ()

{

void my_print(char *);

void my_print2(char *);

char my_string[] = "hello there";

my_print (my_string);

my_print2 (my_string);

}

void my_print (char *string)

{

printf ("The string is %s\n", *string);

}

void my_print2 (char *string)

{

char *string2;

int size, size2, i;

size = strlen (string);

size2 = size -1;

string2 = (char *) malloc (size + 1);

for (i = 0; i < size; i++)

string2[size2 - i] = string[i];

string2[size] = '\0';

printf ("The string printed backward is %s\n", string2);

}
Indent does not change how the code compiles; it just changes how the source code looks. It makes the code more readable, which is always a good thing.
gprof
gprof is a program that is installed in the /usr/bin directory on your Linux system. It allows you to profile C, Pascal, or Fortran programs to determine where most of the execution time is being spent.
gprof will tell you how many times each function used by your program is called, and also the percentage of the total execution time the program spent on each function. This information can be very useful if you are trying to improve the performance of
a program.
To use gprof on one of your C programs, you must compile the program using gcc's -pg option. This causes the program to create a file called gmon.out each time it is executed. gprof uses the gmon.out file to generate the profile information.
After you run your program and it has created the gmon.out file, you can get its profile by entering the following command:
gprof <program_name>
The program_name parameter is the name of the program that created the gmon.out file.
The profile data that gprof displays to the screen is quite large. If you want to examine this data, you should either redirect gprof's output to a file or use the more or less pipes.
f2c and p2c
f2c and p2c are two source code conversion programs. f2c converts FORTRAN77 code into either C or C++ code, and p2c converts Pascal code into C code. Both are included in the Linux installation when you install GCC.
If you have some code that has been written using either FORTRAN77 or Pascal that you want to rewrite in C, f2c and p2c can prove to be very useful programs. Both programs produce C code that can typically be compiled directly by gcc without any human
intervention.
If you are converting small, straightforward FORTRAN77 or Pascal programs, you should be able to get away with using f2c or p2c without any options. If you are converting very large programs consisting of many files, you will probably have to use some
of the command-line options that are provided by the conversion program that you are using.
To invoke f2c on a FORTRAN program, enter the following command:
f2c my_fortranprog.f
f2c requires that the program being converted has either a .f or a .F extension.
To convert a Pascal program to C, enter the following command:
p2c my_pascalprogram.pas
Both of these commands create C source code files that have the same name as the original file, except with a .c extension instead of .f or .pas.
For more information on the specific conversion options that are available with f2c or p2c, refer to their respective man pages.
Summary
This chapter introduced the GNU C compiler and many of the options that you will typically use when you compile C code. It also introduced the concepts behind debugging code with the GNU debugger, and illustrated the usefulness of some of the other C
utility programs that are either included on the Linux CD-ROM, or available via FTP from sunsite.unc.edu.
If you will be writing C code, the time that you spend learning how to use gdb and some of the other tools mentioned in this chapter will be more than worth the eventual time-saving that you will gain.
The next chapter will discuss many of the same topics, but with a focus on C++ development rather than C development.

Popular Tutorials
-
 MS Access
1109
MS Access
1109
-
 C++
1222
C++
1222
-
 HTML
584
HTML
584
-
 JavaScript
616
JavaScript
616
-
 Vbscript
873
Vbscript
873
-
 Oracle
473
Oracle
473
-
 VC++
875
VC++
875
-
 SQL
2959
SQL
2959
-
 XML
514
XML
514
-
 Java
814
Java
814
-
 Perl
455
Perl
455
-
 Linux
451
Linux
451


