Web based School
ActiveX Control Downloading |
Chapter 17ActiveX Control DownloadingEarlier lessons discussed briefly some of the
processes involved in downloading controls via the Internet, and the security threats
posed by the shared nature of the Internet. In this chapter, you will learn about the
actual process of installing Internet components and a few ways to prevent the
installation of unwanted code or content. This process involves three stages:
The following sections of this chapter define these
steps, and describe, in greater detail, the various application program interfaces (APIs)
that apply to them. OLE ObjectsActiveX objects within an HTML document go through
several stages before they are installed on a user's local machine. AcquisitionThe first step, the downloading or acquisition of
the component, can happen in a couple of different ways. A few of these ways (as they
relate to the Web) were discussed earlier, ( when installing an application such as
Internet Explorer, for instance). Remember however, in this network-centric lesson, that
ActiveX controls can be installed via floppy disks, data tape, and so on. The usual method
of installing these components, however, is from within an HTML document via an ActiveX
Web browser—using the <OBJECT> tag. VerificationThe second step, verification , can use any or none
of the following steps (installation and component downloading) to ensure that the control
will not act maliciously on your system. Because the verification process is not
mandatory, each individual user, programmer and administrator must decide which, if any,
of the processes will be used. InstallationThe third step, installation, depends on which
selected verification process the control has successfully passed through. Even if a
control has no programmed security features, users will be prompted on whether or not they
wish to install that object. This is because objects with no security features cannot
identify themselves as safe. Not every installed object is necessarily be an OLE
object. When the object is an OLE control, there are several considerations for ensuring
its integrity. Component DownloadingThere are two primary HTML tags that can be used to
download an item from the Internet : <OBJECT> and HREF. Minimal security via ActiveX is available within the
HREF tag because HREF is treated as a hyperlink rather than an OLE object. An example of
this would be a CGI server script; the hypertext reference would look like the following: The browser, treating CGIScript.exe as a hyperlinked
document, would download and launch the .EXE without conducting any real security
activity. To enable the majority of ActiveX security features,
you must identify an item as an object. (CGI scripts are not normally OLE objects).
Identify the item as an OLE object using the <OBJECT> tag.
The CodeBase AttributeAfter identifying an object via the <OBJECT>
tag (and setting its parameters if necessary), use the CodeBase attribute of the
<OBJECT> tag to inform the user's system of the location of the control. The format
of the Code attribute closely resembles the format for any URL: Version ControlAs time goes by, computer programs are either phased
out or, preferably, upgraded. This can cause some problems with conflicting versions of
the same control. When a software manufacturer decides to upgrade its control,
applications or scripts written around that code might not work with versions other than
the one for which it was written. To manage the installation of different versions of the
same control, the Code attribute enables content providers (HTML authors) to specify which
version their page needs. This version identification information is tacked
onto the end of the Code URL in bold in the following example: Using this attribute, you can identify all versions
for which your application is usable. If your application was written for Version 1 and is
still usable with Versions 2 and 3, the preceding example is how you should format the
attribute. If the user has Version 1 installed on his machine, his browser will attempt to
obtain the most recent version specified (here, Version 3) when it hits this tag.
Table 17.1. CD-ROM files .
Next, create a cabinet for each file. Place each
file in its own cabinet to observe the compression ratios for the different kinds of
files.
To make this compression process go a little faster, you can create the following batch file (a sample has already been created on the CD-ROM
called CabZip.bat):
Next, extract each one of the cabinet files. If you
extract them into the current directory (where copies already exist), you will be prompted
as to whether you wish to overwrite the current copy or not. To automate this process,
create a batch file with the following command (a copy of this batch file, named
CabUnZip.bat is in the \CabZip\ directory on the CD-ROM): Type the whole thing on one line. Perform this
function from the command prompt as well as from within a batch file. From a prompt,
replace the batch variable identifier (%%) with a command line variable identifier (%). PEsThe .OCX, .EXE and .DLL files are referred,
collectively, as PE (Portable Executable) files. These files are the simplest to use as
ActiveX controls because they require no other files (that is, they are standalone
utilities) and they can be run automatically. A PE cannot be cross-platform compatible. It can
only run on the machine type for which it was compiled. For this reason, content providers
who use PEs as embedded objects need to consider the type of machine with which their
users will be accessing the document. Over a distributed environment such as the Internet,
these BLOBs (Binary Large Objects) can take a long time to download. If the code is tight,
or the file is compressed using a compression algorithm, this significantly reduces the
amount of time it takes to download them. But if the file is compressed, it can not be
self-executing. It must first be uncompressed, or returned to its original form. The
exception to this is .CAB files—they can be self-executing when used as ActiveX
objects. .INF—Setup Information Files.INF files are used to tell the local machine how to
setup the control and where to get its components. By specifying the files that various
machines might need (such as Mac, UNIX, Win95), the .INF file can be used to install a
different package for each type of system. These .INF files are very similar to the old .INI
(INItialization) files. Referring to the preceding sample .INF file, note
that when launched by an ActiveX browser, the commands within an .INF file would install
two files: sample.ocx and sample.dll. The .OCX would be retrieved from www.domain.net,
while the .DLL would come from the same directory as the .INF (because no external site or
directory was specified). The destdir setting has 2 options: 10 for the Windows directory,
and 11 for the Windows\System directory. If no destination directory is specified, the
control is kept in a cache until purged by automatic (that is space-saving) or manual
means. You can also see in the sample that the file version
is 1.0.0.0 (note that commas are used instead of dots in the .INF file version settings).
If the machine has version 0.9 installed, it will still download the newer version. If,
however, the local machine has a newer version, 1.0.1.0 for instance, it will not bother
to install the older version. That would be a bug. Cross-Platform CompatibilityAn attribute of the <OBJECT> tag, called the
CODETYPE attribute , can be used to further inform the system about the object's
requirements. CODETYPE identifies the object's MIME type. An example of the CODETYPE
attribute, defining an audio-video interface animation would look like this: ActiveX uses another MIME type to identify the
machine for which the code was written. This feature of the Code tag is perhaps one of the
most exciting. The Holy Grail of programming has been the use of one program on a variety
of systems. Although this is still not possible (and probably never will be), features of
the Code tag do allow the user's machine to retrieve a copy of the control, designed for
the user's individual system—whether it is a Mac, UNIX box, PC, or whatever. The
format for this is a MIME type that conforms to the following specification: where the options for each field include: Referring to the preceding sample, note that this
MIME type format is extended to allow an .INF file to specify which files would be
required on different machines. In this example, the controls for a Win95 MIPS machine
would be in Win95.cab, the controls for a WinNT Alpha machine would be in WinNT.cab and
the controls for a Macintosh are in MAC.cab. In each case, the entire cabinet would be
downloaded, but only the necessary files would be installed. Also, it keeps a Mac from
having to download the code for a PC and vice-versa. Internet SecurityThe threats to system security manifest themselves
in three items: OLE objects, non-OLE objects, and document content. The first two are of
primary significance to the system developer. The last, document content, allows parents,
employers and other individuals to determine the type of content their users view, without
actually censoring every item their users can access—an impossible task. Prior to ActiveX, the installation and configuration
of software was completely controlled by the user or his system administrator. Now,
through simply looking at a Web page, a control or other object can find its way to the
user's machine with very little user interaction. This exposes the user to the threat of
malicious or simply undesirable code being installed on their local machine.
Although a determined hacker can still create a Web
page that gives the user this kind of grief, the use of ActiveX security measures helps
ensure that the developer of the code is identifiable. In the event that the developer's
software creates an undesirable effect, the user will have information to contact him and
inform him of his code's apparent bugs. Another feature of ActiveX security is that it
allows users to determine whether they want to install a piece of code in the first place.
If the control does not have security features enabled, the user is told that the code
might not be safe, and prompts him as to whether or not he wants it installed on his
machine. If the security features are enabled, it gives the user's machine certain
information about the code and its developer, and that information is verified over the
Net through certifying authorities such as Dun & Bradstreet or GTE. See trust verification in action when you visit
Microsoft’s ActiveX control site at http://www.microsoft.com/activex/controls.
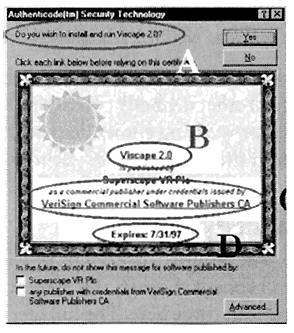
When you download a page with an ActiveX control that is not already installed on your
system, Internet Explorer begins downloading the control to your cache (see Figure 17.1).
When the control has been retrieved, another window pops up, asking if you want to install
the control and informing you of any security certificates it contains (see Figure 17.2). Figure 17.1. When downloading an ActiveX control, several things happen in Internet Explorer. Figure 17.2. After an
ActiveX control is downloaded, a pop-up window appears.
Finally, ActiveX security has a feature called
Internet Ratings , which provides a degree of parental, administrator or employer control
to define which sites are not to be accessed by their users. Web page developers can place
code within their HTML pages or their ActiveX controls to inform systems that attempt
access about the any risque[as] content on that page. Administrators can then determine
what level of freedom their users have in accessing pages with various levels of violent
or sexual content. On the enclosed CD-ROM, a directory called \Ratings\
contains several HTML files. If you load the ratings.aspl file into Internet Explorer, you
can view different pages with the ratings system enabled on them. For more information
about having your site rated, you should contact a ratings service. CertificatesWhen you buy a software product off the shelf at
your local store, you have certain assurances that the product will perform as stated on
the box. This assurance (or "Implied Warranty of Merchantability") comes in the
form of a product logo. Microsoft uses a very high-tech hologram to mark its products. If
a knock-off artist wants to copy a Microsoft product and sell it on shelves, he would need
more than a simple printing press—he'd need a hologram copying program as well (or a
box of Microsoft hologram stickers). This logo-on-a-box method is not as easy to do with
software that is distributed via the Net. Instead, several other methods of verifying
security come into play in ActiveX programming. Information for verifying authenticity and
integrity is contained within the object itself. It might come in the form of X.509
security certificates or other embedded information. Base Security LayerMicrosoft's Base Security Layer SDK provides the
means whereby a control can be certified as safe. This happens through the System
Certificate Store. I will only briefly discuss the System Certificate Store here. The full
specification can be found in the ActiveX SDK in the \INetSDK\Help\Security\BSLH
Directory. When you download and install code that has a
Certificate of Authenticity, this software vendor's certificate is stored in the local
machine's System Certificate Store. Certificates from a variety of vendors can be found
here. Some of the API calls for accessing this store are
as follows:
Using these API calls, a programmer can query the
Base Security Layer for the existence of a security certificate, and retrieve the
information within that certificate to validate a control or controls as authentic. This
certificate is used by the trust verification service. Trust Verification ServiceTrust verification service is the set of API calls
that determines whether a requested object can be trusted. It provides features whereby a
trust administrator can define what is and is not allowed to be installed on a machine. It also provides a means whereby the administrator
of a system can define the types of processes, controls and other objects that will be
allowed. Although the security certificate will provide information about an object, it is
still up to the trust administrator to make the final call. To take advantage of trust-verification services,
the trust administrator must work with a trust provider. This provider maintains a server
or group of servers that provides authentication of certificates. This provider determines
the methods used in validating a certificate, thus freeing users and their system
administrators from the complexities of producing and verifying trust certificates. When an application on a user's machine attempts to
use an object that requires trust verification, the service contacts the software
provider, their agent and/or any other trust providers to validate or update the
certificate. Safety APINow that you know a little about the
behind-the-scenes processes used to identify safe objects, let's go into how local users
and administrators can implement these features in their own systems. As I stated earlier,
security of all kinds boil down to a few basic features: UserID, Password and,
occasionally, physical location. Still, these can be very powerful when any or all of them
are kept secret. The Safety API has its first implementation in the
Microsoft Internet Explorer. Users can designate the degree of security they wish to
observe by selecting the Security tab of the View|Options menu in MSIE and pressing the
Programs button (see Figure 17.3). The three options are
Figure 17.3. Internet
Explorer configuration menu to select the level of security. The complexities of ActiveX security boil down to
two basic questions:
The Safety API provides the means to evaluate these
hazards during creation and initialization. Creation—Is This Control Still Safe When Scripted?When creating an OLE control , programmers define a
set of interfaces with which they want that control to operate. An example of this type of safe control is the
Marquee control. Its only function is to display animated text in a box. There is no way
for this cutesy little display to harm your machine, so it is safe with any code. An example of a potentially unsafe control is the
SMTP control from the Internet Control Pack. This control could be scripted to send an
e-mail resignation letter to your boss, or worse—your spouse! To identify the control as safe for scripting, add
it to the CATID_SafeForScripting Component Category in the system registry. Additionally,
you can add code to the control's internal registration and unregistration routines to
ensure its management in the proper Component Category. Initialization—Is the Control, Standing Alone, Safe?Controls go through several phases, each having its
own risks and strengths. When controls are first created (or initialized) on
a system, certain properties define them. In turn, these properties are defined by the
data from an IPersist* interface. The data in this interface can come from just about
anywhere, including some remote server. The danger here is twofold: the control can
initialize in an undesirable way, or worse, it can send your private data to an untrusted
system. To identify the control as safe for initializing,
add it to the CATID_SafeForInitializing Component Category in the system registry. IObjectSafetyA more versatile, although higher level, method that
works with registry settings is the IObjectSafety interface . In addition to marking a
control as safe or unsafe, it can be manipulated programmatically to command a control to
change its safety level. To make a control safe for initializing, set the
SetInterfaceSafetyOptions of this interface to INTERFACE_SAFE_FOR_UNTRUSTED_CALLER. To make a control safe for scripting, set the
SetInterfaceSafetyOptions of this interface to INTERFACE_SAFE_FOR_UNTRUSTED_DATA. Of course, a particularly brilliant and malicious
programmer can build, rebuild, or reverse-engineer any control to report itself as safe
for scripting, and cause all kinds of damage. That makes trust verification of the source
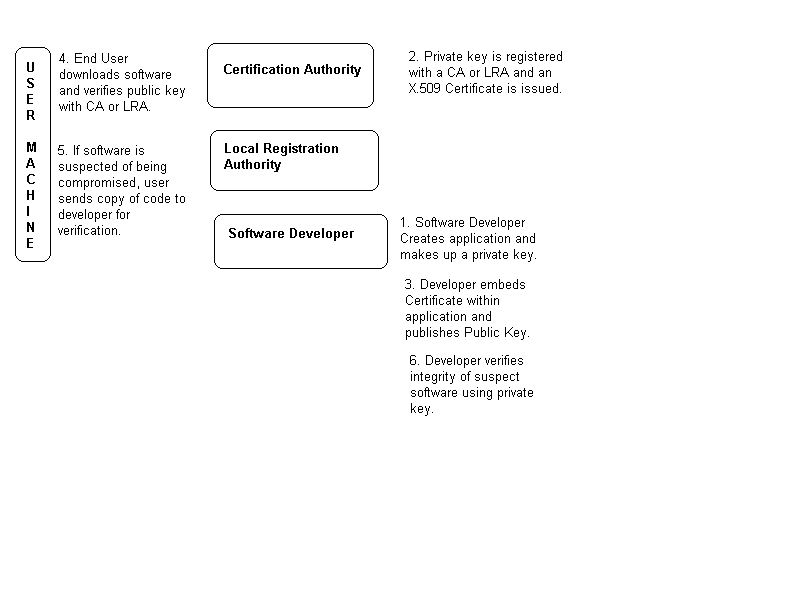
of the control all the more important. The Code-Signing Tool KitThe ActiveX SDK includes a set of tools to assist
the programmer in signing code as safe. This reduces the preceding complex steps to a few
simple steps. This kit helps the programmer certify PEs, cabinets, controls and class
files. This tool kit uses public key encryption and digital
signatures to determine both the true source of a control and the integrity of that
control (because it was released by the source). The following details each step required
for signing a control as safe.
Figure 17.4. The processes
behind public key encryption go through many levels to ensure integrity.
For a walk through the steps of signing a control,
along with links to a certification authority, check out Microsoft’s Authenticode
site at http://www.microsoft.com/intdev/security/authcode/sixsteps.asp.
Internet RatingsMany different government actions (such as the
Computer Decency Act and the Clipper chip in the United States, and Germany's temporary
ban on Compuserve) have tried, without success, to regulate violent or sexually oriented
content on the Internet. Each effort has failed, due to the distributed nature of the Net
and public outrage at anything that smacks of governmental censorship. The World Wide Web Consortium has been working to
allow parental, employer and administrative control over this type of material.
Self-regulation is expected to prove much more successful than governmental action because
it empowers people closer to home to determine what material is or is not acceptable. PICS—Platform for Internet Content SelectionThe PICS standard is the result of several
conferences addressing the conflicting needs of censorship and free speech. By
implementing a standard system of rating content (much like in the film industry), content
developers can post labels on their network content, describing the level of risque[as]
material it contains.
Rating SystemsPICS is not attempting to establish how ratings are
assigned, but rather how rating systems are implemented.
Rating LabelsWeb site administrators can register the content of
their Web pages with an entity such as the RSAC. When you receive your ratings, they
should be placed within the <HEAD> container tag of an HTML document. An example of
this tag is as follows: This example rates the URL
http://WWW.Domain.Net/User as a 0 (completely safe) for Nudity, Sex, Violence and
Language. It was registered in the name of User@Domain.Net, and is good from August 16,
1996 until January 1, 1997 between the hours of 8:15 AM and 5:00 PM. It's everything a
parent could ask for. Internet Ratings APIMicrosoft's Internet Ratings API exposes certain
features of the PICS standard to the programmer. This API is also part of Nashville
(Microsoft's code name for their Internet add-on pack). With this API you can, of course, enable or disable
the ratings features. You can also check the authorized level of access enjoyed by the
current user. This access is defined by the PICS standard. If the user does not have a
level of access appropriate for the page, a Request Denied dialog is displayed. Using this API, you can determine the ratings of a
site or compare the ratings on two different sites. In this way, you can assure a user (no
guarantees, though) that a site that reports a set of ratings has been verified by a
trusted 3rd party. SummaryIn this chapter you have learned about the processes
involved in downloading, verifying and installing ActiveX controls. You have learned about two of the <OBJECT>
tag's parameters—Code and CODETYPE, and how they can be used to identify the
location, version and machine type for a control. Files of several kinds can be used as
ActiveX controls, including portable executables, custom controls and cabinet archives.
You can add an .INF file to a cabinet or place it all by itself on a Web page to tell a
user's machine the where, how and what of installing ActiveX controls and their required
files. ActiveX uses an enhanced MIME type to identify the
type of computer, such as Mac, UNIX or Windows. This format allows a content provider to
enable a user to reap the benefits of an ActiveX Web site, no matter what type of computer
he prefers to use. You are also familiar with many of the features of
ActiveX security. This set of APIs enables users of your control to rest assured that the
code they download from the Net is the same code that you posted. ActiveX security relies on the use of X.509 and
PKCS#7 security certificates. These certificates are verified with a trusted authority,
such as a commercial or individual issuer. These security measures can reassure, but not
guarantee, a user that his copy of your code is intact. The only way to guarantee its
integrity is to process it against your top-secret private key. You can, but do not have
to, use the Base Security Layer SDK to enable these security features. ActiveX has another type of security, based on the
PICS standard, to allow parents, employers and other authorities to censor access to
content they feel is not appropriate for their users. Using the Internet Ratings API, you
can add this level of security to your own standalone applications. Use the HTML
implementation of PICS to rate the content of your own Web pages. Q&A
WorkshopCreate an .INF file that performs the following
functions:
|
Popular Tutorials
-
 MS Access
1109
MS Access
1109
-
 C++
1222
C++
1222
-
 HTML
584
HTML
584
-
 JavaScript
616
JavaScript
616
-
 Vbscript
873
Vbscript
873
-
 Oracle
473
Oracle
473
-
 VC++
875
VC++
875
-
 SQL
2959
SQL
2959
-
 XML
514
XML
514
-
 Java
814
Java
814
-
 Perl
455
Perl
455
-
 Linux
451
Linux
451


