


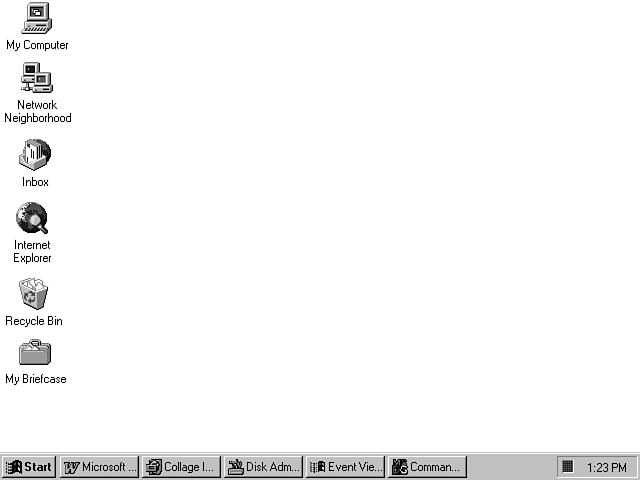
5Introduction to the Windows 95 InterfaceThe recent success of Windows 95 and its improved usability (although some might take umbrage with that) is the driving force behind Microsoft's latest upgrade for Windows NT: The Shell Update Release. With Windows NT 4, Microsoft has woven a common fabric back into its line of Windows products. Windows 95, Windows NT Workstation 4, and Windows NT Server 4 now all share the same look and feel. Windows NT Server 4 looks little like its predecessors. Gone is the familiar Program Manager as well as the Print Manager and File Mangler (Manager) tools. Windows NT now sports more of a desktop metaphor with icons that can be placed directly onto the desktop precluding the need for them to be housed inside of a program group window. You are not apt to have to double-click your mouse button as often as before and you can task switch between applications without touching the keyboard. Welcome to the new look of Windows NT Server 4! The New Taskbar: Easier Access To Applications, Switch Programs Like Changing ChannelsOne of the first things that you will notice when working with Windows NT Server 4, is the new Taskbar. By default, the Taskbar is located at the very bottom of the Windows NT Desktop. (See Figure 5.1.) However, its onscreen position is customizable. (See Figure 5.2.) The new Start button is prominently displayed at one end of the Taskbar, and your system's current time appears at the opposite end. One of the Taskbar's primary jobs is to display buttons indicating which applications are currently running. The Windows NT Server desktop and Taskbar.
The Windows NT Taskbar docked on the right side of the desktop.
The Windows NT Taskbar showing applications currently running.
Task switching between programs can be done quite easily using the new Taskbar: Click your mouse on the Taskbar button of the application that you wish to switch to. (See Figure 5.3.) Think of it like channel-surfing while watching television. The keystroke combination of Alt+Tab still functions the same way as it always has to maneuver between different programs. But now, you have a choice.
An Enhanced Windows NT Task ManagerWindows NT Server now sports a highly informative Task Manager. To access this updated tool, right-click a blank area of the Taskbar, or, press CTRL+ALT+DEL on the keyboard to invoke the Windows NT Security dialog and select Task Manager. When you first launch the Task Manager, you will see the Applications tab. (See Figure 5.4.) From this page of the Task Manager, you can view all of the tasks that are currently running on your Windows NT Server computer. If you select one of the tasks by clicking it, you then have the option of terminating that task by clicking the End Task button at the bottom of the window. You can also task switch to one of the running programs by clicking the program that you want to switch to and clicking the Switch To button. By clicking the New Task button, you elect to run an application from the Create New Task dialog which appears. The New Windows NT Task Manager.
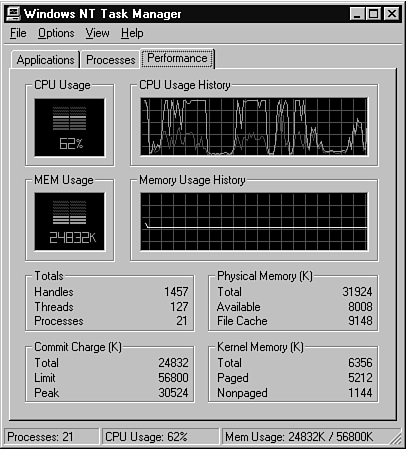
Click the Processes tab to see a listing of all of the operating system's processes that are presently running. (See Figure 5.5.) You can select one of the processes by clicking it and if you then click the End Process button, the Windows NT Server will kill that process. (I do not recommend this.) The Task Manager's third tab shows four graphical displays: CPU Usage, CPU Usage History, MEM Usage, and Memory Usage History. (See Figure 5.5.) This window allows you to gauge your server's performance at a glance without invoking the Windows NT Performance Monitor. Under the Options menu, you can see the Hide When Minimized option. If you select this option, the Task Manager will not appear on the Taskbar when you minimize it. The only indication that it is running appears as a green square just to the right of the system time display on the Taskbar. (See Figures 5.6 and 5.7.) If hold the mouse pointer over the Task Manager indicator on the Taskbar, you will see a tooltip showing you the CPU Usage percentage. You can restore the Task Manager by either double-clicking its square indicator or by right-clicking it and selecting Restore Task Manager from the pop up menu. Windows NT Task Manager's Processes tab.
Windows NT Task Manager's Performance tab.
The Task Manager Taskbar icon with the Hide When Minimized option selected. The Start Button and The Start MenuThe Windows NT Start button is a powerful, central beginning point. One click of the Start button displays the Windows NT Server Start menu, a cascading list of computing options. As pictured in Figure 5.8, from the Start menu, you can perform almost any action such as launching an application, finding files, obtaining Help, changing system settings, accessing recently-used documents, and even logging off or shutting the server down. As you move your mouse pointer up and down over the Start menu's options, a highlight bar will appear and travel right along with your mouse pointer's movement until it moves off of the Start menu.
The Windows NT Start button and Start menu.
The top four options on the Start menu contain submenu items that appear whenever you position your mouse pointer over one of them. The Programs menu option often contains multiple levels of submenus. These submenu items have replaced Program Manager's program groups and icons. Later in this chapter, you will discover how you can add, delete, and modify program items listed on the Start menu. Each submenu's list of items is cascaded over the Windows NT Desktop for easy viewing and accessibility. (See Figure 5.9.) As you move your mouse pointer from one cascading menu to another, the submenu that is currently in focus is displayed.
The Windows NT Start menu with cascading submenus.
Launching ApplicationsLaunching an application program from the Start menu is easy. Click the Start button, position your mouse pointer over the Programs menu item, click one of the programs from the cascading submenu or position your mouse over one of the submenu items until you locate the program that you want to run. Click the application that you want to execute.
New Windows NT Server Administrative wizards.
Accessing Recently Used DocumentsWindows NT Server 4 gives you the ability to quickly retrieve recently worked-on documents such as word-processing files, spreadsheet files, even database files, if they were created by registered, 32-bit applications. Simply click the Start button, select Documents from the Start menu, and click the document that you want to work with. (See Figure 5.11.) The document's associated application will automatically run and load the selected document for you. The Windows NT Start menu Documents option.
Changing System Settings and Monitoring PrintersThe Windows NT Control Panel is still the mecca for changing most of your system's configuration settings. To access the Control Panel from the Start menu, select the Settings option and then click Control Panel. (See Figure 5.12.) Other system components can also be accessed from the Start menu's Settings option. You can view the Windows NT Server Printers folder by clicking the Printers submenu item. The Taskbar and the Start menu programs can both be customized by clicking the Taskbar submenu item. Customizing the Taskbar and the Start menu is covered in the section of this chapter titled "How To Customize The Taskbar and The Start Menu."
The Windows NT Start menu Settings option.
Locating Files, Folders, and Other ComputersUse the Start menu's Find option to search for specific folders, files, or other computers that are a part of your network. (See Figure 5.13.) Click the Start button, select Find, and then click the Files or Folders item to use the Find utility. In the Named textbox, type in a specific filename to look for, or search for multiple files or folders that match certain wildcard criteria. (See Figure 5.14.) Choose a local or network drive in which to perform the search using the Look in drop-down. Be sure to mark the Include subfolders checkbox if you want the Find tool to search through all of the subfolders within the specific drive. Click Find Now to initiate the search. The Find results are displayed in the lower window. The Windows NT Start menu Find option.
The Windows NT Find utility.
You can also search for files or folders based on their date stamp by clicking the Date Modified tab. The Advanced tab of the Find tool allows you to search for files that contain specific text strings. You can even save your searches so that you can use them again later by clicking the File menu and selecting Save Search. A .fnd file is placed on your Windows NT Server Desktop for each search that you save. Click the Options menu and select Save Results to save the results of the search along with the search criteria. You can locate other computers on the network by using the Find: Computer tool from the Start menu. Type in the name of a specific computer or use wildcard parameters in the Named textbox. (See Figure 5.15.) Click Find Now to start the search. The Find results are displayed in the lower window. If you have appropriate access privileges, you can view the contents of the computer(s) that have been found by either double-clicking the computer's name or right-clicking the computer's name and selecting Open or Explore. The Windows NT Find: Computer tool.
Getting Windows NT Server HELPThe Start menu provides access to Windows NT HELP. You can also press the F1 key from the Windows NT Server Desktop to access HELP. With its new tabbed dialog, Windows NT HELP now sports a brand new interface. The Contents tab provides an overview of available HELP topics. (See Figure 5.16.) You can double-click any one of these topics to drill down and locate information on a specific item. guide icons represent general subject areas. Question mark (?) icons denote specific help items that are displayed by selecting them and then clicking the Display or Print buttons at the bottom of the HELP dialog. (See Figure 5.17.) The Windows NT 4 Help dialog.
The Windows NT 4 Help dialog with Help items displayed.
The Index tab assists you in quickly finding a particular Help category so that you can locate and view information on related items. (See Figure 5.18.) As you type in each letter of the Help category that you are looking for, the Windows NT Help engine narrows down the list of available topics to match your input. When you have found the Help topic that you want, click that entry in the lower pane and then click the Display button. The Windows NT 4 Help dialog's Index tab.
The new Help dialog's Find tab permits you to search for Help topics that contain specific key words that you are looking for, instead of having to locate Help references only by typing in names of categories. (See Figure 5.19.) The Options button gives you the flexibility of changing various search parameters such as requiring exact word matching with what is typed. You can allow matching for any words that begin, end, or simply contain the same characters that are typed. First, type in the word(s) you want to find in the top drop-down box. Next, click one of the matching terms shown in the middle drop down. Finally, click the topic that you want to view and then click the Display button. The Windows NT 4 Help dialog's Find tab.
Running Programs Not Displayed on the Start Menu or on the DesktopThe Start menu's Run option enables you to execute applications as well as to open folders or documents that may not be listed on either the Start menu or as icons on the Desktop. Clicking the Run option from the Start menu brings up the Run dialog. (See Figure 5.20.) Simply type the appropriate drive letter, path, and executable filename, folder, or document name in the Open drop-down box. A list of the most recently accessed items is maintained within the Run dialog's drop-down listbox. If you are not sure of the exact path or filename, click the Browse button to locate it. Click OK when the full Run command is filled in. The Start menu's Run dialog.
Logging Off or Shutting Down the SystemLogging off or shutting down Windows NT Server can still be accomplished in similar ways as before. The keystroke combination of Ctrl+Alt+Del still displays the Windows NT Security dialog. From here, you can lock the workstation, logoff, shutdown, change your password, view the Task List, or cancel and return to Windows NT Server. Pressing Alt+F4 will still bring up the Shut Down Windows dialog. (See Figure 5.21.) The one new method for closing down the server or just logging off is to click Shut Down from the Start menu. The same Shut Down Windows dialog will appear as with pressing Alt+F4. Windows NT asks you to confirm that you wish to perform one of three actions:
Click the appropriate option button and then click Yes. If you want to cancel and not shut down or log off, click No. The Windows NT Server Shut Down dialog. How To Customize the Taskbar and the Start MenuYou can customize both the Windows NT Taskbar and Start menu by selecting Settings from the Start menu and clicking Taskbar The Taskbar Properties dialog will appear. (See Figure 5.22.) Notice that this dialog contains two tabs: Taskbar Options and Start Menu Programs. The Taskbar Options tab shows four options, each with its own checkbox:
The Always on top and the Show clock checkboxes are marked by default. Naturally, you may clear either one or both of these checkboxes if you want to not always have the Taskbar on top and/or if you do not want for the system clock to display. The Auto hide and the Show small icons in Start menu checkboxes are both cleared by default. Mark the Auto hide checkbox if you do not want to see the Taskbar until you explicitly move your mouse pointer off of the desktop, beyond where the Taskbar should be. This will activate the Taskbar and make it visible. When you move your mouse pointer back onto the desktop and off of the Taskbar, the Taskbar will automatically hide. Mark the Show small icons in Start menu checkbox if you simply prefer the smaller size of the Start menu that this option offers or if you have highly customized your Start menu with many additional menu options tagged onto the top of it. (See Figure 5.23.) When you have finished making any changes, click Apply to activate the changes without closing the Taskbar Properties dialog. Click OK to activate your changes and close the Taskbar dialog. Click Cancel to abandon any changes that you have made and close the dialog box. The Taskbar Properties dialog.
The Start menu with small icons.
Click the Start Menu Programs tab to add, modify, or remove listed programs or to clear the contents of the Documents menu option. (See Figure 15.24.) The Taskbar Properties dialog's Start Menu Programs tab.
To add programs to the Start menu:
The Windows NT Server Browse dialog.
The Create Shortcut dialog.
The Start menu with a new folder and a new program added.
To remove programs from the Start menu:
Click the Advanced button to manipulate the Start menu Programs folder using the new Windows NT Explorer file and folder administration tool. The Explorer is covered at the end of this chapter in the section titled "Navigating Through Folders and Files." If you want to remove the contents of the Documents menu, click the Clear button. The list of most recently used documents will be emptied. When you are done customizing the Taskbar and have completed configuring the Start menu, Click OK to close the Taskbar Properties dialog. New Window DressingIf you are accustomed to working with Windows 3.x or Windows NT 3.x, you will immediately notice that the decor of the windows in Windows NT 4 and Windows 95 is quite different. The windows in Windows NT now sport a more stream-lined, three-dimensional look. The new design improves efficiency as well as aesthetics. A New Look and Feel for the Windows within NTApplication programs now have their titles left-justified instead of being centered on the title bar. A set of four (only three appear at one time) new windowing control icons reside in the upper-right corner on the title bar. These new icons provide one-click functionality for minimizing, restoring, maximizing, and closing down windows. Figure 5.28 provides an example of what these new icons look like in a maximized window:
Figure 5.29 shows how the icons look within a restored window: The only difference is that the double squares icon is replaced by a single square icon, which is the maximize button. By the way, you can still use the familiar Control Menu box in the upper-left corner of every window. Just click the icon that replaces the minus sign in each window, and you will see the standard Control Menu box options. User Manager for Domains in a maximized window.
Server Manager in a restored window.
Menus now exhibit a slightly different behavior: When you click a menu option from the menubar, you can now move your mouse pointer up and down through the current list of menu choices as well as side to side to view other menubar options, without holding down a mouse button. When you no longer want to view the pull-down menu items, you must either click a menu choice or click somewhere off the menubar. How To Change Views and Adjust Windowing BehaviorApplication program windows are not the only types of windows present in Windows NT Server 4. The new desktop comes with four icons that are designed to work with both folders and files. When you double-click My Computer, Network Neighborhood, Recycle Bin, or My Briefcase, a window opens up displaying a new menubar, tool bar, and a status bar with a whole host of customizable options. (See Figure 5.30.) My Computer window displaying its View menu, toolbar, and status bar.
As you can see in Figure 5.30, My Computer, Network Neighborhood, Recycle Bin, and My Briefcase windows give you a lot of flexibility in how the window looks and presents its information. You can uncheck the Toolbar option from the View menu if you don't want to display the toolbar. You may uncheck the Status Bar option so that it will not display at the bottom of the window. You can select from one of four different ways to display system resources, folders, and files: Large Icons, Small Icons, List, or Details. (See Figures 5.31, 5.32, and 5.33.) Another way to change a window's view is to right-click a blank area inside of the window. You can arrange icons using this same method. The viewing and arranging options available by right-clicking are identical to those available through the View menu. Right (or secondary) mouse support options are covered in the section of this chapter titled "An Object-based Desktop Metaphor." My Computer window with large icon view and no toolbar.
My Computer Window with small icon view and no toolbar.
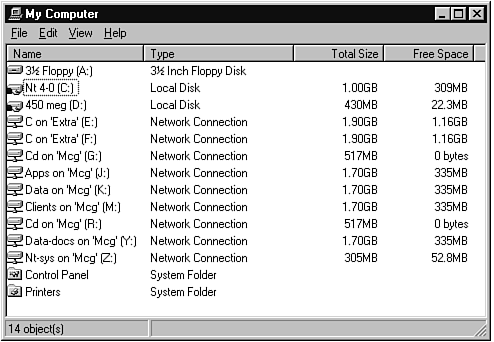
My Computer window with details view and no toolbar.
You can choose to arrange the icons by Drive letter, Type, Size, or Free Space. In Large or Small Icon view, you can choose to Line up the icons. To refresh the window's display, click View | Refresh or press the F5 function key. You can also change the way in which subsequent (child) windows are opened when you are drilling down to view the contents of a folder and its subfolders. When you click View | Options, you are presented with a three-tabbed dialog. (See Figure 5.34.) The Folder tab offers you two browsing options: Open a separate window for each folder or do not open separate windows for each folder and simply display the contents of each folder within the same (current) window. Click the option that you prefer. My Computer window's View | Options dialog.
The View tab of the View menu asks you if you want Windows NT to display all files or if you want the system to hide certain system files whose file extensions are displayed in the listbox. (See Figure 5.35.) You also can elect to display the full drive letter and path for the currently displayed folder in the window's title bar. In addition, you can choose to hide the file extensions for known file types (such as .txt, .exe, and .bmp[md]and other registered file types). My Computer window's View | Options Dialog View tab.
The File Types tab works similarly to the way File Manager associates filename extensions with application programs. You can add, remove, or edit file types. You can also add, remove, or edit different actions that applications can perform on their associated file types, such as opening a file or printing a file. You can even specify default actions for an application to perform upon its registered types of files, if more than one action is specified. Click the OK button when you are done customizing the various aspects of the View | Options menu.
An Object-Based Desktop MetaphorWith Program Manager gone, Windows NT Server 4 now presents you with a desktop-centric environment where all things (icons, folders, files, printers, and so on) within the environment are considered to be objects. These items can be considered objects in a computer programming sense because they each have modifiable attributes known as properties. These objects also have intelligence programmed into them so that they will react in certain ways to different events. Windows and Windows NT have always been event-driven operating systems. The user causes different events to be triggered by moving and clicking the mouse and by pressing keys on the keyboard. Each time an event occurs, Windows NT sends out an event message. Because Windows NT's objects have been programmed to react to events, these objects will provide appropriate functionality in response to events. Secondary Mouse Button Support (Right-Clicking)Another major improvement to Windows NT Server 4 is its prolific utilization of the secondary mouse button (often referred to as right mouse button support). You can have some fun exploring all of the various features now built into right mouse clicking. You have already seen how desktop shortcuts are created by right-clicking. You can also right-click a blank area of the Taskbar to cascade or tile, horizontally or vertically, or to minimize all active windows. (See Figure 5.36.) Right-clicking the Taskbar can also summon the Task Manager so that you can view all the programs that are currently running. In addition, you can select Properties from the right-click pop-up menu, which is identical to clicking the Start button and selecting Settings | Taskbar. You can right-click the Start button, too. Here, you get three options: Open (open the Start menu folder), Explore (open the Start menu folder from within the Windows NT Explorer), or Find (the same as clicking Start, Find, Find Files or Folders). From My Computer, Network Neighborhood, Recycle Bin, and My Briefcase, you can right-click a blank area of the window to change the window's view, to arrange icons, to line up icons, or to paste. You can also undo a delete, undo a copy, or undo a move action and view properties of your Windows NT Server's system. (See Figure 5.37.) Right-click one or more selected icons within one of these windows to open the file, print the file, view the file using Quick View, send the file to another location, cut, copy, create shortcuts, delete, rename, or view properties of the file. (See Figure 5.38.) Support for clicking and dragging objects such as files and folders has never been better. You can left-click and drag files or folders, but now you also have the option of right-clicking and dragging them to a new location. If you left-click and drag a file or folder from one local folder to another local folder (or to the local desktop), Windows NT will move the file or folder without prompting you. If you want to copy the file or folder instead of moving it, you must hold down the Ctrl key as you drag it to its new location. If you attempt to drag and drop a file or folder from a network drive to a local drive, or vise-versa, Windows NT will automatically copy the file instead of moving the file or folder. To ensure that files or folders are moved and not copied, you must hold down the Shift key while clicking and dragging. Right-clicking and dragging offers the best of both worlds. When you right-click and then drag a folder or file, Windows NT asks you exactly what you want to do with the objects. As soon as you complete a right-click and drag operation, a small pop-up menu appears offering you four options: Move Here, Copy Here, Create Shortcut(s) Here, or Cancel. With the added flexibility that right-clicking and dragging gives me in Windows 95 and Windows NT Server 4, I always prefer to right-click and drag rather than left-click and drag! Now you might be starting to realize how powerful right mouse button support can be, if you didn't know already. The right-click pop-up menu for the Taskbar.
The right-click pop-up menu for a blank area of a window.
The right-click pop-up menu for one or more selected icons. How To Select Objects on the DesktopBecause the entire Windows NT background (wallpaper) comprises its desktop, objects such as icons and shortcuts can exist directly on top of the Desktop. You can select a single object the same way that you would select a program group or icon in Windows NT 3.x, by clicking it. You can select multiple objects by using the Ctrl or Shift keys in conjunction with clicking your mouse. Use the Ctrl key to select a noncontiguous range of objects: Click the first object you want to select, and then hold down the Ctrl key and continue clicking each object that you want to select. Use the Shift key to select a contiguous range of objects: Click the first object that you want to select, and then hold down the Shift key and click the last object that you want to select. All of the objects in between the first and last object will become selected. The new way to select objects is by lasooing: Drag the mouse pointer from a blank area on the desktop over all of the objects that you want to select. You will see the outline of mouse pointer's movement displayed as a dotted line. As the outline of your mouse pointer passes over each object, the object will become selected. Let go of the mouse button after all the objects you want to select have been highlighted. Cut, Copy, and Paste EverywhereThe familiar Windows concept of cutting, copying, and pasting text and other objects has been extended to include almost any type of object in Windows NT 4. One file or multiple files can now be copied to the Windows NT Clipboard and then pasted to another folder. You can also copy a file and then paste it within the same folder under a different name. Using the My Computer window, for example, you can select a file or multiple files and then click Edit | Cut or Edit | Copy to either cut or copy the file(s) to the Windows NT Clipboard. (See Figure 5.39.) You can also press Ctrl+X for cut or Ctrl+C for copy. After cutting or copying files to the clipboard, you can paste the files into a different folder or even right onto the Windows NT Desktop. To paste files into a different folder or navigate to a folder in My Computer, Network Neighborhood, or The Windows NT Explorer, click the Edit menu and select Paste (or press Ctrl+V). To paste files from the Clipboard to the Desktop, click a blank area of the desktop and press Ctrl+V, or right-click the mouse on a blank area of the Desktop and select Paste from the pop-up menu. (See Figure 5.40.) After you choose the Paste option, you will see an animated message box appear displaying the progress of the copy procedure. (See Figure 5.41.) Some Desktop icons, such as My Briefcase, can be copied by simply clicking the icon once to select it, pressing Ctrl+C to copy it, and then pressing Ctrl+V to create a duplicate of it. Copying files to the Clipboard from My Computer.
Pasting Files onto the desktop by using the menu that pops up when right-clicking the mouse.
Animated message box showing files being copied to the desktop. Deleting ObjectsIt's easier to delete objects than copy them. However, you cannot delete four of the Desktop icons (these are not Shortcuts!) that are installed by default with Windows NT Server 4: My Computer, Network Neighborhood, Inbox, and Recycle Bin. These are system icons, and they are permanent. To delete an object or many objects, first select the object(s) that you want to delete. Next, press the Delete key on your keyboard or right-click one of the objects that you want to delete and select Delete. (See Figure 5.42.) If you are working within a window (such as My Computer), you can also click the File menu and select Delete. A warning message will appear asking you to confirm that you really want to send the file(s) to the Recycle Bin. (See Figure 5.43.) The Recycle Bin serves as a holding tank for deleted files in case you decide later that you really did not want to get rid of those files. Click Yes to complete the procedure or click No to stop this procedure from happening. If you would prefer to not have the file(s) sent to the Recycle Bin, hold down the Shift key before selecting Delete. When you hold down the Shift key and then perform a deletion, a different warning message will appear asking you to confirm the deletion procedure. (See Figure 5.44.) When you delete files in this way, they do not go to the Recycle Bin, so they are not recoverable. Deleting objects.
File delete confirmation message to send files to the Recycle Bin.
File delete confirmation message without sending files to the Recycle Bin. Working with new Desktop ShortcutsYou can create some of your own objects and place them right on top of the desktop. One type of these objects is called a shortcut. Desktop shortcuts provide easy access to applications, folders, and data files. You can even use Shortcuts to access network folders and files. Desktop shortcut icons are distinguished from actual files by their upward pointing arrow, which is a part of their icons' design. The Windows NT desktop is simply a folder like any other folder. It is a physical folder located on a local hard drive as the \\%systemroot% profiles\%username%\desktop folder. Each local interactive user has his/her own unique desktop. You can work with files as well as shortcuts directly on the desktop. To create a desktop shortcut to an application program, a folder, or a data file with a registered file type extension:
The Create Shortcut dialog
Newly created Desktop Shortcut icons.
To use a desktop shortcut, double-click the Shortcut icon. If the shortcut accesses a folder, a window will open displaying the contents of that folder. If the shortcut is for a program, the program will execute. If the shortcut is associated with a data file whose file type is registered with the system, the Shortcut will first run the file's associated application and then automatically load the file so that it's ready for you to work with it. (See Figure 5.47.) Looking at Objects' Properties: The Attributes of ObjectsBecause an object-based metaphor requires that all objects possess properties (or attributes), you must have a way to alter some of all of those properties. You can almost always access an object's properties by right-clicking the object and selecting Properties. Right-click the My Computer icon on the Desktop. Select Properties from the pop up menu. Notice that the System dialog is displayed, the same dialog that you see when you click the Start button and select Settings, Control Panel, and double-click the System icon. If you think about it, it does make logical sense. The properties of My Computer (your NT Server) are its system settings, and you can configure many of its important attributes from this dialog box. The System dialog.
The right-click pop-up menu for a Floppy Drive icon.
If you right-click the Network Neighborhood icon and select Properties, you will view all of the networking settings for the system, such as the adapters installed and the protocols and services running, in addition to viewing the server's identification on the network and the computer's network bindings. (See Figure 5.49.) If you right-click a drive letter icon, a file icon, or a folder icon and select Properties, you can view pertinent information about that particular object. (See Figure 5.50.) The Network dialog.
The Properties dialog for drive C. How To Personalize Your DesktopRight mouse support helps to make it easy to customize your Windows NT Server desktop environment. The Windows NT Server desktop, like any other object, has its own properties. To personalize your desktop, you need to make some changes to your its properties. Right-click a blank area of the desktop and select Properties. You will see the Display Properties dialog appear. The Display Properties dialog has five tabs: Background, Screen Saver, Appearance, Plus!, and Settings. (See Figure 5.51.) From here, you can change your desktop's background appearance, choose a Screensaver, select from various Windows NT color schemes and screen fonts, play with various visual settings, and configure your monitor's color palette, desktop area (resolution), font size, and refresh frequency. Click Apply to see how your changes look without closing the Display Properties dialog. Click OK to accept any changes that you have made and close down the Display Properties dialog or click Cancel to abandon any configuration changes that you made. The Display Properties dialog after right-clicking the desktop. Navigating Through Folders and FilesYou have several ways to manage folders and files in Windows NT Server 4. The Desktop icons My Computer and Network Neighborhood let you move, copy, delete, rename, and omanage files and folders. The new Windows NT Explorer offers more features than My Computer and Network Neighborhood along with a global view of all system and network resources. The new Recycle Bin icon provides a safe, temporary haven for those previously unwanted files that might be wanted again. The new My Briefcase icon is a file version synchronization folder used to compare differing copies of data files. Working With the My Computer Desktop IconThis chapter has touched upon various aspects of the new My Computer icon and window. Double-click the My Computer desktop icon to reveal its window. All currently available resources are displayed within this window, including all currently mapped network drives. The system's Printers folder is available within My Computer as is the Control Panel folder. Figure 5.52 shows the My Computer window with its toolbar displayed. The very first icon on the toolbar (reading left to right) moves you back one folder level when you click it. You can get the same affect by pressing the Backspace key on your keyboard. If you hold your mouse pointer directly over each icon for a second or so, a tooltip describing its function will appear. The second icon on the toolbar will permit you to map a local drive letter to a network share. The next toolbar icon will disconnect you from the currently-selected networked drive. The next three icons provide the familiar cut, copy, and paste options as they now apply to folders and files. The next icon tool, a left-pointing arrow, is the Undelete icon. The icon directly to the right of that one is the Delete icon (a handwritten X). Adjacent to the Delete icon is the Properties icon. The final four toolbar icons consist of window view options. These icons determine how drive letters, folders, and files should be displayed within the window: large icons, small icons, list view, or details view. Touring Through The Network NeighborhoodThe Network Neighborhood icon displays all of the networked computers and printers that are present on your network. Double-click the Network Neighborhood icon to open up its window. The initial view shows your current network workgroup or Windows NT Server domain resources. (See Figure 5.52.) Its windowing traits and toolbar are identical to its software cousin, My Computer. To view other workgroups and domains that exist on your network, double-click the Entire Network (globe) icon. If you are part of a multivendor network environment, you might see icons that support different network operating systems such as Microsoft, Novell, or others. Double-click the icon of the particular network that you want to browse. In a Microsoft Windows network, you would then view a set of icons representing available workgroups and/or Windows NT Server domains. (See Figure 5.53.) Double-click the workgroup or domain icon of your choice to view its available computers. Within the workgroup or domain that you select, double-click the computer/server icon that you want to browse. After you double-click one of the computers, you will see a set of icons that represent all of the shared folders and shared printers for that specific computer. You can double-click each of the shared folders to browse their contents or right-click one or more of the shared folders and map a local drive letter to each one. (See Figure 5.54.) For the shared printers, you can right-click each shared printer that you want to use and select Install from the pop-up menu. Installed network printers appear in your local Printers folder; mapped network drives appear inside of the My Computer window. The Network Neighborhood window's initial view.
The Network Neighborhood window's entire network view.
The Network Neighborhood window's view of shared folders and printers. The Recycle BinThe new Recycle Bin is a central repository for homeless, unwanted files. The amount of hard disk space that you want allocated to this resource is configurable by right-clicking the Recycle Bin icon and selecting Properties. The Recycle Bin window works very much the same as the My Computer window and the Network Neighborhood window. Double-click its Desktop icon to open the window. You can choose to recover one, some, or all of the deleted files stored in the Recycle Bin by selecting the files you want undeleted and then clicking File | Restore. (See Figure 5.55.)
The Recycle Bin Window with files selected to be restored. My Briefcase: Synchronizing Different Versions of FilesMy Briefcase is a special Windows NT system folder that provides a synchronization feature that can be used to update one version of a file with a another copy of the same file. My Briefcase can work between computers on a local or wide area network, over a dial-up networking connection, a direct cable connection, or via a floppy disk. One of the common scenarios for using My Briefcase is when you are making updates to a document from both a floppy disk and a hard disk or network drive. Copy the document(s) from your local or network drive to the My Briefcase icon by right-clicking and dragging the file(s). Select Make Sync Copy from the pop-up menu that appears after you drop the file(s) into My Briefcase. Next, move My Briefcase over to a floppy disk. After you have made some changes to the file(s) that are being housed inside of My Briefcase on the floppy disk, return the floppy to the original computer where you first copied the file(s) into My Briefcase. Insert the floppy disk into the drive, double-click the floppy drive icon, double-click the My Briefcase folder, and look at the My Briefcase window. When you view the window in Details view, under status, My Briefcase should report that the file(s) need updating. (See Figure 5.56.) Click the Briefcase menu and select either Update Selection or Update All to synchronize the version of the file(s) that are in My Briefcase with the original version of the file(s). My Briefcase will report the time and date stamps that are present on the differing versions of the files. (See Figure 5.57.) Click Update to synchronize the files. (See Figure 5.58.) When the process completes, My Briefcase will have updated the older version(s) of the file(s) with the latest version(s).
Viewing the update status of a file in the My Briefcase window.
The Update My Briefcase dialog.
Updating the Briefcase Message box. The Windows NT Explorer: Beyond File ManagerThe new Windows NT Explorer is the replacement for the now retired File Manager tool. The Explorer provides you with a global view of all of the resources available to your computer on the network. (See Figure 5.59.) The Explorer's window is very similar to the My Computer window and the Network Neighborhood window. The Explorer window is divided into two panes. The left pane contains the folders view, and the right pane displays the contents of each folder as you click each folder icon in the left pane. The listing of folders and subfolders can be expanded wherever you see a plus sign (+) next to a resource in the left pane. You can contract the list wherever you see a minus sign (-) next to a resource. You may move, copy, rename, and delete files in all of the ways that have been mentioned in this chapter. To successfully drag and drop files or folders from the right pane over to the left pane of the Explorer, locate the file(s) or folder that you want to move or copy in the right pane. Next, navigate your way to view the destination folder, the target to where you want to copy or move the files, on the left pane by clicking the plus signs only. (Clicking the folders themselves on the left pane changes the content's view on the right pane.) Once you are able to see both the source file(s) in the right pane and the destination folder in the left pane, you can perform the drag-and-drop procedure. Explorer views can be customized. For instance, if you want to view the contents of folders located within C:\WINNT, you can run the Explorer from the command prompt, specifying these arguments: Explorer /e, root, c:\winnt. (See Figure 5.60.) When you run the Explorer this way, you can specify what the highest level folder view should be. With built-in tools such as the Explorer, My Computer, Network Neighborhood, and its new object-based desktop interface, Microsoft has successfully blended Windows NT Server's robust performance and security with Windows 95's ease of use and its improved, functional design. Windows 32-bit computing now has the same look and feel on both the client and the server which is good news for network administrators. The New Windows NT Explorer.
The Windows NT Explorer with a limited top-level view.
|
