Chapter 9
Using Frames, Cookies, and Other
Advanced Features
CONTENTS
In this chapter, you'll continue to revise the FSC Web pages created
in Chapter 8 moving on to features found in the latest browsers-
specifically, the latest version of Netscape. Features such as
frames and cookies enable you to add unique capabilities to a
JavaScript-enhanced page.
Although Netscape version 3.0 is the current version at this writing,
most of the features discussed in this chapter were introduced
in version 2.0, which also introduced JavaScript.
| Note |
At this writing, Microsoft has released a beta version of version 3.0 of its Internet Explorer (MSIE) Web browser. This release supports frames and cookies, along with much of JavaScript.
|
Before you get into the use of the new features with JavaScript,
let's take a quick look at how you use them in a simple HTML page.
This will enable you to make them work easily with JavaScript
later in this chapter.
Netscape introduced frames in version 2.0. Recall that frames,
also called framesets, are used to divide a Web page's display
into multiple sections, each of which can display a different
document or portion of a document. Frames are becoming a popular
feature in Web pages and are already supported by some non-Netscape
browsers.
An example of a document that uses frames is Netscape's JavaScript
Authoring Guide, shown in Figure 9.1. The window is divided into
three frames: a frame on the left with the table of contents,
one on the right with the actual text, and a small strip on the
bottom with two buttons used for JavaScript functions.
Figure 9.1 : Netscape's JavaScript Authoring Guide is
an example of a document that uses frames.
Each frame acts as a separate window; it has its own URL. Each
frame can also have horizontal and vertical scrollbars. The user
can move the dividing lines to resize the different frames. You
can enable and disable scrollbars and resizing through HTML attributes.
Defining a Frameset
You use the <FRAMESET>
tag to define a framed document. This tag is used instead of the
<BODY> tag. The page
with the <FRAMESET>
declaration defines the layout of the different frames and which
documents are loaded into them, but contains no actual data-the
contents of each frame are at their own URLs.
The frame definition begins with the <FRAMESET>
tag and ends with the closing
</FRAMESET> tag. Within
these tags you can't use any ordinary HTML; you can use only tags
and attributes that define frames. You can also nest a frameset
within another frameset.
The <FRAMESET> tag
has two attributes: ROWS
and COLS. These define how
the window is divided. You can use either of these attributes
or both. Both of these attributes have the same value, which is
a list of dimensions for each row or column. You can define the
rows or columns in the following ways:
- Specify a numeric value to define the size of a row or column
in pixels. For example, "40,40,40"
defines three frames, each 40 pixels in size. Note that Netscape
will expand the frames to fill the browser window, though.
- Specify a percentage value to allocate a percentage of the
window. For example, "20%,40%,40%"
allocates 20 percent of the window to the first frame and 40 percent
to the other two.
- Specify a relative value with the asterisk (*) character.
For example, "*,*,*,*"
divides a page evenly into four frames. You can specify a number
to give a frame more than one share; for example, "1*,2*"
creates two frames, one with 1/3 of the space and the other with
2/3.
| Note |
It is considered bad style to specify an exact number of pixels for a frame except in certain cases. Users may have different window sizes and different fonts, and you will end up annoying some users. One exception is when you are using a frame to display
an image, such as a logo or navigation icons. You can then set the frame size to fit the image exactly.
|
You can combine the different methods any way you like; in fact,
this is almost always the best way to define a frameset. The following
examples will give you some ideas of how these can be combined:
- <FRAMESET ROWS="30,*">
devotes 30 rows of pixels to the first frame (for a navigation
bar image, perhaps) and the remaining space to the second frame.
- <FRAMESET COLS="50%,25%,*">
splits the screen vertically into three frames. The first uses
50 percent of the available space, the second uses 25 percent,
and the third uses the remaining space (25 percent).
- <FRAMESET ROWS="*,*,50">
splits the screen horizontally. The bottom frame is exactly 50
pixels high, and the top two frames divide the remaining space
equally.
- <FRAMESET ROWS="*,*"
COLS="*,*"> splits the screen into four
equally spaced frames.
| Note |
Notice that you are not required to define a value for the number of frames in the frameset. This value is calculated based on the number of values in the ROWS and COLS lists.
|
Defining Individual Frames
Within the frameset, you use the <FRAME>
tag to define each of the frames and the document it will contain.
You should include one <FRAME>
tag for each of the frames you defined in the ROWS
and COLS attributes. The
<FRAME> tag includes
the following attributes:
- SRC specifies the URL
of the document to place in this frame. If this attribute is left
out, the frame will be empty.
- NAME enables you to specify
a name for the frame. You will use this in targeted links, described
later in this chapter; you can also use this name in JavaScript.
If a frame will contain a single document and will not be changed,
you can omit the NAME attribute.
- MARGINWIDTH defines the
left and right margins of the frame, in pixels. This number of
pixels will be left blank on either side of the frame's contents.
This attribute must be at least 1, the default, and can be any
size-provided room is left for the document between the margins.
- MARGINHEIGHT defines
the top and bottom margins of the frame. This works in the same
way as the MARGINWIDTH tag.
- SCROLLING defines whether
the frame includes horizontal and vertical scrollbars. This can
have three values: YES forces
the scrollbars to be included; NO
prevents them from being included; and AUTO,
the default value, displays scrollbars only if the document is
larger than the frame's size.
- NORESIZE has no value.
If it is included, it indicates that the frame cannot be resized
by the user. By default, the user is allowed to resize all frames.
As an example of the <FRAMESET>
and <FRAME> tags, Listing
9.1 shows a complete definition for a frameset containing three
documents, each displayed in a horizontal frame.
Listing 9.1. (FRAME1.asp) A simple frameset definition with
three horizontal frames.
<FRAMESET ROWS="10%,*,*">
<FRAME SRC="doc1.asp">
<FRAME SRC="doc2.asp">
<FRAME SRC="doc3.asp" MARGINWIDTH="50">
</FRAMESET>
The first frame takes 10 percent of the available space, and the
second and third divide the remaining space equally, giving them
45 percent each. The third frame includes a left and right margin
of 50 pixels. Figure 9.2 shows how this set of documents looks
in Netscape.
Figure 9.2 : An example of a framed document with three
horizontal frames.
Using Nested Framesets
Although you can combine ROWS
and COLS to divide a page
both ways, you might wonder how you create unevenly divided frames.
This is done by nesting the <FRAMESET>
tags. You can use a <FRAMESET>
tag instead of a <FRAME>
tag to further subdivide that frame.
To use nested frames, try to start with the largest divisions
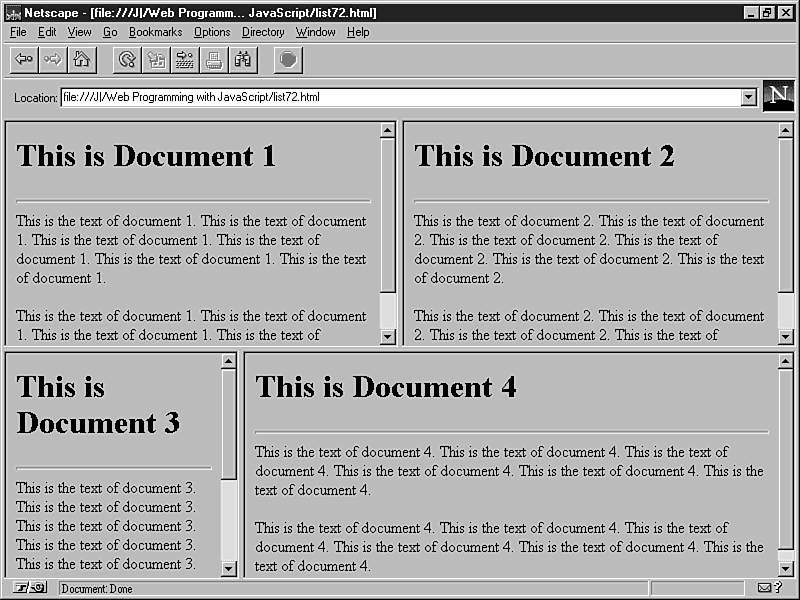
of the page and end with the smallest. As an example, Listing
9.2 shows a frameset document that defines a set of nested frames.
Listing 9.2. (FRAME2.asp) A document with four frames, using
nested framesets.
<FRAMESET ROWS="*,*">
<FRAMESET COLS="*,*">
<FRAME SRC="doc1.asp">
<FRAME SRC="doc2.asp">
</FRAMESET>
<FRAMESET COLS="30%,*">
<FRAME SRC="doc3.asp">
<FRAME SRC="doc4.asp">
</FRAMESET>
</FRAMESET>
This first divides the window into two rows, each with half of
the area. The first row is divided into two columns of equal size;
the second row is divided into a narrow column and a wide column.
The output of this example is shown in Figure 9.3.
Figure 9.3 : A window with nested framesets showing four
documents.
The <NOFRAMES>
Tag: Providing an Alternative
Along with the <FRAME>
tag and nested framesets, one other tag can be used within a frameset
document: <NOFRAMES>.
This is a container that you can use to display information to
users with non-frame browsers.
The way it works is this: Netscape and other browsers that support
frames ignore everything within the <NOFRAMES>
tags. Other browsers don't know what to do with the tag, so they
ignore it and display the information between the tags.
This enables you to do things like this:
<FRAMESET ROWS="*,*">
<FRAME SRC="doc1.asp">
<FRAME SRC="doc2.asp">
<NOFRAMES>
<h1>Hello</h1>
You are using a non-frame browser. Please go away
and don't come back until you support frames.
</NOFRAMES>
</FRAMESET>
This simply displays a rather rude message to users of non-frame
browsers, although frame browsers display the framed documents
normally. Unfortunately, <NOFRAMES>
is often used to display messages like this; there are many users
with non-frames browsers, though, and they often don't have the
option of upgrading.
A much better approach is to use the <NOFRAMES>
section to enclose a non-frame version of the same document set
or an index of links to the documents. You could also include
a simple link to send the user to the non-frame version.
| Note |
One common mistake is to assume that browsers that support frames also support JavaScript. Some Web authors have used <NOFRAMES> to weed out non-JavaScript browsers. There are now several browsers that support frames but not JavaScript, so
this is not reliable. The <NOSCRIPT> tag, introduced in Netscape 3.0b4, provides a solution.
|
Common Uses for Frames
You might wonder why you would want to display several documents
on the screen at once with frames. In fact, many users of the
Web complain about just that. Nonetheless, there are several valid
uses for frames. Here are a few ideas:
- You can display a table of contents in one frame and the document
in the other. This enables the table of contents to remain visible.
- Frames are often used for status messages, or for navigation
aids, or to display a logo on all pages in a static frame.
- Web-based games and utilities can use frames to control their
layouts.
You will look at some of these uses later in this chapter; you
will also use frames in many of the applications created in the
upcoming chapters.
Because you can display multiple documents in a window with frames
and multiple windows, you need a way to specify which window or
frame to use. The TARGET
property enables you to do this.
The TARGET property is used
in links, and it indicates the window or frame in which the document
will be displayed. This is the name you assigned using the NAME
attribute of the <FRAME>
tag. For windows you create in JavaScript, this is the window
reference you specified when creating the window.
For example, this link will open the order.asp
document in the win1 frame
or window:
<A HREF="order.asp" TARGET="win1">Order form</A>
If the window doesn't already exist, a new window will be created
with the document loaded. For example, this link creates a new
window called win2 and loads
the support.asp document
into it:
<A HREF="support.asp" TARGET="win2">Technical Support</A>
Another tag, <BASE>,
enables you to define a default target window for a document.
This target will be used for all links in the document except
those with a differing TARGET
property of their own. This statement sets the default target
to win2:
<BASE TARGET="win2">
This is particularly useful for a frame that will be used as a
navigation bar or table of contents, because you will want every
link in the document to load in a different frame.
| Note |
As mentioned in Chapter 6 "Using Interactive Forms," the <FORM> tag can also have a TARGET property. In this case, it defines which window or frame will be used to display the results after the form
is submitted.
|
In CGI programming, one of the most vexing problems is storing
state information. When users go from one page to the next, it's
hard to keep track of what they were doing, or even if they are
the same users.
Netscape created cookies as one solution to this problem.
A cookie is a chunk of information sent by the server, which can
be stored on the client. Cookies are stored with a date they expire
and the name of the host from which they came. When the user communicates
with the same host later, the data is sent back.
Here are some examples where cookies can be useful:
- They can store a user's "preferences" for a Web
page. When users return to the page, they can view it in their
desired fashion. For example, Netscape's home page uses this technique
to turn frames on or off based on the user's preference.
- They can maintain state between CGI scripts or JavaScript
programs. For example, a quiz might ask you one question, then
load a new page for the next question, storing your score in a
cookie.
- They can remember information so that users can avoid entering
it every time they access a page. For example, a page that requires
a user's name can remember it with a cookie.
Cookies can also be used in JavaScript. You can use them to store
information between pages, or even to store information on users'
computers to remember their preferences next time they load your
page.
Each cookie stores a named piece of information and includes an
expiration date. With few exceptions, this date is usually one
of the following:
- When used to store preferences, a faraway date is usually
used-in essence, it never expires.
- When used to maintain state, a date in the near future-typically
the next day-is used. In the previous quiz example, a user that
came back the next day would have to start the quiz over.
The cookies are stored in a "cookie jar" on the user's
computer. Specifically, each cookie is a line in a file called
cookies.txt, usually in the
same directory as Netscape itself.
One feature added by Netscape surpasses even frames: the plug-in
specification. This is an Application Program Interface (API)
that enables programmers to create add-ons for Netscape. These
are typically used to enable the browser to view non-HTML data.
Plug-ins are available for a wide variety of formats, and more
are coming out every day. You can use plug-ins to display new
kinds of images, animations, video, and 3D graphics directly in
the browser window.
Because plug-ins are all about multimedia and bring many new media
formats to
the Web, you'll explore them in detail in Chapter 13, "Working
with Multimedia and Plug-Ins."
| Note |
You can't write plug-ins with JavaScript, but there are features to enable you to control and interact with them using JavaScript.
|
By combining JavaScript and frames, you can create multiwindow
documents that interact with each other in new ways. Frames and
JavaScript are used together frequently, and you'll use them many
times in the rest of this guide.
This section begins with an introduction to the objects and terminology
you'll need to know to work with frames in JavaScript. Next, you'll
apply what you've learned to add frames capability to the FSC
Web page created in Chapter 8.
When a window contains multiple frames, each frame is represented
in JavaScript by a frame
object. This object is equivalent to a window
object, but it is used for dealing with that frame. The frame
object's name is the same as the NAME
attribute you gave it in the <FRAME>
tag.
Remember the window and self
keywords, which refer to the current window? When you are using
frames, these keywords refer to the current frame instead. Another
keyword, parent, enables
you to refer to the main window.
Each frame object in a window is a child of the parent
window object. Suppose you define a set of frames using the HTML
in Listing 9.3.
Listing 9.3. (FRAME3.asp) A framed document that divides the
page into quarters.
<FRAMESET ROWS="*,*" COLS="*,*">
<FRAME NAME="topleft" SRC="topleft.asp">
<FRAME NAME="topright" SRC="topright.asp">
<FRAME NAME="bottomleft" SRC="botleft.asp">
<FRAME NAME="bottomright" SRC="botright.asp">
</FRAMESET>
This simply divides the window into quarters. If you have a JavaScript
program in the topleft.asp
file, it would refer to the other windows as parent.topright,
parent.bottomleft, and so
on. The keywords window and
self would refer to the topleft
frame.
| Note |
If you use nested framesets, things are a bit more complicated. Window still represents the current frame, parent represents the frameset containing the current frame, and top represents the main frameset that contains all the
others.
|
The frames Array
Rather than referring to frames in a document by name, you can
use the frames array. This
array stores information about each of the frames in the document.
The frames are indexed starting with zero and beginning with the
first <FRAME> tag in
the frameset document.
As an example, you could refer to the frames defined in Listing
9.3 using array references:
- parent.frames[0] is equivalent
to the topleft frame.
- parent.frames[1] is equivalent
to the topright frame.
- parent.frames[2] is equivalent
to the bottomleft frame.
- parent.frames[3] is equivalent
to the bottomright frame.
You can refer to a frame using either method interchangeably,
and depending on your application, you should use the most convenient
method. For example, a document with 10 frames would probably
be easier to use by number, but a simple two-frame document is
easier to use if the frames have meaningful names.
Frame Object Properties, Events, and Methods
Each frame object (or each member of the frames
array) has two properties:
- name is the value of
the NAME attribute in the
<FRAME> tag.
- length is the number
of child frames within the frame.
In addition, you can use all the properties of the window
object, which you looked at in Chapter 5 in a frame. You can
also use the methods setTimeout(),
clearTimeout(), blur(),
and focus().
You can define the onLoad
and onUnload event handlers
for the parent window object within the <FRAMESET>
tag. The individual frames in a document do not have their own
event handlers for loading and unloading; the parent window's
onLoad event indicates that
all frames have been loaded.
At this point, you should have an idea of how to access the various
frames in a window from JavaScript. Now let's apply this knowledge
by making improvements to the FSC Software page created in Chapter
8.
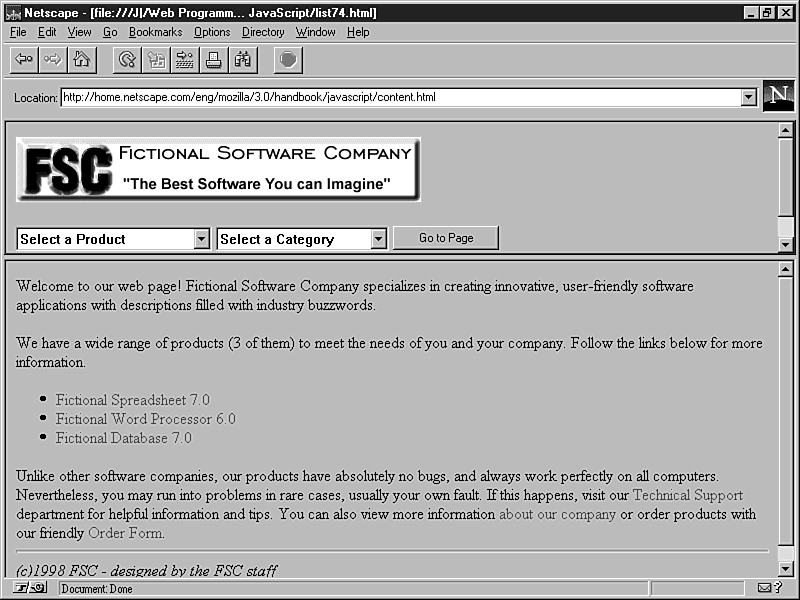
You'll use a simple two-frame structure for the revised FSC page.
You will move the navigation bar (the selection lists and "go"
button) to the top frame, along with the logo. This will enable
the logo and table of contents to remain at the top while the
user visits the various pages in the bottom frame.
To begin, you'll need a frameset document. This will be the document
the user loads first, and it will define the frame layout and
the contents of each frame. This is the easiest part; the frame
definition document is shown in Listing 9.4.
Listing 9.4. (FRAMEFSC.asp) The frame definition document for
the revised FSC page.
<HTML>
<FRAMESET ROWS="30%,*">
<FRAME NAME="contents" SRC="index.asp">
<FRAME NAME="main" SRC="fscmain.asp">
</FRAMESET>
</HTML>
This simply defines two rows of frames. The first will be used
for the navigation bar, which you will store in the file index.asp.
The second frame will be used for whichever document the user
is looking at; it will start with the introductory page, fscmain.asp.
Next, you need to create the index.asp
file. This will include the Navigate()
function created in Chapter 8 the navigation form, and the company
logo. Listing 9.5 shows the contents document.
Listing 9.5. (index.asp) The contents of the top frame.
<HTML>
<HEAD>
<TITLE>Fictional Software Company</TITLE>
<SCRIPT>
function Navigate() {
prod = document.navform.program.selectedIndex;
cat = document.navform.category.selectedIndex;
prodval = document.navform.program.options[prod].value;
catval = document.navform.category.options[cat].value;
if (prodval == "x" || catval == "x") return;
parent.frames[1].location.href = prodval + "_" + catval + ".asp";
}
</SCRIPT>
</HEAD>
<BODY>
<IMG SRC="fsclogo.gif" alt="Fictional Software Company">
<FORM name="navform">
<SELECT name="program">
<OPTION VALUE="x" SELECTED>Select a Product
<OPTION VALUE="w">Fictional Word Processor
<OPTION VALUE="s">Fictional Spreadsheet
<OPTION VALUE="d">Fictional Database
</SELECT>
<SELECT name="category">
<OPTION VALUE="x" SELECTED>Select a Category
<OPTION VALUE="tech">Technical Support
<OPTION VALUE="sales">Sales and Availability
<OPTION VALUE="feat">List of Features
<OPTION VALUE="price">Pricing Information
<OPTION VALUE="tips">Tips and Techniques
</SELECT>
<INPUT TYPE="button" NAME="go" VALUE="Go to Page"
onClick="Navigate();">
</FORM>
</BODY>
</HTML>
The form definition is the same one used in Chapter 8. Only one
change was needed in the Navigate()
function. The last line was changed to this:
parent.frames[1].location.href = prodval + "_" + catval + ".asp";
This sets the location of the second frame to the new URL, rather
than the current frame. Thus, the documents the user selects load
in the second frame, and the navigation bar stays in the first
frame.
To test this multiframe FSC page, you will need the introductory
page, fscmain.asp, to display
in the second frame. This file is shown in Listing 9.6. This is
simply a modified version of the version in Chapter 8after adding
onMouseOver status line help.
Listing 9.6. (FSCMAIN.asp) The document for the second frame.
<HTML>
<HEAD>
<TITLE>Fictional Software Company</TITLE>
</HEAD>
<BODY>
Welcome to our web page! Fictional Software Company
specializes in creating innovative, user-friendly software
applications with descriptions filled with industry
buzzwords.
<P>
We have a wide range of products (3 of them) to meet
the needs of you and your company. Follow the links
below for more information.
<P>
<UL>
<LI><A HREF="spread.asp"
onMouseOver="window.status='Information about the spreadsheet';return true;">
Fictional Spreadsheet 7.0</A>
<LI><A HREF="word.asp"
onMouseOver="window.status='Information about the word processor';return true;">
Fictional Word Processor 6.0</A>
<LI><A HREF="data.asp"
onMouseOver="window.status='Information about the database';return true;">
Fictional Database 7.0</A>
</UL>
<P>
Unlike other software companies, our products have
absolutely no bugs, and always work perfectly on all
computers. Nevertheless, you may run into problems in
rare cases, usually your own fault. If this happens,
visit our <A HREF="support.asp"
onMouseOver="window.status='Technical Support for our products';return true;">
Technical Support</A>
department for helpful information and tips. You can
also view more information <A HREF="company.asp"
onMouseOver="window.status='Information about FSC Software Co.';return true;">
about our company</A> or order products with our friendly
<a href="order.asp"
onMouseOver="window.status='Allows you to order products';return true;">
Order Form</A>.
<HR>
<I>1998 FSC - designed by the FSC staff</I>
</BODY>
</HTML>
You are now ready to test the multiframe document. All you need
to do now is load the frameset document (Listing 9.4) into the
browser. The complete document in Netscape is shown in Figure
9.4.
Figure 9.4 : The complete multiframe document.
Notice that you are now using two HTML documents and two JavaScript
applications. The application in the top frame is used to manage
the navigation. The second frame includes the onMouseOver
functions to display useful information in the status line. JavaScript
works in both at the same time.
You should now understand how frames can be used and the benefits
they offer. You will use frames throughout the rest of this guide
in many more complicated applications.
As a final example of frames, let's create a document that uses
the open() and close()
methods to rewrite a frame's contents from a script in another
frame. As a simple application of this technique, you will create
a clock that displays the time in a frame in a large font.
As usual, the frameset document is the simplest part. The frameset
document for this example is shown in Listing 9.7.
Listing 9.7. (FRAMEUP1.asp) The frameset document for the frame
update example.
<FRAMESET ROWS="50%,50%"
onLoad="window.setTimeout('parent.CodeFrame.Update();',5000);">
<FRAME NAME="TimeFrame" SRC="Doc1.asp">
<FRAME NAME="CodeFrame" SRC="frameup2.asp">
</FRAMESET>
The top frame, called TimeFrame,
is initially loaded with a generic file; if you don't specify
the SRC property, frames don't always work correctly with JavaScript.
This document will be erased by the clock five seconds after the
page loads, as defined in the frameset's onLoad
event handler.
The real work for the clock is done by the document in the second
frame, called CodeFrame.
Listing 9.8 shows this document.
Listing 9.8. (FRAMEUP2.asp) The main document for the frame
update example.
<HTML>
<HEAD>
<TITLE>A Silly JavaScript Clock</TITLE>
<SCRIPT LANGUAGE="JavaScript">
var now;
//function to update time in frame
function Update() {
// get the time
now = new Date();
hh = now.getHours();
mm = now.getMinutes();
ss = now.getSeconds();
// clear and rewrite the "time" frame
parent.TimeFrame.document.open();
parent.TimeFrame.document.write("<HTML><BODY><CENTER><FONT SIZE='+35'>");
parent.TimeFrame.document.write(hh + ":" + mm + ":" + ss);
parent.TimeFrame.document.writeln("</H1></BODY></FONT>");
parent.TimeFrame.document.close();
// set the next timeout
window.setTimeout("Update();",5000);
}
</SCRIPT>
</HEAD>
<BODY>
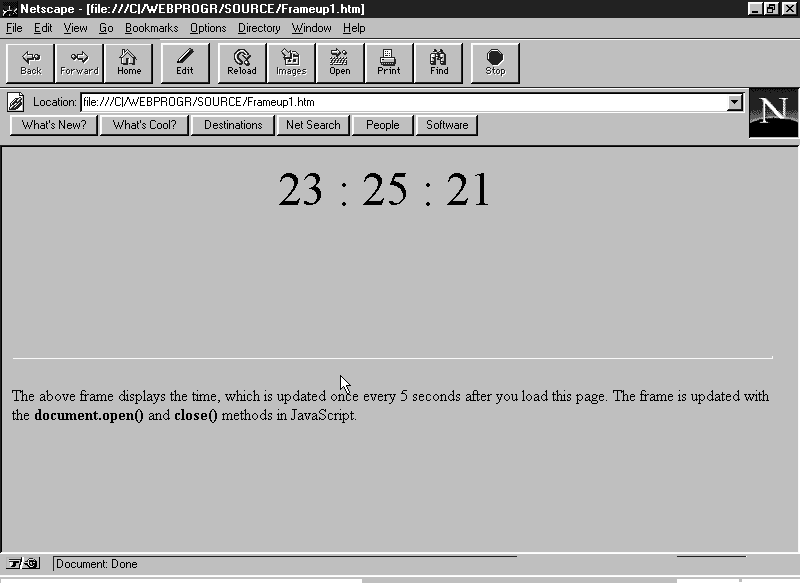
The above frame displays the time, which is updated once every 5 seconds
after you load this page. The frame is updated with the <b>document.open()</b>
and <b>close()</b> methods in JavaScript.
</BODY>
</HTML>
This document includes the Update()
function, which updates the clock by rewriting the TimeFrame
frame's contents. The document.open()
and document.close() methods
used to accomplish this are explained in Chapter 5. Figure 9.5
shows this example in action.
Figure 9.5 : The output of the frame update example.
Let's take a look at using cookies with JavaScript. You can use
cookies to store a preference for the user, or to remember the
user when they come back to your page. (No, you can't eat them.)
Cookies are stored for the current document, and they are accessed
with the document.cookie
property. This property is a text value which can contain the
following components:
- name=value: A name and
value, separated by the equal sign. This is the actual data stored
in the cookie.
- expires=date:
An expiration date. If this date is not included, the cookie is
erased when the user exits the browser. (For the format of the
date, see the example later.)
- domain=machine:
The domain name for which the cookie is valid. By default, this
is the domain of the current page.
- path=path: The
URL path for which the cookie is valid. By default, this is the
current URL.
As an example, Listing 9.9 shows a document that remembers the
name of each user who accesses it. Each section of the document
is explained later.
Listing 9.9. (COOKIE.asp) An example of cookies in JavaScript.
<HTML>
<HEAD>
<TITLE>The page that remembers your name</TITLE>
<SCRIPT>
if (document.cookie.substring(0,2) != "n=") {
nam = window.prompt("Enter your name");
document.cookie = "n=" + nam + ";";
document.cookie += "expires=Tuesday, 31-Dec-99 23:59:00 GMT"
}
</SCRIPT>
</HEAD>
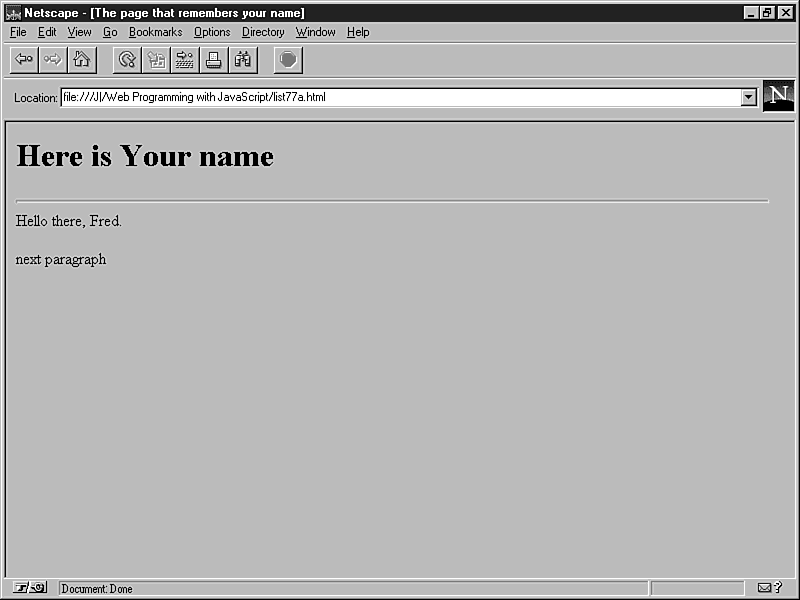
<BODY>
<H1>Here is Your name</H1>
<HR>
<SCRIPT>
indx = document.cookie.indexOf(";");
nam = document.cookie.substring(2,indx+1);
document.write("Hello there, ", nam);
</SCRIPT>
<P>
next paragraph
</BODY>
</HTML>
The script in the document header simply checks the name portion
of the cookie string for the n=
characters. If they are not found, it prompts for the user's name,
and stores the value in the "n="
cookie. A faraway expiration date is used to save the information
indefinitely.
The script in the body of the document is then able to greet the
user by displaying a name, if one has been defined. The output
of this page is shown in Figure 9.6. Obviously, there are more
uses for cookies than just names. You will explore another use
in Chapter 11.
Figure 9.6 : The output of the JavaScript cookie example.
In this chapter, you continued the process of adding interactive
features to a company Web page with JavaScript, taking advantage
of the latest browser features:
- The most important feature you can use with JavaScript is
frames, which enable you to divide a window into multiple areas.
You can use frames to create separate navigation bars, status
areas, and many other useful divisions.
- You can use cookies to store information about the user or
the current session. This can be useful for keeping state between
different documents and for storing user preferences.
You have now expanded your knowledge of JavaScript to include
frames and cookies, and you should have an idea of the possibilities
they offer. Move on with one of the following:
- To review the JavaScript objects referred to in this chapter
and their uses, see Chapter 5 "Accessing Window Elements
as Objects."
- To learn various ways to liven up a page without frames, see
Chapter 8 "Improving a Web Page with JavaScript."
- To learn how to use frames and cookies in more complicated
ways, turn to Chapter 10, "Working with Multiple Pages and
Data."
- To see more examples of the techniques in this chapter, see
Chapter 11, "Real-Life Examples II."
- To learn more about Netscape plug-ins, see Chapter 13, "Working
with Multimedia and Plug-Ins."
| Q: | How do frames and cookies fit into the HTML standards, if at all?
|
| A: | Frames have been proposed as an extension to HTML, but have not been implemented in the latest version (HTML 3.2). You can bet they will become a standard, with both Netscape and
Microsoft behind them. Cookies have not yet been discussed as an addition to HTML.
|
| Q: | Is there any way for a user to access information stored in a cookie by a previous user?
|
| A: | No. Cookies are stored on the user's machine, so each user has a separate database. There is no way to send this data to the server with JavaScript.
|
| Q: | Can I modify the frameset "on the fly"-for example, adding a new frame or eliminating an existing one?
|
| A: | Not without loading a different frameset. JavaScript has no capability of changing framesets, at least in the current version.
|
| Q: | Can I call a function I defined in a different frame's document?
|
| A: | Yes. JavaScript functions are properties of the window object, so you can specify the window and document when you call the function, such as parent.frame2.Update().
Listing 9.7 uses this technique.
|
| Q: | Nobody takes me seriously when I talk about cookies. Who at Netscape can I blame for creating a silly term like that?
|
| A: | Netscape is innocent in this case. The terms "cookie" and "cookie jar" have been used for years in the computer industry to represent named bits of information,
usually stored in a computer's memory.
|


|
 Learn HTML
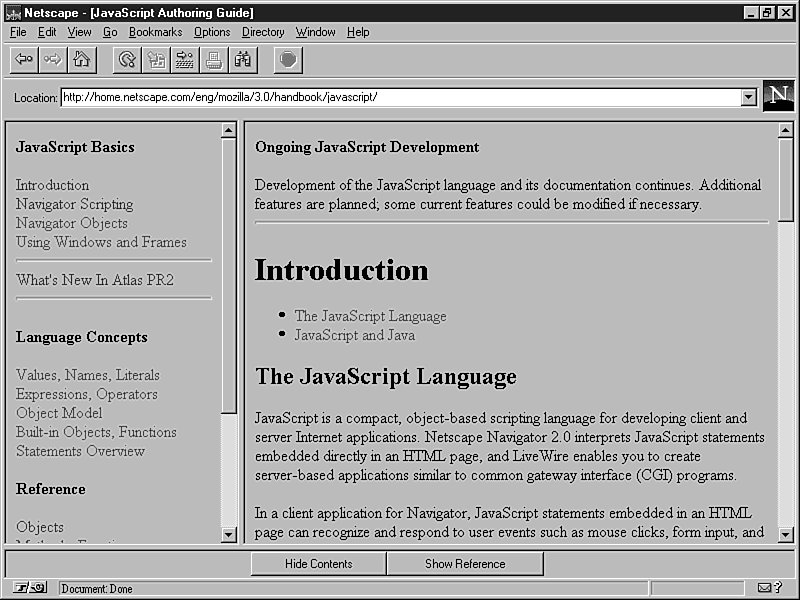