Web based School
Chapter 5
Decoding Data Sent to Your CGI Program
- Using the PostMethod
- Using Radio Buttons in Your Web Page Forms and Scripts
-
Reading and Decoding Data in Your CGI Program
- Using the ReadParse Function
- Creating Name/Value Pairs from the Query String
- Decoding the Name/Value Pairs
- Using the Post Method
- Using the Perl read Function
- Including Other Files and Functions in Your CGI Programs
- Using the Data Passed with Radio Buttons
- Using Perl's If Elsif Block
- Using the HTML Checkbox
- Using a Database with Your CGI Program
- Using Pull-Down Menus in Your Web Page Forms and Scripts
- Using File Data in Your CGI Program
- Learning Perl
- Summary
- Q&A
In the last chapter, you saw how your Web page data was encoded and transferred from your browser/client software to the server software. It's good to know how the data gets to you, but you've got to be able to use that data once it gets to your CGI program. In this chapter, you continue learning about the HTML Form Input tag and focus on using the data sent to your CGI program.
You will learn about the following topics in this chapter:
- Using the Post method to send data
- Using radio buttons to send data
- Decoding data sent to your CGI program
- Using selection pull-down menus
Using the Post Method
In the last chapter, all the examples used the Get method to send your data to the server. Because the Get method is the default method, if your HTML Form tag doesn't include the method type, everything still works. For example, <FORM method=get action="/cgi-bin/first.cgi">
has the same results as <FORM action="/cgi-bin/first.cgi">
and you still have the same limitations of the Get method. You learned about the limitations of the Get method in the last chapter:
- You can lose data by overflowing the maximum buffer size for the URI.
- Using the Get method produces the YUK! factor.
Actually, it's mostly the limitation on how much data can be sent that has moved the Internet community toward the Post method.
In the summer of 1995, the Post method became the method of choice for sending data across the Net. No formal vote was taken. Common sense and practical application chose Post. And HTMLers and CGIers started telling each other, "Hey, use the Post method!"
With the Post method, the
data input on your Web page form is available for reading on the
STDIN filehandle.
| Using STDIN, STDOUT, and STDERR |
| STDIN, STDOUT, and STDERR are part of Perl's special variables. Perl uses lots of special variables to make your programming tasks easier, and I will discuss most of the CGI-relevant ones in this guide. If you're familiar with C or almost any programming language that works with the UNIX environment, STDIN, STDOUT, and STDERR are already well known to you. If not, here is a brief introduction to them. STDIN is read as standard in, STDOUT is read as standard out, and STDERR is read as standard error. When you open a file for reading or writing, you assign the name of the file (filename) you are opening to a variable referred to as a filehandle. Your program references the filehandle instead of the actual filename whenever it wants to read from or write to that file. UNIX/C/Perl treats every piece of the computer like a file. So once you learn how to work with files, you have a good start on learning how to work with the other parts of the computer STDIN, STDOUT, and STDERR are three filehandles that are preset for reading and writing from your computer terminal. The writing or output goes to your computer screen. Perl treats this just like another file. The reading or input comes from your computer keyboard STDOUT and STDERR are for writing. Both these filehandles normally write to your computer screen STDIN normally is associated with keyboard input. For CGI, however, when your data is passed to the server using the POST method, it is available for reading from STDIN. You can adjust what STDIN, STDOUT, and STDERR write to or read from by assigning them new values in your program. This is how your Post data becomes available on STDIN. You can change where the print function sends its output by setting STDOUT to a filehandle you opened earlier in your program. |
There is no limit to the amount of data that can be passed to your CGI program on the STDIN filehandle, and no limits is what the Net is all about. Your program keeps reading data from this filehandle until it has read everything defined by the content-length request header.
In the next section, you will examine how your data is read from the STDIN filehandle.
After your CGI program reads the data from the STDIN filehandle, it must decode those name/value pairs covered in Chapter 4, "Using Forms to Gather and Send Data." Some marvelous functions are available on the Net for decoding data. In this chapter, I use the ReadParse function-which is part of the cgi-lib.pl library, written by Steven E. Brenner-to fully discuss decoding URI-encoded data using Perl.
The next section goes back to studying how your programs receive data from the STDIN filehandle. To send data to your CGI program, I introduce the radio button and the checkbox. These Input types are useful in building professional-looking Web page forms.
Using Radio Buttons in Your Web Page Forms and Scripts
So far, your Web page forms have been relatively simple. Your Web page users have been able to enter data only in text-entry windows. It's amazing how powerful a user interface you can build with just the HTML Form tag and a few different Input types.
By just changing the input type to Radio, you get a working, clickable button on your form. Radio buttons add more power to your Web page forms, providing an easy mechanism for your customers to make choices.
The HTML Radio Button Format
The radio button is designed to allow a choice among several mutually exclusive options. In other words, only one choice is valid at a time. Figure 5.1 shows an example in which only one choice is valid among several possible options.
Figure 5.1 : A computer selection example.
The radio button is part of the HTML Input tag. It is a field of the Type attribute.
The radio button Input type's
syntax is similar to the Submit button:
<INPUT TYPE=RADIO NAME="computer" VALUE="Pentium 90">
| Tip |
| The double quotation marks you may see around differing HTML tags are necessary only if there is more than one word on the right-hand side of the equal sign (=). So, in this example, quotation marks are unnecessary except in the Value field. In the Value field, I use two words, Pentium 90, to define the value, as shown here: <INPUT TYPE=RADIO NAME="computer" VALUE="Pentium 90"> If the double quotation marks were not used, only the Pentium portion of the value would be associated with this radio button. By the way, double quotation marks don't hurt. You can use them at all times if you want |
The Name Attribute
The Name/Value attributes of the radio button are not optional. Unlike the Submit button, this Input type just won't work without a name and a value.
The radio button is different from the Submit option because the Submit button's main function is initiating the data transfer. The radio button's function is sending the selected data to your CGI program.
You must include the Value field and assign data to the Value field. Otherwise, there would be no "value" to send along with the radio button Name field. This guarantees that your CGI program receives data from a radio button group.
Notice in Figure 5.1 that there are two rows of radio buttons. Each row is a radio button group. A radio button group defines for your browser a set of radio buttons that work together. When one is selected, the others are unselected. So each new selection turns off the previous selection and selects the new "clicked" radio button.
A radio button group is defined based on the name given to each button. It's possible to have the same radio button group scattered all over your Web page form. It is possible, but not recommended. You want your radio buttons to be visually connected as well as programatically connected. Remember this when you design your form. If your form is very long and your radio buttons are in a list, some of the buttons might scroll off the screen and confuse your client.
To make your radio buttons work as a group, you must give each button in the group the same name. On the form shown in Figure 5.1, all the name/value pairs that make up the monitor group have the same name: Monitor. You can see this in Listing 5.1, which is the HTML for Figure 5.1.
Listing 5.1. HTML for Figure 5.1.
01: <html>
02: <head>
03: <title>Custom Computer Systems for Austin, Texas by AccN </title>
04: </head>
05: <body>
06: <center>
07: <form method="post" action="cgi-bin/accn_sys.cgi/systems/">
08: <table border=10>
09: <th> <h3> Choose from one of <br>our standard configurations </h3>
10: <tr> <td>
11: Pentium 100 <input type="radio"  name="system" value="P100" >
12: Pentium 75 <input type="radio" name="system" value="P75" checked >
13: Pentium 60 <input type="radio" name="system" value="P60" >
14: 486 DX2 66 <input type="radio" name="system" value="486d66" >
15: <tr> <td>
16: 17 Inch Monitor  <input type="radio" name="monitor" value="17inch" >
17: 15 Inch Monitor  <input type="radio" name="monitor" value="15inch" checked >
18: 14 Inch Monitor  <input type="radio" name="monitor" value="14inch" >
19: <tr> <td>
20: Multimedia? <input type="checkbox" name="sound" value="true" checked>
21: Modem? <input type="checkbox" name="modem" value="true" checked>
22: <tr> <td>
23: <input type="submit" value="Get Current Price">
24: <input type="reset">
25: <tr> </table> </form> </center>
26:
27: <hr noshade>
28:  [ <A HREF="http://www.accn.com">
29:   <img alt="Austin Computer Center "
30:   src="home.gif" border=1 A>  |
31:   <A HREF="pindex.asp"> Parts Index   </A>   |
32: </body>
33: </html>
Lines 11-14 make up the first set of radio buttons. Notice that all the "names" are the same and that the value is something other than the visible HTML. The values are easy to remember and to perform comparisons against in your Perl code. Also notice that, on line 12, Pentium 75 is defaulted to Selected by the Checked attribute. The selections shown in Figure 5.1 return the Web page shown in Figure 5.2.
Figure 5.2 : A Web page returned from selections in Figure 5.1.
The Value Attribute
The Value attribute defines the data that will be sent to your CGI program. Only the selected radio button's Value field is sent to your CGI program.
There is no reason to make what appears on your Web page as a selectable radio button and the Value field the same text strings. This gives you the freedom to make nice, descriptive, selectable radio button names on your Web page and more programatically useful radio button names in your Value fields. You can see examples of this practice in Listing 5.1.
Each Value field in a radio button group must be different. If any of the Value fields are the same in a radio name group, your CGI program will not be able to figure out which radio button was selected.
The Checked Attribute
The only optional attribute of the Input type Radio is the Checked attribute. The Checked attribute defines which radio button in a radio button group is the default. The default radio button appears selected or colored in on your Web page form. You should define one, and only one, of the radio buttons in each radio button group as the default radio button by including the Checked attribute.
Radio Button Rules
The radio button follows a specific set of rules, as outlined here:
- The Name/Value attributes must be filled in.
- The same name should be used in all the Name fields of a radio button set.
- Each of the Value fields should be different.
- The Value field does not need to be the same as what is displayed on your Web page.
- Use the Checked attribute to set one of the buttons as the default selection.
- Only include the Checked attribute in one of your radio buttons.
Finally, a bit of formatting advice for your radio buttons. If you use a table like the one in Figure 5.2, be careful how you place your radio buttons.
With radio buttons lined up in a row, it can be confusing which item is being selected. I like to place my radio buttons first, and then the text that describes the button. You don't have to follow this convention; just remember to be consistent in placing the button and then text, or the text and then button, throughout your entire form.
Reading and Decoding Data in Your CGI Program
Let's use the Get method to send data to your CGI program one more time. Ignoring all my previous complaints is okay, as long as it has a purpose, and, in this case, you need a good example to fully explain decoding your input data. Refer to Figure 5.2, which shows the returned Web page; later in this chapter, I'll repeat this example using the Post method.
Obviously, just to begin to return the data in Figure 5.2, I had to be able to decode the incoming data. Using the Get method, the data is available for my CGI program in the environment variable QUERY_STRING.
All the incoming data is URI encoded, however, so before it can be used, it has to be decoded. "Eric," you say, "NO PROBLEM; I learned all about encoding data in the last chapter, so decoding data should be easy!" Well, actually, you're right! Decoding is easy. But mostly because someone else already has figured out how to make it easy for you.
I don't like doing extra work! I usually have enough to do already. So I look for ways to save my time and effort. cgi-lib.pl, written by Steven E. Brenner, is one of those nice labor-saving devices. Using Steve's code-which he very kindly distributes freely on the Net-makes my coding tasks much easier. I can concentrate on writing the application and use Steve's code to do the decoding.
The file cgi-lib.pl often is referred to as a library of code because it performs several useful functions. This library is covered again in Chapter 8, "Using Existing CGI Libraries," where you will take a look at several useful Net libraries.
Inside the cgi-lib.pl Perl library is a very useful function called ReadParse. It does your decoding work for you. In the next section, you will learn how ReadParse decodes your data, and you will get a firm introduction to the Perl language used in ReadParse. You'll learn about Perl's variable-naming conventions. How the QUERY_STRING is separated into name/value pairs. Looping constructs and the $# variable. The Perl split function. The Perl substitute function. And even Perl's associative arrays. I can't give you all the details of a Perl guide, but I can teach you enough to make you dangerous!
Using the ReadParse Function
The Perl code in Listing 5.3 is the ReadParse function of the very useful Perl library cgi-lib.pl. You can use most of the functions in cgi-lib.pl directly with just a little bit of effort and understanding. The ReadParse function is explained in detail here so that you can learn about decoding incoming data. The ReadParse function separates the input form data into name/value pairs and decodes the URI-encoded data.
Not only is ReadParse an excellent tool for you to use in your CGI programs, but it also provides an excellent programming example for introducing several Perl-related topics.
Before you begin with ReadParse, I have included a program fragment that prints environment variables. Figure 5.3 shows the output from the program in Listing 5.2. This output is part of the input data to the ReadParse function and should help you follow along through the next examples.
Figure 5.3 : The name/value pairs of the query string.
The program fragment in Listing 5.2 does exactly the same thing as line 13 of the ReadParse function in Listing 5.3, but it doesn't use the variable names $in and @in. This fragment is part of another program that returns environment variables to the client. The fragment first prints one variable at a time, showing you how each name/value pair has been placed in a different location in the array (@my_query_string). Then line 7 prints the entire array without any HTML formatting. Finally, the encoded QUERY_STRING is printed.
Listing 5.2. A program fragment for printing environment variables.
1: @my_query_string = split(/&/,$ENV{'QUERY_STRING'});
2: foreach $index (0..$#my_query_string)
3: {
4: print "$my_query_string[$index] <br>";
5: }
6: print "<br>";
7: print @my_query_string;
8: print "<br>";
9: print $ENV{'QUERY_STRING'};
Line 1 splits the environment variable QUERY_STRING into name/value pairs. This step also creates the array @my_query_string. Each name/value pair is one element of the array.
Line 2 uses the Perl foreach statement to step through each element of the array. The foreach statement is a loop construct that begins and ends with the {} characters. Each time through the loop, the variable $index is set to the next array element.
Line 4 prints the next element in the array. The variable $index is used to index through the array in the traditional numeric manner. Line 4 also outputs the <br> statement, which is the HTML CRLF tag.
Line 6 prints the HTML CRLF tag <br> to separate the data from the loop statement from the data printed on line 7. Line 7 prints the entire array, @my_query_string, of name=value pairs, without the extra formatting performed in the loop. Line 9 prints the unformatted QUERY_STRING.
Notice that the only visible difference between the QUERY_STRING and @my_query_string is the missing & between the variable names. The my_query_string is now in the Perl array format, however. That format enables me to decode the passed-in form data one name/value pair at a time.
If you are new to Perl, this is where you might start to realize the power of Perl. Most languages make you write some type of loop construct to build a similar array structure. Perl creates and loads the array in one simple assignment statement.
Calling ReadParse is really easy. You call it by using the standard Perl calling syntax: &subroutine_name, &ReadParse(*return_value)
You pass, using the parameter list, the name of the variable you want ReadParse to return your data in-for example, (*variable-name).
Listing 5.3. ReadParse
from cgi-lib.pl.
# ReadParse
# Reads in GET or POST data, converts it to unescaped text, and puts
# one key=value in each member of the list "@in"
# Also creates key/value pairs in %in, using '\0' to separate multiple
# selections

# If a variable-glob parameter (e.g., *cgi_input) is passed to ReadParse,
# information is stored there, rather than in $in, @in, and %in.

01: sub ReadParse {
02:     local (*in) = @_ if @_;
03:
04:   local ($i, $loc, $key, $val);
05:
06:   # Read in text
07:   if ($ENV{'REQUEST_METHOD'} eq "GET") {
08:     $in = $ENV{'QUERY_STRING'};
09:   } elsif ($ENV{'REQUEST_METHOD'} eq "POST") {
10:     read(STDIN,$in,$ENV{'CONTENT_LENGTH'});
11:   }
12:
13:   @in = split(/&/,$in);
14:
15:   foreach $i (0 .. $#in) {
16:     # Convert pluses to spaces
17:     $in[$i] =~ s/\+/ /g;
18:
19:     # Split into key and value.
20:     ($key, $val) = split(/=/,$in[$i],2); # splits on the first =.
21:
22:     # Convert %XX from hex numbers to alphanumeric
23:     $key =~ s/%(..)/pack("c",hex($1))/ge;
24:     $val =~ s/%(..)/pack("c",hex($1))/ge;
25:
26:     # Associate key and value
27:     $in{$key} .= "\0" if (defined($in{$key})); # \0 is the multiple
  separator
28:     $in{$key} .= $val;
29:
30:   }
31:
32:   return 1; # just for fun
33: }
How does this code work and what is it supposed to do? Well, it makes your life a lot easier by decoding the data and separating that data into name/value pairs and then placing those name/value pairs into an associative array. After it's in an associative array, your program can access the data by using the name portion of the name/value pair as an array index.
So how does it do this? It starts by figuring out where to go to get the data. So line 7, if ($ENV{'REQUEST_METHOD'} eq "GET") {
checks to see what type of method was used to request the data. You're going to use the Get method first and then talk about the Post method.
Because you're using the Get method, line 8 is executed next. The line $in = $ENV{'QUERY_STRING'};
copies the entire QUERY_STRING into a local variable, $in. Remember that the server has created a bunch of environment variables for you. The QUERY_STRING environment variable has the input data from the Get method.
Creating Name/Value Pairs from the Query String
Now that the data is in a variable, you can begin making the data easier for your CGI program to use. So, the next thing to do is to separate the data into name/value pairs. Remember that name/value pairs are separated by the ampersand (&). You can see this in the Location field on line 13 of Listing 5.3: @in = split(/&/,$in);
This line uses the Perl split function to separate the name/value pairs in the $in variable into the array @in.
I have problems with line 13, and I understand Perl! The variable $in and the variable @in are two different variables. One ($in) is a scalar variable or, in this case, a string of characters. The other is an array (@in).
This might be clearer if the line was rewritten as this: @in = split(/&/,$ENV{'QUERY_STRING'});
Decoding the Name/Value Pairs
The URI-encoded data is decoded on lines 15-30 of the ReadParse function shown in Listing 5.3. Notice that once the code has reached this point, it doesn't matter whether the data was sent via the Get or the Post method. Everything is in the variable @in.
Line 15, foreach $i (0 .. $#in) {
begins a new loop block. The variable $i will be set to each of the integer values between 0 and the last index of the @in array.
The $#in variable is interpreted by Perl to calculate the maximum subscript of the array @in. The $#array_name is a special variable of Perl. It always returns the maximum subscript value of the array. The maximum subscript value is different from the total number of elements in the array. The first array element starts at 0. So in a 10-element array, the maximum subscript is 9.
The { is the beginning of the loop block. The loop block consists of all the statements that will be associated with the loop-in this case, lines 15-30. The loop block is closed with an ending }.
Separating the Name/Value Pairs
Line 20, ($key, $val) = split(/=/,$in[$i],2);
finds the first occurrence of the equal sign, splits that into two fields, and assigns the results to variables $key and $val. That's an awful lot for one line, with lots of Perl special syntax in it. So here's a detailed breakdown of line 20:
- The split function searches for a pattern in an input string. The pattern is defined between the two forward slashes. In this case, the pattern is = and the input string is the variable $in[$i].
- $in[$i] references one
of the name/value pairs that was separated from the QUERY_STRING
into the @in array on line
13. Remember that [$i] actually
is being converted to
[0], [1], ... [last_array_index]
The $in tells Perl that you want the contents of the @in array. - The last part of the split function (,2);) tells the split function to create only two fields, regardless of how many patterns it finds. This splits the array element on the first equal sign (=) it finds. The left-hand side of the pattern match is put into the first variable, $key, and whatever is left goes into $val.
The split function has this syntax: split(/pattern/,$variable,field_limit)
Decoding the URI-Encoded Strings
Lines 23 and 24 decode the contents of $key and $val. The substitute function looks for any embedded hexadecimal values and converts them into the correct ASCII values.
Consider line 23: $key =~ s/%(..)/pack("c",hex($1))/ge;
- The syntax of the substitute
function follows:
s/search_pattern/replace_pattern/ - search_pattern is a percent sign (%) followed by any two characters.
- replace_pattern is the expression pack("c",hex($1)). This pack function interprets the "c", field as convert to a signed character, whatever follows next. hex($1) converts to a hexadecimal value the matched fields from search_pattern.
- The g at the end of the s///ge; is used to apply the search-and-replace rule to the entire variable. Otherwise, the pattern would be matched and replaced only once.
- The e at the end of the s///ge; tells Perl to evaluate replace_pattern. Without the e, search_pattern (a hexadecimal value) would be replaced with "pack("c",hex($1))" instead of the results of the pack function.
- Finally, =~ is a special symbol that makes the substitute function operate using the variable on the left of the =~ as both the input variable to search on and the output to replace to.
Creating the Associative Array
Lines 27 and 28 create the associative array %in. Each reference to $in{} creates a new element in the associative array or adds to an existing element in the array. The magic is performed by using the curly braces ({}), which, in Perl, are used only to reference or create associative array elements.
These two lines have lots of Perl magic in them: $in{$key} .= "\0" if (defined($in{$key})); # \0 is the multiple separator $in{$key} .= $val;
The curly braces of an associative array are used here to both create and reference the associative array elements.
The first time a new element is assigned to an associative array, the element is created. So each new $key used in the associative array $in{$key} creates a new element for that new $key. The next time the same $key is used in the array, the previously created array element is referenced.
The addition of the new value is handled by the .= operator. This operator is shorthand for the normal string concatenate operation (new_string = string1 . string2). It is similar to the += operator of C. It takes the contents of the variable on the right-hand side of the operator and appends them to the contents of the variable on the left-hand side of the operator.
The final trick here is on line 27. The "\0" string separator is added only if the element $in{$key} is not the first $key of the array. This is done in the if (defined($in{$key}));
part of line 27. The next line creates and/or appends the $key value, whether or not it is the first $key in the array.
Exercise 5.1. Renaming ReadParse variables
Even with all that explanation, the small subroutine shown in Listing 5.3 can be hard to follow, and the main problem is the reuse of the variable name "in". It works just fine, because Perl understands that $, @, %, $var[], and $var{} all reference completely different variables. But it would be a lot less confusing and no less efficient if three variables with different names were used. Perl understands the difference without any problem, but it sure confuses me. I have rewritten the offending lines, shown here in Listing 5.4. I don't mean any offense to the author (Steven E. Brenner); I use this code unmodified and love it.
Listing 5.4. Renaming the variable in ReadParse.
04: local ($i, $loc, $name, $val);
08: $my_query_string = $ENV{'QUERY_STRING'};
13: @name_value_pairs = split(/&/,$my_query_string);
17: $name_value_pairs[$i] =~ s/\+/ /g;
20: ($name, $val) = split(/=/,$name_value_pairs[$i],2); # splits on the
first =.
23: $name =~ s/%(..)/pack("c",hex($1))/ge;
27: $final_name_value_pair{$name} .= "\0"
if (defined($final_name_value_pair {$name}));
28: $final_name_value_pair{$name} .= $val;
This should help you see how the data is moving from one variable to another. This is only illustrative. I would have to do a little more work to make this completely correct. I haven't handled the Post function in my renaming of the variables $in and @in. But for the purposes of clarity, I hope this example helps.
Using the Post Method
The Perl code uses the same ReadParse function of the cgi-lib.pl, shown in program Listing 5.3, for decoding Post data. ReadParse uses the same instructions to decode the data passed to the server, but it needs to determine where to read the data from before it can read the data into its "in" array.
ReadParse does this on lines 6-11 of Listing 5.3, repeated here as a program fragment (see Listing 5.5), by reading the REQUEST_METHOD environment variable on line 7. Because there are only two methods right now, this code could have been written without the check for the Post method on line 9. If the HTTP request method is not Get, then it must be Post. But this code is written so that more methods can be added without changing the format. If REQUEST_METHOD is Post, the data will be passed as part of standard input, after any HTTP request headers. Line 10 uses the Perl read function to get the data.
Listing 5.5. Reading the Post
method.
06: # Read in text
07: if ($ENV{'REQUEST_METHOD'} eq "GET") {
08: $in = $ENV{'QUERY_STRING'};
09: } elsif ($ENV{'REQUEST_METHOD'} eq "POST") {
10: read(STDIN,$in,$ENV{'CONTENT_LENGTH'});
11: }
Using the Perl read Function
In order to get any data that comes from outside your CGI program, you must understand the read function. In the UNIX world, any device you send data to or receive data from is treated like a file. This means that after you learn the method to read and write file input/output, you will understand how to write to any device you use.
In this case, you treat the input file stream from your Web browser like a file. The data comes in on STDIN, and you read from that predefined filehandle.
So the only difference between the Get and Post method as far as ReadParse is concerned is where it gets the data. If it's the Get method, it's in the QUERY_STRING. If it's the Post method, the data is at the STDIN filehandle.
Either way, the data is placed into the $in variable for further processing.
The Perl read function reads from a file into a variable you define for the length of the input string: read(READ-FROM-FILE HANDLE, READ-INTO, LENGTH-TO-READ)
Line 10 uses one of the Perl-defined filehandles: STDIN. So READ-FROM-FILE HANDLE is STDIN. The READ-INTO variable is $in, and LENGTH-TO-READ is given in the environment variable 'CONTENT_LENGTH'. Environment variables are covered again in Chapter 6.
Finally! We've gotten the data into our program and we can start doing something with it! So what are we going to do next? Well, let's use it!
Of course, nothing is ever that easy. You first should know about some setup code so that you can use other libraries and functions in your CGI code. Without understanding the Perl push function and the @Inc array, you won't be able to add new functions and those neat, free Internet libraries to your code.
But after that setup, you actually can begin using the data passed by the radio buttons, so you'll learn how to get that data out of the associative array. Next, you need to learn about checkboxes. The way in which checkbox data is sent to your CGI program is different, so I want to be sure that you understand that difference. Along the way, you also will learn about some more Perl constructs, including the if, elsif statements.
Listing 5.6 contains the Perl code for generating the Web page shown in Figure 5.4. I use this real-world example to explain the concepts outlined earlier. Notice on line 5 the call to the ReadParse function. The ReadParse function reads the input data and then returns it in the variable *input.
Figure 5.4 : A form input with a 486 and check-boxes not selected.
Listing 5.6. A CGI program for handling radio buttons.
01: #!/usr/local/bin/perl
02: push(@Inc, "/cgi-bin");
03: require("cgi-lib.pl");
04:
05: &ReadParse(*input);
06:
07: #Determine the base price based on the system variable
08: if ($input{'system'} eq "486d66") {
09:       #set 486 only variables
10:       $computer_name = "486DX2-66";
11:       $price = 1099;
12:       $memory = 4;
13:       $video = "VLB";
14:       }
15: else {
16:      #not a 486 must be pentium system
17:      $computer_name = "Pentium";
18:      $memory = 8;
19:      $video = "pcI";
20:      $cache = "256K Cache" ;
21:      if ($input{'system'} eq "P100"){$price = 1799 ;$ptype = 100}
22:      elsif ($input{'system'} eq "P75"){$price =1550 ;$ptype = 75}
23:      elsif ($input{'system'} eq "P60"){$price = 1450;$ptype = 60}
24:      }
25:
26: #add extra price for monitors over 14inch
27: $monitor = $input{'monitor'};
28: if ($input{'monitor'} eq "17inch"){$price += 650 ;}
29: elsif ($input{'monitor'} eq "15inch"){$price +=200 ;}
30:
31: #add multimedia system
32: if (defined($input{'sound'})) {
33:    $price += 190;
34:    $multimedia="MultiMedia System";
35: }
36:
37: #add 14.4 modem price
38: if (defined($input{'modem'})) {
39:    $price += 69;
40:    $modem="14.4 modem";
41: }
42:
43: print &PrintHeader;
44: print<<"print_tag";
45: <html>
46: <head>
47: <title>$computer_name Systems from Austin Computer Center North </title>
48: </head>
49: <body>
50: <h1 align=center> Austin Computer Center North <br>Austin Texas! </h1>
51: <center>
52: <img src="/accn.jpg" align=left>
53: <table border=5>
54: <th colspan=2 align=center> <h2>
55: ${computer_name} $ptype for only \$$price
56: </h2>
57: <tr><td> <ul>
58: <li>$memory megs of Ram
59: <li>$cache
60: <li>Enhanced IDE In/Out Controller
61: <li>$monitor NIL SVGA Monitor
62: <li>1 Meg $video SVGA Video Card
63: <li> $multimedia
64: </ul>
65: <td> <ul>
66: <li>1.44 Floppy Drive
67: <li>500+ meg Hard Drive
68: <li>Mouse
69: <li>Windows 95
70: <li> $modem
71: </ul>
72: <tr>
73: <td align=right colspan=2> <h2> 1 YEAR WARRANTY PARTS & LABOR! </h2>
74: <tr>
75: </table>
76: </center>
77: </body>
78: </html>
79: print_tag
Including Other Files and Functions in Your CGI Programs
How do you include new libraries like cgi-lib.pl in your CGI programs? Well, you could just append them onto the end of every program you write. But that seems like way too much work. There's got to be a better way. And, anyway, how come some of these libraries already are available to my code from my server's CGI directory? Well, one of Perl's special variables, the @Inc array, tells the Perl interpreter/compiler where to look for functions required by your code.
On line 2 of Listing 5.6, the Perl push function is used to add the path to the cgi-bin directory (/cgi-bin) to the @Inc array. The push function adds values onto the end of an array (like a stack). The array increases in length by the size of the item added to the list.
The @Inc array contains the list of places to search for Perl programs. It always starts with the default Perl directory and the current directory as search paths, and line 2 adds the cgi-bin directory to the end of the list of paths to search. You can move your personal paths to the front of the search path by using this command instead of the push command: unshift(@Inc,/cgi-bin);
If you use unshift(@Inc,/cgi-bin);
Perl first searches the /cgi-bin directory for your programs before looking in the system directories or the current directory. Why would you want to do this? Usually, you move your personal directory to the top of the search list to make sure that Perl uses your code instead of someone else's code. Or maybe you just downloaded the latest revision to one of the libraries that your server has in the default directory. You want your code to use the latest revisions. If you leave the @Inc array in its normal setup, the old version of the library will be used. You have to put your directory first in the search list to force Perl to use the newer code you just downloaded.
Line 3, require("cgi-lib.pl");
tells Perl that your CGI program requires the Perl code in cgi-lib.pl in order to run. Perl searches the paths in the @Inc directory for the file cgi-lib.pl and includes it in your program, compiling only the functions your program uses.
Using the Data Passed with Radio Buttons
Now you are going to start using the data passed to your CGI program by the Web page in Figure 5.1. Listing 5.7 repeats a fragment of the HTML shown in Listing 5.1 so that you can refer to it as you work with it.
Listing 5.7. HTML for generating radio buttons and checkboxes.
09: <th> <h3> Choose from one of <br>our standard configurations </h3>
10: <tr> <td>
11: Pentium 100 <input type="radio" name="system" value="P100" >
12: Pentium 75 <input type="radio" name="system" value="P75" checked >
13: Pentium 60 <input type="radio" name="system" value="P60" >
14: 486 DX2 66 <input type="radio" name="system" value="486d66" >
15: <tr> <td>
16: 17 Inch Monitor <input type="radio" name="monitor" value="17inch" >
17: 15 Inch Monitor <input type="radio" name="monitor" value="15inch" checked >
18: 14 Inch Monitor <input type="radio" name="monitor" value="14inch" >
19: <tr> <td>
20: Multimedia? <input type="checkbox" name="sound" value="true" checked>
21: Modem? <input type="checkbox" name="modem" value="true" checked>
22: <tr> <td>
You must deal with two radio button variables and two checkbox button variables in order for the form shown in Figure 5.1 to work. You'll start working with just one radio button groupname for now. You can see the other radio button groupnames in Listing 5.6. The first radio button's name is System. You can get the value of System after passing the data to ReadParse. It returns the name/value pairs in the variable declared on line 5 as "*input". Remember that an asterisk (*) defines any type of Perl variable.
The values of "system" are in the associative array "input". One way you can tell that it is an associative array is because the name is used as a lookup key. Line 8, if ($input{'system'} eq "486d66") {
checks the value of system
against the 486d66 value
defined in the form on line 14 of Listing 5.7. I use the Perl
string compare eq and the
"" around 486d66
because I am comparing strings and not numbers. You can see in
Figure 5.1 that the input values should be a Pentium 75 with a
15-inch monitor, multimedia, and a modem system
| Tip |
| If you want to check what your input is to see whether your CGI program is working correctly, use the Perl command print %array;. In this case, that would translate to print %input. This prints the entire associative array so that you can see the data passed to your CGI program. This method doesn't put any spaces between the name/value pairs, but it does print all your variables in one easy call. |
Using Perl's If Elsif Block
Now you are still working with the Perl code shown in Listing 5.6 and the data passed to your program from the radio button form. You have determined that the system type is not a 486d66.
Because the value of name is not equal to 486d66, you fail the first if check on line 8 and move to the else block-everything enclosed between the beginning curly brace ({) on line 15 to the ending brace (}) on line 24. I have repeated those lines in the fragment shown in Listing 5.8.
Listing 5.8. Setting variables returned in HTML.
15: else {
16: #not a 486 must be pentium system
17: $computer_name = "Pentium";
18: $memory = 8;
19: $video = "pcI";
20: $cache = "256K Cache" ;
21: if ($input{'system'} eq "P100"){$price = 1799 ;$ptype = 100}
22: elsif ($input{'system'} eq "P75"){$price =1550 ;$ptype = 75}
23: elsif ($input{'system'} eq "P60"){$price = 1450;$ptype = 60}
24: }
Because I only have to choose between the 486 and Pentium models, and it isn't a 486, it must be a Pentium. So now I can set all my Pentium required variables: the computer name, minimum memory, video type, and cache. You can see these variables in the title, main heading, and the list on the returned Web page in Figure 5.4. You can see how I use these variables in the HTML on lines 47, 55, 58, 59, 61, 63, and 70 of Listing 5.6. Actually, generating Web pages on-the-fly and using variables isn't that hard!
I then use the if, elsif statement to figure out what type of Pentium it is. You don't have to worry about not getting your input fields set with radio buttons the way you do text-entry fields. With radio buttons, the "name" always will be set to some value. In this case, the result is a P75, so I set the base price and define the $ptype variable for use in the HTML generated from my CGI. Notice that if it is a 486 system, $ptype is never set. This means that when it is interpreted in my HTML, nothing will print and the 486 $computer_name defined on line 10 will look just fine.
I now have the base price to work from and start adding in the "extras." My extras are the radio button with the name Monitor and the checkboxes.
Using the HTML Checkbox
You still are processing the input data from the Computer Selection example in Figure 5.2. All that's left to do is deal with the checkbox input. Checkbox values are not like radio buttons. The data is passed to the server only if the checkbox is selected. This means that you can check the %input array to see whether the name/value pair was sent to the server. Remember that if a checkbox is not selected, nothing is sent to the server for that name/value pair. So, on line 32 of Listing 5.6, if (defined($input{'sound'})) {
I use the Perl defined function to check the associative array %input for a sound key. If there is a sound key, the checkbox was selected.
The defined function checks to see whether a variable has been set at least once or has been declared in some other manner, such as with the Perl local statement. Add the price for a sound system on line 33, $price += 190;
and create the list element on line 34, $multimedia = "MultiMedia System";
used on line 63.
Figure 5.4 shows the form used without selecting checkboxes and using the 486 variables. Notice that the list has bullets for blank lines. These are the checkboxes that didn't get selected and the undefined cache variable. Take time to look at the CGI program and see where these variables are defined. This is a powerful Perl feature. You can reference variables that are never set. If they are not set, they do not print anything, and they do not create an error as they would in most traditional programming languages.
Using a Database with Your CGI Program
I have covered quite a bit in the last two chapters. You now should know how to encode and decode data, use variables, and read from a file. Now it's time to make your CGI program work with a simple database file.
Working with a database file means that your program doesn't have to change whenever the data changes. The program in Listing 5.6 has to be modified every time a price changes. That is a lot of extra, unnecessary work.
You already know how to read files; all that's necessary is to add a file with the correct data in it. Then your program can send the correct data back to your client without ever being updated. In its basic form, that's all a database is-a file with some data that you read from and/or write to.
In the next section, I use pull-down menus to build a custom computer for a Web client. The price of the computer is calculated by reading from a formatted file. I include the actual file data in this example so that you can see the working solution from beginning to end.
In the next section, you'll learn about the HTML Select tag, the Perl special input characters <>, and some tricks for using data inside your code.
Using Pull-Down Menus in Your Web Page Forms and Scripts
A pull-down menu compacts lots of information into a small space. When your user clicks on the down arrow, he is presented with a menu of choices where only one was visible before. This lets you build a form with lots of information that doesn't have to crowd the data into one small screen.
Using the HTML Form Select Tag
You create pull-down menus by using the HTML Form Select tag. The Select tag has multiple options that act much like radio buttons. Like the radio button, the Select tag has a single name for all its possible values. Unlike the radio button, you can select more than one item by adding the Multiple attribute for the Select tag.
The data passed to your CGI program from the Select pull-down menu is identical in format to the radio button. But the syntax of the Select tag is quite different. First, the Select tag is not part of the Input type group. Next, like other HTML tags, it has an opening Select tag and a closing Select tag. What goes between those tags defines what appears on the pull-down menu.
The Select pull-down menu can operate just like a radio button, with only one menu item at a time being selectable. Or you can allow multiple items to be selectable by adding the Multiple attribute to the opening Select tag, Select Multiple.
Using the Option Field
You can think of the Option field as similar to the Value field of the radio button. The Option field defines the visible items of the pull-down menu. Each new Option field makes a new item on the pull-down menu. Unlike the radio button, the visible item also can be used as the value sent to your program. You also have the option of giving each of your menu options a "value" that is different from the visible menu selection. To do this, just add the Value field to the Option field. If the Value field is not defined, the text after the Option field becomes the "value" portion of the name/value pair passed to your CGI program. Figure 5.5 shows a working example of the pull-down menu that uses the Option field.
Figure 5.5 : A working pull-down menu.
Listing 5.9 summarizes the format of the Select tag.
Listing 5.9. The HTML Form
Select tag.
1: <SELECT NAME="some_name"> <OPTION> name1 <OPTION> name2 </SELECT>
2: <SELECT MULTIPLE NAME="some_name"> <OPTION> name1 <OPTION> name2 </SELECT>
Listing 5.10 shows the HTML required for the pull-down menus shown in Figure 5.5. Any one of these pull-down menus could be made into multiple selection pull-down menus by adding the Multiple attribute to the Select tag, as shown on the second line of Listing 5.9.
Listing 5.10. HTML for creating pull-down menus.
01: <h3> Or Build your own  </h3>
02: <form method="post" action="/cgi-bin/accn_build.cgi">
03: <table>
04: <th> CPU <th> Memory <th> Hard Disk <th> Video Card <th> Monitor <th> CD ROM
05: <th> Modem
06: <tr>
07:
08: <td>
09: <select name="cpu" >
10: <option value="P100"> Pentium 100
11: <option value="P75"> Pentium 75
12: <option value="P60"> Pentium 60
13: <option value="486d66"> 486 DX2 66
14: </select>
15:
16: <td>
17: <select name="memory" >
18: <option value="32 MEG"> 32 Meg Memory
19: <option value="16 MEG"> 16 Meg Memory
20: <option value="8 MEG"> 8 Meg Memory
21: <option value="4 MEG" > 4 Meg Memory
22: </select>
23:
24: <td>
25: <select name="disk" >
26: <option value="1 GIG IDE"> 1 Gig IDE
27: <option value="850 IDE"> 850 Meg  IDE
28: <option value="560 IDE" > 560 Meg IDE
29: </select>
30:
31: <td>
32: <select name="video" >
33: <option value="4 MEG">  4 Meg  card
34: <option value="2 MEG">  2 Meg  card
35: <option value="1 MEG"> 1 Meg  card
36: </select>
37:
38: <td>
39: <select name="monitor" >
40: <option value="17 INch"> 17 .28 NI
41: <option value="15 INch"> 15 .28 NI
42: <option value="14 INch" > 14 .28 NI
43: </select>
44:
45: <td>
46: <select name="CD-ROM" >
47: <option value="4X CDROM"> Quad Speed
48: <option value="2X CDROM"> Double Speed
49: <option value="NONE" > NONE
50: </select>
51:
52: <td>
53: <select name="modem" >
54: <option value="28.8 MODEM"> 28.8
55: <option value="14.4 MODEM"> 14.4
56: <option value="NONE" > NONE
57: </select>
58:
59: <tr>
60: </table>
61: <input type="submit" value="Get Current Price">
62: <input type="reset">
63: </form>
64: [ <A HREF="http://www.accn.com">
65:   <img alt="Austin Computer Center "
66:   src="home.gif" border=1 A>  |
67: <A HREF="pindex.asp"> Parts Index   </A>   |
68: </body>
69: </html>
Lines 9-14 define the pull-down menu for the computer choices of this form. The first option in the select list is the default option. You can choose a different option as the default displayed, however, and you can choose the selected value by adding Selected to the Option field of the HTML Select tag. If you want the 8MB memory to be the default option even though it isn't at the top of the list, change line 20 to look like this: <option value="8 MEG" SELECTED> 8 Meg Memory
The default option is displayed after your client clicks the Reset button or loads your Web page. Just like with the radio buttons, it is an error to have more than one option selected for single-choice menus.
Also notice that I have given an explicit "value" to each of the options. This makes it easier for my CGI program. I use some shorthand for my program to check against, and I use easy-to-understand text for the pull-down menu. If you do not use the Value attribute of the Option field, it is not an error. The text after closing the Option tag (the >) is displayed on your pull-down menu and used as the value sent to your CGI program.
Using File Data in Your CGI Program
This is where you get to learn how to work with a simple database. In this case, you will work with one file that has some data in it. But don't be underwhelmed by this. A database program does no more than work with one or more files. This is a foundation you can take as far as you want.
In this example, you will examine reading from a file and using the data passed from pull-down menus in a little more sophisticated manner. The CGI program in Listing 5.11 handles the data sent by pull-down menus. It is similar to the CGI program in Listing 5.10, so I will just go over the new features.
Listing 5.11. A CGI program for managing pull-down menu data.
01: #!/usr/local/bin/perl
02: push(@Inc, "/cgi-bin");
03: require("cgi-lib.pl");
04:
05: &ReadParse(*input);
06: open($PRICE_FILE, "../systems/sys2.txt");
07: while (<$PRICE_FILE>) {
08: chop;
09:($item, $price) = split(/:/,$_,2) ;
10: $price_list{$item} = $price ;
11: }
12:
13: #Determine the base price based on the system variable
14: $price = $price_list{$input{'cpu'}};
15:
16: if ($input{'cpu'} eq "486d66") {
17:    #set 486 only variables
18:    $computer_name = "486DX2-66";
19:    $video = "VLB";
20:    $price += $price_list{$input{'memory'}};
21:    $memory = $input{'memory'};
22:    }
23: else {
24:   #not a 486 must be pentium system
25:   $computer_name = "Pentium";
26:   $video = "pcI";
27:    $cache = "256K Cache" ;
28:    if ($input{'memory'} ne "8 MEG"){
29:       $price += $price_list{$input{'memory'}};
30:       }
31:
32:    if ($input{'memory'} eq "4 MEG"){
33:       $memory = "8 MEG";
34:       }
35:    else { $memory = $input{'memory'};}
36:
37:    if ($input{'cpu'} eq "P100"){$ptype = 100}
38:    elsif ($input{'cpu'} eq "P75"){$ptype = 75}
39:    elsif ($input{'cpu'} eq "P60"){$ptype = 60}
40:    }
41:
42: #add extra price for monitors over 14inch
43: $monitor = $input{'monitor'};
44: $price += $price_list{$input{'monitor'}};
45:
46: #add multimedia system
47: if ($input{'CD-ROM'} ne "NONE") {
48:    $price += $price_list{$input{'CD-ROM'}};
49:    if ($input{'CD-ROM'} eq "2X CDROM") {
50:       $multimedia="Double Speed MultiMedia System";
51:       }
52:    else {
53:        $multimedia="Quad Speed MultiMedia System";
54:       }
55:    }
56:
57: #add 14.4 modem price
58: if ($input{'modem'} ne "NONE") {
59:    $price += $price_list{$input{'modem'}};
60:    $modem = $input{'modem'};
61:    }
62:
63: #add disk price
64: $price += $price_list{$input{'disk'}};
65: $DISK = $input{'disk'};
66:
67: #add video
68: $price += $price_list{$input{'video'}};
69: $VIDEO = $input{'video'};
70:
71: print &PrintHeader;
72: #print <$in1>;
73: print<<"print_tag";
74: <html>
75: <head>
76: <title>$computer_name Systems from Austin Computer Center North </title>
77: </head>
78: <body>
79: <h1 align=center> Austin Computer Center North <br>Austin Texas! </h1>
80: <center>
81: <img src="/accn.jpg" align=left>
82: <table border=5>
83: <th colspan=2 align=center> <h2>
84: ${computer_name} $ptype for only \$$price
85: </h2>
86: <tr><td> <ul>
87: <li>$memory of Ram
88: <li>$cache
89: <li>Enhanced IDE In/Out Controller
90: <li>$monitor NIL SVGA Monitor
91: <li>$VIDEO $video SVGA Video Card
92: <li>$multimedia
93: </ul>
94: <td> <ul>
95: <li>1.44 Floppy Drive
96: <li>$DISK Hard Drive
97: <li>Mouse
98: <li>Windows 95
99: <li>$modem
100: </ul>
101: <tr>
102: <td align=right colspan=2> <h2> 1 YEAR WARRANTY PARTS & LABOR! </h2>
103: <tr>
104: </table>
105: </center>
106: </body>
107: </html>
108: print_tag
Opening a File
On line 6 of Listing 5.11, open($PRICE_FILE, "../systems/sys2.txt");
the file that contains the current prices of computer systems at AccN is opened for reading.
You can open a file for reading, appending to, or writing. Be careful, though; opening a file for writing destroys the contents of any old file with the same filename. Think of opening a file for writing as creating a new file. The default is to open for reading, so the read symbol (<) is not required. The write symbol (>) opens a file for writing and destroys any data that was previously in the file. If you want to add data to a file, open it for appending (>>). This adds any data you write to the end of the file. These symbols go just before the filename; in this example, it can be written as the following: open($PRICE_FILE, "<../systems/sys2.txt");
Use this statement to write to a file: format printf(FILE-TO-WRITE-TO FORMAT-STATEMENTS, DATA);
Reading Formatted Data
When you read from a database, you are reading from some type of formatted data. In this simple model, you read in one line of data at a time and then interpret that line.
Line 7 of Listing 5.11, while (<$PRICE_FILE>) {
reads one line at a time from the file. The <> symbols are used to read input until an end-of-file (EOF) character is read. The line of data is read into the special Perl symbol $_. The next lines operate on the $_ symbol.
The $_ is another of Perl's special variables. The $_ is the default variable for data input and pattern-matching functions. If you look at other Perl programs and can't figure out what variable the code is operating on, it's probably $_. The Perl chop function uses the $_ by default.
The chop function is one of Perl's handy, built-in functions. It removes the last character of a string. You'll find it used in all kinds of Perl functions to get rid of the CRLF (newline) character at the end of reading an input line.
Using Formatted File Data
Line 9, ($item, $price) = split(/:/,$_,2) ;
uses the $_ explicitly as the input expression. This line looks a lot like the split function in the ReadParse function of the cgi-lib.pl library. One difference is the split pattern :-I use this to allow formatting of the file data. The file data is formatted to work with the name/value pairs coming from the form page and to be displayable as the data displayed on the Web page, which is generated on-the-fly from the CGI program.
Line 10, $price_list{$item} = $price ;
builds an associative array. This array is indexed by the variable $item and contains the value of the $price variable. Listing 5.12 contains the data in the file. The $price and $item variables are set by reading the file data on line 9. This is really the crux of making the file, your CGI code, and your Web page form work together.
If you look at this closely, you will see that the data to the left of the colon (:) matches up with the input form values from the pull-down menus. And it matches up with most of the data displayed back to the client, when the CGI generates the HTML on lines 74-108 of Listing 5.11. It should be clearer now why it is so crucial to design your form at the same time you are designing your CGI program. It all has to fit together, and it can make your CGI work a lot easier.
Listing 5.12. Pricing data used with the pull-down menu CGI
program.
P100:1799
P75:1550
P60:1450
486d66:1099
32 MEG:800
16 MEG:300
8 MEG:160
4 MEG:0
1 GIG IDE:175
850 IDE:110
560 IDE:0
4 MEG:320
2 MEG:120
1 MEG:0
17 INch:650
15 INch:200
14 INch:0
4X CDROM:290
2X CDROM:190
NONE:0
28.8 MODEM:139
14.4 MODEM:69
NONE:0
Using Data to Make Your CGI Programming Easier
Notice that on line 14 of Listing 5.11, $price = $price_list{$input{'cpu'}};
I set the base price of the computer. I used several lines to do this in the first program. This time, my form passes a name/value pair that matches the data I read in from a file. The "value" of the name 'cpu' is P100, P75, P60, or 486d66. The data that contains the price is identical: P100:1799. The P100 in the file matches the P100 passed as part of the name/value pair (cpu/P100). The ReadParse function places the P100 value in the input array matched up to its name, 'cpu'.
Taken one step at a time, line 14 works like this:
- You read code inside braces or parentheses-{}[]()-from the "inside out." You start with $input{'cpu'}. $input{'cpu'} returns the value associated with the name cpu P100, in this case.
- So now, line 14 can be read as
$price = $price_list{P100}
The $price_list file was built from line 10. The P100 value read from the file was 1799. - So now, line 14 can be read as $price = 1799.
I use this format (whenever I can) throughout this program. It means a lot less code for me, and when I want to change prices, I just change the file instead of the Perl code. I also use the values passed from my form as part of the HTML generated by my CGI program. Line 21, $memory = $input{'memory'};
is a good example. I just take the value passed to me with the 'memory' name/value pair and redisplay it on line 87, <li>$memory of Ram
Figure 5.6 shows the Web page generated by this CGI program and this input data.
Figure 5.6 : Results from the pull-down menu program.
So there you have it. A few simple tricks and your code becomes data driven. This is easier to maintain, because the data that makes your code work isn't scattered all over your code. It's located in one easy-to-maintain file.
Learning Perl
This morning's "Learning Perl" section tackles two programming tasks that seem to be taken for granted. When I started programming, I found it really frustrating that you just seem to be expected to know how to read from and print to the command line. So, today, I hope to eliminate some of those frustrations before they happen to you. Reading from the command line and printing to files and the terminal are something you do every day. So I think that you should spend some time learning about these common programming tasks.
When you read from the command line, you use an array variable called @ARGV; Perl provides several helper variables that make reading from the command line easier. After you work through the following exercises, you'll have a much better understanding of how data gets into your program from the command line.
The print statement is one of those common commands that you just have to know about. You'll use it for debugging and communicating with the user of your program. Here, in one simple section, are the basics of using the print command. By the time you're done with this "Learning Perl" section, you should feel more comfortable about getting data into your program and sending data out of your program.
Exercise 5.2. Using ARGV
In this exercise, you will learn how to read parameters passed
to your program from the command line. Most parameters passed
to your program will be read from one of Perl's special variables,
called @ARGV. @ARGV
is an array that is always available for your program's use. Perl
creates @ARGV when it loads
your program into memory or starts your program. @ARGV
contains anything typed on the same command line you used to start
your program. An example of this is shown here in a call to the
program in Listing 5.13:
> sub.pl old_value new_value file_list
| Note |
| C programmers expect argv(0) to be the program name. $ARGV[0] is not the program name in Perl. $ARGV[0] contains the first command-line argument rather than the name of the program. In the preceding example, $ARGV[0] contains old_value. If you want the program name, use $0, which would contain sub.pl. |
Perl actually creates a set of variables to help with handling command-line arguments: @ARGV, $#ARGV, ARGV, and $ARGV.
The variable $#ARGV contains the number of command-line arguments in @ARGV. You already should expect this variable to exist. It is the same variable created for every array variable. Every array has an $#ArrayName variable that contains the number of elements in the array @ArrayName. Don't forget that this is the number of array elements minus 1. Arrays normally start with index 0, and $#ArrayName is the index to the last element of the array. So the total number of elements in the array is $#ArrayName + 1.
$ARGV contains the name of the current file when you are reading from the ARGV filehandle variable.
ARGV is the filehandle that is set when your program reads from a file list in the @ARGV array. Perl provides some special syntax to help you read through lists of files. You'll be introduced to that syntax during this exercise, and you'll learn more about reading and writing to files in Chapter 6's "Using Files with Perl" section.
When reading from a list of files using @ARGV, you do not need to include the filehandle ARGV between the input operator (<>), which you normally will use like this: <FILEHANDLE>. The ARGV filehandle, when used with the input operator (<>), can be written like this: <ARGV>-but it usually is written using the null filehandle <>. Just like a print statement that includes an implied $_ variable, Perl knows to look at the ARGV filehandle when it sees the <> null input operator
.
| Note |
| In case you're curious, ARGV comes from the C input variable argv, which stands for argument vector. So @ARGV is an array vector of arguments. |
The program in Listing 5.13 modifies one or more files by substituting the second parameter for the first parameter whenever it finds the first parameter in the file.
Listing 5.13. A substitution program.
01: #!/usr/local/bin/perl
02: if ($#ARGV < 2)
03:    {
04:     print<<"end_tag";
05:
06: # $0 opens a file for reading and changes a name in the file
07: # use: $0 OLD_NAME NEW_NAME FILE_LIST
08: #      param 1 is the old value
09: #      param 2 is the new value
10: #      param +2 is file list.
  There is no programatic limit to the number of files processed
11: # the original file will be copied into a .bak file
12: # the original file will be overwritten with the substitution
13: # the script assumes the file(s) to be modified are in the directory that
14: # the script was started from
15: # SYMBOLIC LINKS are NOT followed
16: end_tag
17:     exit(1);
18:    }
19:
20: $OLD = shift; # dump arg(0)
21: $NEW = shift; # dump arg(1)
22: # now argv has just the file list in it.
23:
24: while ($ARGV = shift)
25:    {
26: #    print "\n$ARGV is being skipped it is a sym link" if -l $ARGV ;
27:     next if -l $ARGV; #skip this file if it is a sym link
28:     print "\nprocessing $ARGV ...";
29:     $count = 0 ;
30:     open(INFILE, $ARGV);
31:
32:     while (<INFILE>)
33:        {
34:     $count++ ;
35:         print "." if (($count % 10) == 0);
36:
37:         if ($ARGV ne $oldargv) #have we saved this file ?
38:            {
39:
40:     #       print "$ARGV\n"; #$ARGV is one of those magic perl variables
41:     # it contains the name of the current file when  reading from <ARGV>
42:     # which can be encrypted as <>
43:            rename($ARGV, $ARGV . '.bak'); #mv the file to a backup copy
44:            $oldargv = $ARGV ;
45:            open (OUTFILE, ">$ARGV");# open the file for writing
46:            }
47:     #    print ;        #DEBUG
48:         s/$OLD/$NEW/go;# perform substitution
49:                        # o - only interpret the variables once
50:         print OUTFILE; #dump the file back into itself with changes
51:     }
52: }
53:
The program in Listing 5.13 is a program I use in my regular working environment. It is commented to remind me, or anyone else who might use the program, how the program works. Lines 2 through 18 don't make the program work-they provide information on how the program is supposed to be called from the command line and what the program's func-tion is.
Commenting a program-describing its use and function-is really
a good habit to get
into. If you are going to let other people use your code or you're
planning on using it over an extended period of time, take the
time to document how the code should be called and what it does.
Line 2, if ($#ARGV < 2)
verifies that the minimum number of arguments is passed to this program when it is invoked from the command line. Remember that $#ARGV is an index into the last array cell of @ARGV, which is also a count of the number of elements in the array. In order for this program to work, it must have at least three arguments:
- The old value to be replaced is in $ARGV[0].
- The new value to be substituted for the old value is in $ARGV[1].
- The filename that the program (sub.pl) should operate is in $ARGV[2]. If there is more than one filename, the additional filenames will be in subsequent array cells of @ARGV.
If there are not three arguments, $#ARGV will be less than 2 (not 3, because $#ARGV starts counting from 0), and the information message on lines 6-15 will be printed.
Take note of the $0 variable on lines 6 and 7. The shell (UNIX) actually places each of the command values into separate variables, starting at $0. $0 represents the command used to invoke or start the program. You could have used the program name on lines 6 and 7 instead of $0, but this is a better solution.
If you or someone else renames the program or creates an alias for the program, $0 will contain the new name or alias. When this informational message is printed, the aliased name is printed to the user. If you use a hard-coded value, the original program name always is printed instead of the name the user used to invoke the program.
When the program is called incorrectly, it prints its informational message and then exits on line 7.
Lines 20 and 21 perform dual functions. First, the old and new values to be modified are saved into the variables $OLD and $NEW, which are used later in the program. Just as important, however, the @ARGV array is modified by the shift command.
The shift command can operate on a normal array when called as shown here: shift(@ArrayName);
Whenever the shift command is not given an argument as on lines 20 and 21, it operates on the @ARGV array. Just as its name indicates, shift shifts every element in the array down one element. Element 0 is shifted out of the array.
So, for a three-element array,
- Element 1 becomes element 0.
- Element 2 becomes element 1.
- Element 0 is pushed out of the array.
- The three-element array is now a two-element array.
Element 0 can be saved into a variable, as shown on lines 20 and 21, as long as a variable is on the left-hand side of the assignment operator (=).
The @ARGV array needs to be modified so that it can be used as a file list. After the first two arguments are removed from the @ARGV array using the shift command, the remaining arguments are supposed to be a list of files.
Lines 24-32 take advantage of the conversion of @ARGV to a list of files. Lines 27-29 are used to do some special processing, but if you don't need the processing on lines 27-29, you can replace lines 24-32 with the following single statement: while (<>){
That's right-this one statement serves exactly the same function as these lines of code: while ($ARGV = shift){ open (INFILE, $ARGV); while (<INFILE>){
If you're not a Perl programmer, though, while(<>) is as clear as mud. I could look at while(<>) all day long and never come to the brilliant conclusion that
- The @ARGV array is being shifted one array cell at a time.
- The shifted element of @ARGV is being stored into $ARGV.
- $ARGV is being used to open the filehandle ARGV.
- Each line of the file is being read into the $_ variable, until all lines have been read.
- The file is being closed when ARGV is used to open the next file, when step 1 is repeated.
Somehow, all that just isn't obvious to me. So I figured maybe you would want to see it in long form also. After you get used to what while(<>) does, your code probably will start including this shorthand. I like to understand how that magic stuff works before I use it, though!
Lines 34 and 35 are used to give a little feedback to the user for long files. For every tenth line read from the file, a period (.) is written to the screen. This is accomplished inside the if conditional expression (count % 10).
The percent sign is used for modulo calculations. Essentially, this conditional expression divides $count by 10 and, if the remainder is 0, the test ==0 returns true.
Lines 37-46 are used to keep from overwriting the original file. Each time a new file is read, the conditional expression on line 37 evaluates to true. Line 43 saves a copy of the original file by renaming it as the original name plus the .bak extension. Line 44 saves the filename you just opened for the next time through the loop.
Line 45 reopens the input file for output. Because INFILE is a filehandle to a file already open, the data in the old file still can be read. If the file had not been opened for reading first, line 45 would have destroyed the original file.
By studying this exercise, you should get a good understanding of the different methods Perl uses with @ARGV to help you read arguments from the command line.
Printing with Perl
Printing seems to be another one of those things that everyone takes for granted. So I guess you're just supposed to know about it through osmosis. Don't snicker. This is a tried-and-true method called on-the-job training. It's sometimes referred to as the blind leading the blind.
After you really start programming, you'll find that, when building a new program, you very seldom start from nothing. It's a lot easier to start with some old code-yours or someone else's-and then modify the old code to meet your current needs. So lots of people end up using and writing code that they don't fully understand. Sometimes it's quite practical not understanding all your code, but you really should know the basics. Osmosis will work, it's just real slow. So, in this section, you'll learn the basics of the print command.
Let's start with that stupid \n at the end of lots of print commands. The \n is a control character that is part of the ASCII character set. The print command interprets the ASCII control character (\n) as a newline character. So whenever print sees an \n, it skips down one line and starts printing at the left margin.
This also can be done by using the carriage return and the line-feed
control characters together. You'll probably only use the newline
character (\n), but Table
5.1 lists some of the more common control characters used with
the print command.
| Meaning | |
| Backspace | |
| Form feed | |
| Newline | |
| Return | |
| Tab |
Okay, that was simple. Now take a look at another simple command, illustrated in Listing 5.14.
Listing 5.14. The magic print
command.
1: while(<>){
2: print;
3: }
"Would someone PLEASE tell me what is going on here?" At least that's what I said the first time I saw this statement. This felt like reverse osmosis to me. Everything I knew was being sucked out of my brain. AAARRRGH!
As you'll learn from Exercise 6.1, the paired angle brackets (<>) read a single line from a file. When placed inside the conditional expression of a while loop, the file is read one line at a time until all the lines of the file are read. But what the heck is print PRINTING?
Replace line 2 of Listing 5.14 with this and see what happens: print STDOUT $_;
Line 2's print;
actually is print STDOUT $_;
That really twisted my knickers the first time I figured that out. So here's what's happening.
The syntax of the print command is print FILEHANDLE LIST;
You might see lots of variations of this, but, essentially, they are all the same. When FILEHANDLE is missing, and you see print "something";
the print command is printing to the selected output file. It just so happens that the FILEHANDLE STDOUT, which is usually your computer monitor, is selected by your computer if you don't select a filehandle for it. So, by default, the print command prints to your monitor. You can change where print directs output by adding a valid open FILEHANDLE, as shown here: open(OUTPUTFILE,">/temp/test"); print OUTPUTFILE "This is a test\n";
If you want to print to a file but don't want to include FILEHANDLE in the print command, you can select the FILEHANDLE you want print to send your data to like this: open(OUTPUTFILE,"/temp/test"); select(OUTPUTFILE); print "this is another test\n"; select(STDOUT);
The select statement sets the default output device and all references to the default output to the filehandle supplied to it. Now you know the first half of why line 2 in Listing 5.14 works. Now for the rest of the story.
When reading from a filehandle, $_ is the default storage variable. The statement while(<>) actually is reading data into the default storage variable $_. The statement while(<>) is equivalent to while ($_ = <>). When you're printing and you omit any output data, the print command uses the $_ variable as the data source.
According to the Perl magicians, there is some underlying reason for the naming of the $_ variable, but I think someone just liked cryptic code. If you want to learn more about the $_ variable and other Perl special variables, refer to the section "Using Perl's Special Variables" in Chapter 7.
Just as a reminder, these lines of code can be used to replace line 2 of Listing 5.14: print; print STDOUT; print $_; print STDOUT $_;
Summary
In this chapter, you learned how to decode data, work with formatted files, and build Web page forms with radio buttons and pull-down menus. I include the major topics of discussion in the following list. You can use this list in the future to refresh your memory on each of the rules discussed in this chapter.
The basic rules of radio buttons follow:
- The radio button forces a choice of one among several options.
- When you define your name/value pairs, all the names of a set of radio buttons should be the same.
- Your Web page client should be making a choice among several things, but only one choice is valid at a time.
- You can preset which radio button will be selected by adding the Checked attribute to the HTML Radio tag.
Here are some other things you might want to keep in mind:
- The ReadParse function is used to decode incoming data from your Web page form.
- All variables in Perl begin with a $, @, or %. The $ refers to strings or numbers. The @ refers to arrays indexed by numbers. The % refers to arrays indexed by strings.
- The split function searches for a pattern in an input string and has this syntax:
split(/pattern/,$variable,field_limit)
- The curly braces of an associative array are used to both create and reference associative array elements.
- The first time a new element is assigned to an associative array, that element is added to the array.
- If the element already exists in the associative array, the contents of the array are modified with the new value.
- The Perl read function
reads from a file into a variable you define for the length of
the input string
read(READ-FROM-FILE HANDLE, READ-INTO, LENGTH-TO-READ) - The @Inc array contains the list of places to search for Perl programs. It always starts with the default Perl directory and the current directory as search paths.
- Checkbox data is passed to the server only if the checkbox is selected.
- You create pull-down menus by using the HTML Form Select element.
- The Option attribute defines the visible items of the pull-down menu.
- Opening a file for writing destroys the contents of any existing file with the same filename.
| Tip |
| Don't rename the Reset button. It's common to want to customize your menus to make them unique and show off your skills. But, in this case, it's bad style to relabel the Reset button. Notice that the programs you are used to and comfortable with have a similar layout as you move from window to window. The Reset button is one of those buttons that gives your clients some level of familiarity and comfort with your Web site. This button always should be labeled Reset and always should perform the default action. |
Listing 5.15. An HTML fruit fragment. 1: <select name="fruit" > 2: <option value="tomato"> Tomato 3: <option value="banana"> Banana 4: <option value="avocado"> Avocado 5: <option value="pomegranate"> Pomegranate 6: </select>
Q&A
| You never mentioned the Reset button in Listing 5.1 and Figure 5.1. How does it work? | |
| The Reset button is really a special case for Form elements. All other Form elements in some way are designed to send data entered by your Web client to your CGI program. The Reset
button's job is not to send data but to change all the values on a form back to their default conditions.
In particular, for the radio button, the individual radio button that has the Checked attribute becomes selected. With pull-down menus, the pull-down option that has the Select attribute is selected. For text fields, the field first is cleared and then, if there is any default data, it is displayed in the text window. The same is true for all the other input types of the form that have default values. The Reset button sets the value back to whatever is defined as the default value for each form element. If the form is submitted after the Reset button is clicked and before any other changes have occurred on the form, only the default data is transferred to the CGI program identified in the Action field. | |
| Why is the radio button called a radio button? | |
| Picture your car radio. Imagine that you press one of the preset radio station buttons on the tuner. What happens? A new radio station is selected and the previous radio station is deselected. Any noise
or stations between the new radio station and the old radio station are ignored. You only get what you selected and none of the garbage between.
Now think of how the radio buttons work on your HTML form. You only get what you allow your Web page client to select. And whenever a selection is made, the previous selection is deselected. Just like your car radio. By the way, the term radio button did not begin with HTML forms. Radio buttons and pull-down menus are terms that have been used by Human Control Interface (HCI) designers for years. HCI designers also are called Graphical User Interface (GUI) designers. They are responsible for the look and feel of a program's interface with the human user. | |
| What does creating Web pages on-the-fly mean? | |
| This is one of those Internet terms that just doesn't seem to be defined anywhere. But it sure is used a lot. Creating Web pages on-the-fly simply means that some of the data returned after a client clicks on a link or submits a form is generated when the called URI is returned. This can be as simple as adding the current date to your Web page or as complex as generating a completely new Web page full of variable data and different HTML based on what data was sent with the form. | |
| How do I use the data sent by a multiple pull-down menu selection? | |
| You might think that you would have to go to a lot of extra effort to get at the multiple name/value pairs sent to your CGI program from a pull-down menu with the Multiple attribute. Or you
might think that you could lose information because all the names of a pull-down selection will be the same in the name/value pairs sent to your CGI program.
Happily for everyone who uses the ReadParse function, ReadParse deals with name/value pairs in which the names are the same-cleanly and simply. Line 27 of Listing 5.3 does all the magic for you: This line was discussed when you were stepping though the code of ReadParse. Each time a name is parsed by ReadParse, it is checked against the other names in the %in array. If the name already is defined (exists) in the %in array, the value is placed into the array, but only after the special string terminator "\0" is inserted. For multiple selections, each selection is available using the Select element's Name attribute. Each value of the Option field is separated by an "\0". So, if you have a pull-down menu made up of fruit, such as the one in the HTML fragment shown in Listing 5.15, and all the options are chosen, referencing the %in array as $in{'fruit'} yields this string:
$in{$key} .= "\0" if (defined($in{$key})); # \0 is the multiple separator You can extract each of the values of the fruit string by using the split function with a pattern of "\0". This splits the string into an array of separate fruits, which you then can access one at a time. |


Popular Tutorials
-
 MS Access
1109
MS Access
1109
-
 C++
1222
C++
1222
-
 HTML
584
HTML
584
-
 JavaScript
616
JavaScript
616
-
 Vbscript
873
Vbscript
873
-
 Oracle
473
Oracle
473
-
 VC++
875
VC++
875
-
 SQL
2959
SQL
2959
-
 XML
514
XML
514
-
 Java
814
Java
814
-
 Perl
455
Perl
455
-
 Linux
451
Linux
451


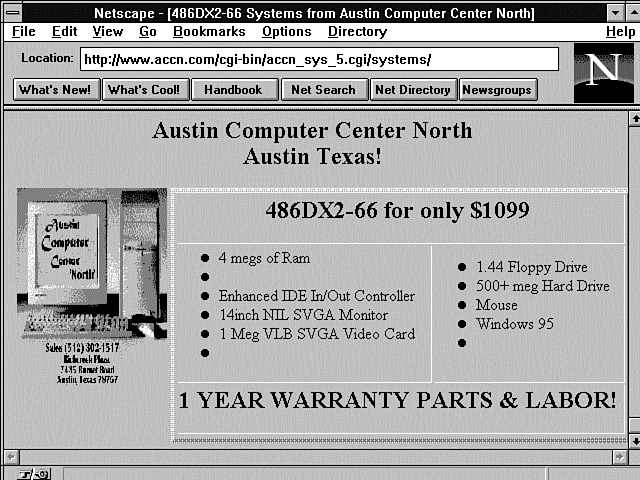
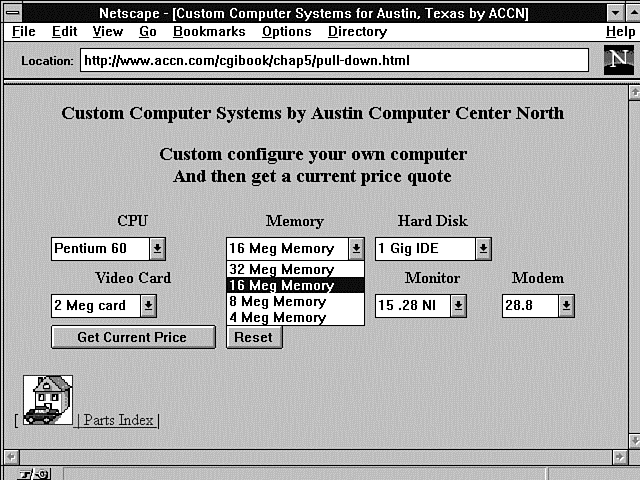