CMS Browser
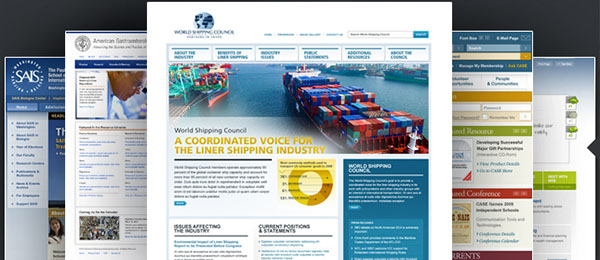
Powerful CMS, building and editing a website just got much easier for everyone involved.Application overview
Browser CMS is a general purpose, open source Web Content Management System (CMS) that supports Ruby on Rails v4.0. It can be used as a standalone CMS, added to existing Rails projects or extended using Rails Engines. It is designed to support three distinct groups of users:Non-technical web editors who want a humane system to manage their site, without needing to understand what HTML or even Rails is. Designers who want to create large and elegantly designed websites with no artificial constraints by the CMS. Developers who want to drop a CMS into their Rails projects, or create CMS driven websites for their clients.
Easy to Use and to Customize
Take back your websiteBrowser CMS is easy for anyone to use, and is at once familiar.
- Browse by an intuitive sitemap of folders and pages
- Search for content, or browse by content type
- No IT degree required
Browser CMS gives you complete design freedom to develop a unique look and feel.
- If you can dream it, you can build it in Browser CMS
- Easily extend functionality with our APIs
- Dozens of pre-built modules available
Built by a commercial CMS company, browser cms offers the quality you'd expect from a commercial product.
- No more vendor lock-in
- Available support packages
- Best of all: It's free
CMS Browser Main Features
The application is intended to offer features comparable to commercial CMS products, which can support larger teams of editors. This means having a robust set of features as part of its core, as well as the capability to customize it via modules.- Here's a quick overview of some of the more notable features:
- Standalone CMS: Browser CMS is designed to provide a robust CMS capabilities out of the box for content heavy web sites. Mobile Friendly: Sites can be built to use mobile optimized designs that are optimized for small screens, with low bandwidth, with responsive design.
- In Context Editing: Users can browse their site to locate content and make changes from the page itself.
- Design friendly Templates: Pages aren't just a template and giant single chunk of HTML. Templates can be built to have multiple editable areas, to allow for rich designs that are still easy to manage by non-technical users.
- Highly Extensible: Developer have access to the full Rails development stack, and can customize their project by adding their own controllers, views as well as CMS content types.
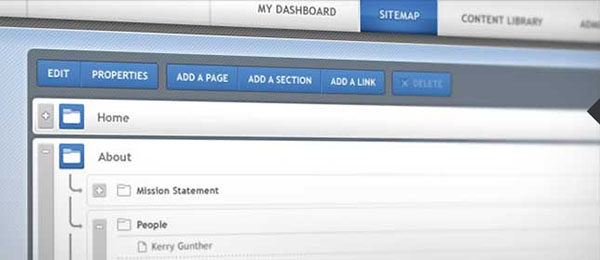
- Sitemap: An explorer/finder style view of sections and pages in a site allowing users to add and organize pages.
- Content Library: Provides a standardized 'CRUD' interface to allow users to manage both core and custom content types.
- Content API: A set of behaviors added to ActiveRecord which allow for versioning, auditing, tagging and other content services provided by the CMS.
- Section Based Security: Admins can control which users can access specific sections (public users), as well as who can edit which pages (cms users).
- Workflow: Supports larger website teams where some users can contribute, but not publish. Users can assign work to other publishers to review.
- Page Caching: Full page caching allows the web server (Apache) to serve HTML statically when they don't change. CMSify your Rails App: Browser CMS can be added to existing Rails applications to add content management capabilities.
Why a Rails CMS
A scalable and productive website requires the ability to add new features and a simple way to keep content up to date.Rails Browser CMS combines the best of two worlds. Developers can use the highly productive Ruby on Rails framework to extend and add features. Editors can use the browser cms user interface to keep content up to date.
Benefits of Rails-Based CMS
Extendable using Rails conventions.
Provides commonly requested CMS features, saving time over custom projects.
Makes simple sites easy and complex ones possible, using one API.
Modules
Modules are the easiest way to create and share new features between BrowserCMS projects. By creating new modules to extend the functionality of the core BrowserCMS project, the community can help make developing web sites faster and easier through reusable code.Below is a list of available modules that you can add to Browser CMS projects. It’s not an exhaustive list.
In addition to listing some of the more frequently used modules, this list covers version compatiblity to make sure you can easily figure out if there is a version of the module you want available for your version of Browser CMS.
Module List
In most cases, BrowserMedia is maintaining the modules listed below, though some notable exceptions are also listed.
| Name | 3.1 | 3.3 | 3.4 | 3.5 | Priority | Notes |
|---|---|---|---|---|---|---|
| bcms_news | ✓ | ✓ | ✓ | High | ||
| bcms_google_mini_search | ✓ | ✓ | ✓ | High | ||
| bcms_blog | ✓ | ✓ | ✓ | Medium | ||
| bcms_content_rotator | ✓ | ✓ | ✓ | High | ||
| >bcms_webdav | ✓ | ✓ | Medium | |||
| bcms_polling | ✓ | ✓ | Medium | |||
| bcms_download | ✓ | Medium | ||||
| bcms_settings | ✓ | ✓ | ✓ | High | ||
| bcms_seo_sitemap | ✓ | ✓ | ✓ | High | ||
| bcms_cas | ✓ | ✓ | ✓ | High | ||
| bcms_event | ✓ | ✓ | ✓ | High | ||
| bcms_rankings | ✓ | ✓ | Medium | |||
| bcms_page_comments | ✓ | ✓ | Medium | |||
| bcms_fckeditor | ✓ | ✓ | ✓ | Medium | ||
| bcms_kcfinder | ✓ | Medium | ||||
| bcms_content_syncing | ✓ | Medium | ||||
| bcms_netforum | ✓ | ✓ | Medium | Commercially licensed. For netFORUM Enterprise integrations | ||
| bcms_netforum_ondemand | ✓ | ✓ | Medium | Commercially licensed. For netFORUM Pro integrations (Team has no xweb api) | ||
| bcms_bmedia_feeds | ✓ | ✓ | Medium | Updated fork of the original module | ||
| bcms_aws_s3 | ✓ | ✓ | Medium | Updated fork of the original module |
Table Legend
Priorities
- High – Somebody needs asap
- Medium – Used frequently. Needs to get done eventually
- Low – Rarely used. Candidate for deprecation
Versions of Browser CMS
- 3.5 – Rails 3.2.x compatible
- 3.4 – Rails 3.1.x compatible
- 3.3 – Rails 3.0.x compatible
- 3.1 – Rails 2.3.x compatible
Installation
The best way to get Browser CMS is to install it as a Ruby Gem. Before you get started, there are a few prerequisites. You should have the following software installed:The Ruby Language (1.9.2 or later)
Ruby Gems - The package management system
Rails - The web framework
A Rails friendly database - Either MySQL or SQLite along with the appropriate RubyGems.
Once you have RubyGems installed, you can install the latest version of Browser CMS via the following command line script.
$ gem install browsercmsOnce Browser CMS is installed, you can create new projects using the browser cms command line program.
$ bcms new project_name
- Install the browser cms gem
- Create a demo project to explore browser cms
- Create a blank project for building a website from scratch
This Guide Assumes
Before you can create a project using browser cms, you will need to have the following installed.
- The Ruby Language (Version 1.9.2 or later)
- The Rails framework (use “gem install” instruction below)
- A working installation of SQLite or MySQL as well as the gems for your database of choice.
- (As of v3.5.0) A working copy of ImageMagick (for processing file uploads). See ImageMagick for general install instructions. We recommend using Homebrew for Mac users to install it.
Starting a demo project
This section of the guide will cover creating a sample website with browser cms, using a demo website layout and content.
The goal is to give you some content and templates to play with to explore the CMS. Later sections of this guide will
cover the more common cases where you are creating a new website from scratch and want only the bare minimums.
Installing browser cms
browser cms is packaged as a gem which can be included in any Rails project. To install the gem, do the following:
$ gem install rails -v 3.2.13 # Or latest 3.2.x version
$ gem install browser cms
Note: You must install the compatible 3.2.x version of Rails first. browser cms will not work with Rails 4.0 (yet!)
Creating a Demo Website
Run the following from your terminal window.
$ bcms demo project_name
$ cd project_name
$ rake db:install
$ rails server
If you are seeing an error containing “Could not find table ‘users’”, run
rake cms:install:migrationsIf you are running 3.5.x there is a temporary work around for an existing issue, AFTER running rake db:install, prior to starting the server run:
$ rails g cms:template default
This will create a browser cms project which used SQLite as the data storage. You need to have the sqlite3-ruby gem installed for this to work.
Using your Site
Open your browser to http://localhost:3000/cms to log into the admin for the CMS. Enter the default username/password (in development mode) is username=cmsadmin, password=cmsadmin. You should be now be logged in, viewing the home page of the site. You can now edit or add new content via the admin interface.
To learn more about the types of things you can do with browser cms, see the User's Manual.
Starting a ‘Real’ project
Demo sites are fine for learning the ropes, but when its time to start working on a ‘real’ project, you don’t want a lot
of dummy data that needs to be cleaned out. To start a typical, ‘blank’ project, you can run the following command. Here
we will specify the -d flag, which will use MySQL as the database.
Run the following:
$ bcms new project_name -d mysql
$ cd project_name
$ rake db:install
$ rails server
If you are seeing an error containing “Could not find table ‘users’”, run
rake cms:install:migrationsIf you are running 3.5.x there is a temporary work around for an existing issue, prior to starting the server run:
$ rails g cms:template default
You need to have the mysql gem installed for this to work. This is going to create the development and testing copies of
the database, migrate the db, populate it with the bare minimum content it needs, and copy all of the necessary files
from the gem into the rails project. Open your browser to http://localhost:3000/cms to log in,
using cmsadmin/cmsadmin as the username/password.
Alternative command
There is a longer version of the command line script, which works identically to the shorter form detailed above.
$ browsercms new project_name -d mysqlNo difference in functionality, just slightly more to type.
Getting Command line Help
You can get assistance from the commandline tool by running the bcms command with no arguments, like so:
$ bcms
This will show common usages, as well as all the help options available. The browser cms command piggybacks on top of the
rails command, so many of the options available are the same as rails, including -f or —force.
Trouble Shooting
This section covers some potential problems you might run into when trying to create a browser cms project.
Creation fails to create MySQL Database
browser cms will attempt to create and populate the database when you invoke rake db:install. When running against mysql, Rails will assume you have a username called root with an empty password. The database create/migrations will fail if you don’t have that username/password set. If this occurs, you can update the config/database.yml with correct username/password before your run rake db:install
Deploying to Production
Once you get ready to start deploying your application into production environments, be sure to review the Deployment Guide. There are several ‘gotchas’ to be aware of that may differ from deploying other Rails applications.
Basic Concepts
There are several concepts which underly how Browser CMS works. To be productive, users of Browser CMS should ideally understand these ideas:
-
Pages – Visitors experience your site primarily via pages. Pages are really compound documents, consisting of more than one editable area of content. This allows for an intricate design, without needing to be edited via a single giant HTML area.
-
Content Blocks – Blocks are the most granular bits of content in a system. Pages usually have one or more blocks of content associated with them. Content blocks can be anything from a simple fragment of HTML, to a News Article (which might have multiple data fields like name, body and summary), to portlets, which dynamically display other types of content.
-
Portlets – Sometimes you don’t want to manually place all the content on your site. You want to set up some rules, so that when new content is entered, it appears in multiple places. Portlets are generally how that gets done. Portlets are really just a slightly special version of blocks, which generally query for other blocks, and then format them for display.
-
Sections – Each page lives in a section. Sections are the primary way pages are organized. Menus are usually dynamically constructed based off the hierarchy of sections and pages. Sections also handle security, where individual groups are allowed to see pages within a given section. Sections and pages can be reordered by using the Site Map tab.
-
Templates – Each page has a template, which governs the styles and layout for that page. A template will determine what areas of the page are editable, how many columns it has and how the navigation will work. A website will usually have multiple templates (i.e. Home Page and Subpage) which provide different layout choices for users when they create new pages.
-
Users and Groups – Security is handled via users and groups. A user might represent a ‘public’ user, who can access some sections of your website (like a ‘Members only section’). They might also be a ‘CMS’ user who has the ability to make changes to the content via the CMS editing tools. Each user can be part of multiple groups, which define what they can do, including editing pages, viewing content or publishing new pages.
Common Tasks
This section will cover some of the more frequent tasks that site managers will need to undertake in order to manage their website. For the purposes of this section, all examples assume a locally running copy of Browser CMS, accessed as http://localhost:3000. A site hosted elsewhere might be running at http://yourcms.yourcompany.com.
Logging into the CMS
To access that administrative portions of a CMS, you have to go to the admin login page. To do this, add /cms to your website’s URL. Working locally, this would be http://localhost:3000/cms. From this page, you can log in with your username and password. For a local site, this will be username = cmsadmin and password = cmsadmin. For a live site, this will have been randomly set during install.
After you log in, you will be sent to the dashboard (/cms/dashboard). The details of this page will be covered later, but the dashboard serves a summary of content in various workflow stages. From here, you can jump to other sections of CMS.
Editing the home page
To understand how editing pages in the CMS works, let’s jump over to the homepage. The quickest way to do that is to click on the Browser CMS logo in the top left. This will always take you to the home page for your site. When you visit a page in Browser CMS, and are logged in as editor, you will see the page exactly as a visiter would, with the addition of a toolbar at the top of the page. This toolbar gives you the tools/buttons necessary to make changes to pages, or jump to other CMS admin tabs.
In Context Editing
One of the key concepts to make page editing easier in Browser CMS is called ‘In Context Editing’. It allows you to browse the site as a visitor would, and then edit content directly on the page. By default, you can’t see the editable areas of a page (called ‘Containers’), because the Visual Editor is turned off. To show the containers, click the ‘Turn On’ button on the right side of the toolbar, which turns on the visual editor. You should now see the containers highlighted on the page. The templates for each page determine what areas of the page are editable. Clicking the ‘Turn Off’ button will hide the containers again, giving you a more accurate view of what the finished page will look like.
Containers
A container is marked by a box with a grey header, with several buttons on it. Each container has two controls, one to Add new content to that container (The + icon) and another to place existing content into the container. It also has a status indicator which shows if any content blocks in that container are in draft mode. Each container can hold zero or more content blocks.
Blocks
Each block within a container is marked with a grey border, and several buttons. Blocks can be edited, reordered using the up or down arrows, or removed from the page (which does not delete it).
Making changes
To edit some existing content, pick the block you want to edit, and click the ‘wrench’ icon. This will take you to the edit screen for that block. Most content blocks placed on pages are usually ‘Text’ blocks, which are just pure html content, with a name for organization purposes. On the ‘Edit Text’ page, you can change the name, or use the WYSIWYG editor to make changes to the content. If you want to edit the source html directly, you can change your editor preference with the toggle to the top right of the editor.
Once your edits are complete, you can save your changes using the Save button at the bottom of the page. This will return you to the page, where you can see how your changes look in context to the rest of your page. Your changes won’t be visible on the public site yet, so you can choose to make more changes. See the next section on how to publish changes.
Publishing pages
The basic rule of publishing is that all changes need to be published before they go live. This allows editors to always see how their page is going to look, before they decide to commit their changes. Any time you alter how a page looks, the CMS stores a new version of that page and all its content. This happens when you add a new block to a page, make an edit or remove a block from that page. Each time a change is made to content on a page, that page will go into ‘Draft’ status. As an editor, you will see the ‘latest’ version of that page, but the public will continue to see the last ‘published’ version of that page.
Each page has a status of either ‘Published’ or ‘Draft’. When you like how your changes look, and want to publish the page, push the ‘Publish’ button in the upper left hand corner of a page. This will makes your changes ‘live’ and visible to the world. When a page is published, each block on that page will also be published.
Adding a new page
To add new pages to a site, click on the Site Map tab from any where within the CMS admin. The Site Map page shows a tree with all the sections and pages in your site. From here, you can add new pages or sections, choose a page to edit, or reorganize the site using drag and drop to move sections around.
To add a new page, click on the ‘My Site’ section at the top of the site map. Then click the ‘Add Page’ button in the toolbar. This will add a new page to the root of the site. There are several fields to fill out the important ones are the name and templates. When you name a page, the CMS will generate a default relative URL (a path) for it. You can also choose a template via a drop down, which will show all available templates for the current site.
After filling out those two fields, you can click save to create the new page. After saving, you will be taken to that page, which will be blank, not having content blocks selected for it.
Adding new text content to a page
When viewing a page, you can add new content to it. First, make sure the Visual Editor is turned on, so you can see the containers. Find the ‘Add Content’ icon (+) on the container you want to add the new content to. You will then be able to choose what kind of content you want to create. Text is the most frequently used content type, and is essentially just HTML, including the ability to create links and include images.
Choosing Text will take you to the ‘Add New Text’ screen. The first field will prompt you for a ‘name’. This ‘name’ is used to help identify your content later, when you are looking for it in the Content Library. Naming Text blocks after the page they are going on is a common choice. The second field is ‘content’, which allows you to enter formatted text using a rich text (or WYSIWYG) editor. The editor has buttons for common formating options, like making text bold, copy/pasting of text (including from Microsoft Word) and creating links to other pages.
If you like, you can also change your text editor choice from \‘Rich Text\’ to \‘Simple Text’, which will allow you to edit the source HTML directly. This choice is saved as user preference, so next time you edit content, you will use the same editor you picked.
Adding images and files to pages
When creating content for pages, its a common task to add images or link to files (like PDFs) in the body of the text. There are two steps to adding an image or file to a page. First you need to upload the image/file to the content library. The second is to link to or place the image within a Text block. It is possible to directly place an image or file block into a container (via the ‘Add New Content’ option we talked about earlier) but this gives you less control over formating and placement.
Uploading files
To add an image or file to the content library, click the ‘Content Library’ tab, and then click the ‘Image’ or ‘File’ menu items on the left hand side. (These content types are under the ‘Core’ module, so you may need to click ‘Core’ to show all the content types) Next click ‘Add New Content’ on the main menu. From here, you can fill in all the details on your image/file, including the file on your local hard drive that you want to upload. One of the choices about creating Image and Files is which section they should be stored in. It’s a good idea to create one or more image/file galleries to keep your files organized.
After the file is uploaded, you can then place it on a page using a Text block.
Placing an image
To place an image, first find the text block that you want to edit (or add). Using the ‘Rich Text’ editor, click the ‘Insert/Edit Image’ button. Next click ‘Browse Server’, which will allow you to browse through all the images in your content library. This will popup a window which gives you a sitemap view of your site. You can drill down through the sections, finding which the one where you placed your image. Once you locate the image, click the image name to select it. This will add the path to the image to the ‘Image Properties’, and allow you to preview the image alongside the text. You can alter the image attributes (size and alignment) or just click ‘Ok’ to place the image.
At this point, the Rich Text editor should display the image embedded in the text. You can then save the Text block, and see how it looks on your page.
Placing a link to a file
Placing a file is very similar to placing an image. Select the Text block to edit, and click the ‘Insert Link’ button. On the ‘Link’ popup window, click the ‘Browse Server’ button. Using the Site Map browser, choose the file you want to link to, and then select it. This will paste the path to the file into the ‘Link’ window. Click ‘Ok’ to add the link to the Text block.
Finding a page to edit
Browser CMS features two ways to locate pages to make changes to. The first one is just browsing around the site, using the same navigation that your site users would. The second is the by using the Sitemap.
Navigating to find pages
When an editor is logged in, they can browse around the site using the same menus and links that a guest would. Each page will appear with a toolbar, which only editors see, which allows you to make changes to pages and their properties.
Using the Sitemap to find pages
The Site Map allows editors to see a more conventional ‘file and folder’ metaphor to browse through the structure of the site. Clicking the ‘Sitemap’ tab will take editors to this view. Once on the sitemap, editors can expand/collapse sections by clicking on the +/- buttons. They can drill down into each section, to locate the page they want to make changes to. Once the page is located, either select the page and click ‘Edit Page’ on the toolbar, or just double click the page name. Both take users to the ‘Edit Page’ view, which allows them to modify the page content.
Reverting a page
Mistakes happen. Sometimes you make a change to a page, and you don’t like how it looks, or you just want to go back to last week’s version. To roll back a page to an earlier version, you must first edit that page (either by navigating to or by the sitemap). Select the ‘List Versions’ button from the toolbar. This will show the complete history of the page, along with who made changes, when the change occured, and note about what change happened in that version.
To see what an older version looked like, select a version, and click ‘View’ on the toolbar. (Recommended Tip: Open the version in a new tab in your browser, by Ctrl-Click on PC, or Command-Clicking on Mac. This will let you compare several versions side by side.) If you like that version, you can revert to it in two ways.
From the ‘List Versions’ page, you can revert by selecting the version, then clicking ‘Revert’. If you are viewing an older version, you can revert by clicking the ‘Revert to This Version’. In both cases, it will restore the page to what it looked like in that version, and will mark the page as ‘Draft’. Once the editor has reviewed the changes, they can publish it.
Reverting Gotchas
Reverting can be a bit tricky to understand. The basic challenge comes from the fact that both pages and block have their own versions, and blocks can be shared across pages. Consider the example of two pages, Page A and Page B, which both share a Text Block ‘C’. Every change to ‘C’ will also create a new version of ‘A’ and ‘B’. Reverting page ‘A’ will also likely revert page ‘B’. Since reverting a page puts it into Draft, you now have two pages in draft mode. You need to publish both of them to make their changes live. This might be manageable for two pages, but imagine you had a Text called ‘footer’ which was shared across 20 pages.
See `Bulk Publishing’ below for details on how to publish multiple pages at once.
Reorganize a site’s navigation
There are two ways that Browser CMS supports navigation. The first is that navigation is manually added as HTML to templates. This is suitable for ‘Fixed Space’ navigation, which might need to be exactly 400 pixels wide and contain exactly 4 menu items, potentially using images for buttons. The second is using dynamic navigation, which can easily grow as the site architecture does. This is more suitable for sub-sections of the site. Browser CMS allows editors to dynamically render menus based off pages in the sitemap.
Understanding how dynamic navigation works
When developers create templates, they can set up menus so that they dynamically link to pages in the sitemap. Menus will show both pages and sections, and can show go one or more levels deep, which reflects how users are ‘drilling down’ into the site architecture. By default, when an editor adds a page or section to the sitemap, under a specific section, a link to that page will automatically be added to the dynamic navigation. For both pages and sections, you can have the option to ‘Hide from menus’, which you can do by editing the properties of either pages or sections. Hiding a page from a menu means its still accessible to the public (if the user knows the URL), but just doesn’t appear in the menus.
Moving pages/sections in the sitemap
When pages and sections are created, they are added last in their parent section. They can be reordered though from the Sitemap, by dragging and dropping. To move a page or section, click-hold and drag the page/section where you want it to be. This allows editors to both reorder pages within a specific menu, or move it to another area of the site entirely.
Dropping an item onto a page will place it ‘after’ that page. Dropping an item onto a section will put it in that section, as the last item. Be aware that moving pages will immediately make changes in how the dynamic site menus appear (there is no ‘publish’ step needed).
Setting up restricted sections
It’s a common task to want to restrict specific users from being able to see certain pages. This might include creating a ‘members’ section, where only registered and approved users can see the content. Browser CMS allows editors/admins to restrict user access based on sections. Individual pages get their security from their immediate parent. For example, if there is a section called ‘Member Only’, which a ‘Guest’ cannot see, all pages in that section will be block, and guests (unregistered users) that try to access those URLs will be sent to the ‘Access Denied’ page.
Creating the groups
The first step to secure a section is to set up the groups who are allowed to see it. An administrator can create a new group by clicking the ‘Administration’ tab, then selecting the ‘Groups’ item from the left menu. Click the ‘Add Group’ button, give the group a name (‘Members’), and choose ‘Registered Public User’ as the group type. By default, this group will able to view all sections within the site. After saving the group, you can alter which sections a user can see, by clicking the name of the group. In this case, the new ‘Member’ group’s permissions are fine.
Adding users
The next step is to create a user in the ‘Member’ group. On the ‘Administration’ tab, click the ‘Users’ menu item on the left menu, and click ‘Add User’ on the toolbar. Fill in the basic user information (name, username, email and password) and check the newly added ‘Members’ group (but no others)
Restricting the sections
The next step is to add the new section, which will be restricted so that only users who are in the ‘Member’ group can see them. Go to the sitemap, select the ‘My Site’ (which is the root of the site) and click ‘Add Section’. Name the section ‘Members Only’, and then uncheck all public permissions except for ‘Member’. Next add a page to this section and publish it.
Now, when users who aren’t logged in (Guests) try to visit any pages in the ‘Members Only’ section, they will be redirected to the Accessed Denied page.
Setting up Workflow
When the number of contributors to a website grows, it may be necessary to restrict who has rights to publish content. This would allow for multiple editors to contribute and edit content, but content would be passed to one or more `publishers’ in order to commit the changes publicly. Workflow in Browser CMS has several concepts which make it work: * Rights – Who can edit and who can publish? * Tasking – Who the work is assigned to? * Notification – How do people know they have new content to look at.
This section covers how to create a simple workflow, that covers two kinds of groups of people. * Contributors: These people should be able to edit pages and content, but should not be able to publish them. * Publishers: These people should be able to edit pages/content, and can publish them.
Basic Contributor and Editor workflow
The first step is to create two new groups, both of which should be of type CMS User’. One should be called ‘Contributor’, and should only have the Edit Content’ permission. The second group should be called Publisher’, and should have Edit Content’ and `Publish Content’ permissions. Next create two users, and assign one of them to each group.
The user in the Contributor group, will be able to make changes to pages and blocks, but will not be able to publish it themselves. When they are done with a page, on the ‘Edit Page’ view, they can use the ‘Assign’ button to pass the page to somebody who has publishing rights. Assigning a page provides a drop down with all users who have ‘Edit Content’ permissions. The contributor can choose the assign to the ‘Publisher’, give it a due date and a comment, and then assign the page. This will notify the ‘Publisher’ via email they have a new task assigned to them, along with the URL to the page.
The ‘Publisher’ can then log in, find the page they want to review, make sure the changes are acceptable, then publish the page. Once they are down with their task, they can click the ‘Complete Task’ button to close the task out. In addition, editors and publishers can always find what open tasks they have by going to the ‘My Dashboard’.
Using My Dashboard
The dashboard is the landing page for editors when they log in. It has two main areas, one shows all pages currently in draft. The other shows open tasks assigned to the current users.
Bulk publishing
Some operations in the CMS can put multiple pages into Draft mode as a side effect. This includes making an edit to a block which is shared across multiple pages, as well as reverting a page with shared blocks on it. The ‘Page Drafts’ panel shows all pages in the CMS which are currently in draft mode. An editor can choose to review each page to make sure it looks right, by clicking on the name of the page. Or they can just select all pages they want to publish via the checkbox, and then click `Publish Selected’.
Tasks
All of the open tasks that are assigned to a user will appear on that user’s dashboard, in the ‘Tasks’ panel. Users can click on the name of the page to review it, and either complete the task, or assign it someone else.
Adding dynamic content via portlets
For most sites, the majority of the content will be placed directly on pages using Text blocks. Another alternative is to use portlets, which can dynamically select and render content. Portlets are usually part of individual modules, and are used to find and display content from that module. For example, the ‘News’ module comes with several portlets, designed to find News Articles by specific criteria. One portlet may display a single Article (using an id parameter in the URL), while another may show the headlines to all Articles, chronologically ordered.
Portlets are one of the primary extension points of Browser CMS, which allows programmers to create new dynamic behavior and allow it to be placed on pages alongside static content. Each portlet will have several attributes which allow users to configure the portlet. These attributes might include a name, max # of results to display, and a template to allow users to change how the portlet displays. This section assumes the News Module has been installed, and walks through the placing and configuring of a portlet.
Placing and configuring portlet on a page
Start by creating a new page. Select the ‘Add New Content’ icon in the container you would like to add the portlet to. On the ‘Select Content Screen’, choose the ‘Portlet’ type. Then choose which type of portlet you would like to add (Choose the News Archive portlet). Give the portlet a name, leave the categories empty and use the default template.
The News Archive portlet is designed to show a list of New Article blocks. So by default, there probably aren’t any News Articles in the database, so the Archive won’t be displaying anything. Let’s add some News, so we can see how it looks.
Adding content via the Content Library
Choose the content library tab, and open the ‘News’ module, by clicking the ‘News’ link on the left. The ‘News Article’ content type should be selected. Click the ‘Add New Content’ to create a News Article. On the form, fill in a suitable name, summary, set the release date to today and body, and then click save.
Now return to the recently added portlet. You can do this by opening the ‘Core’ module, selecting ‘portlets’ and browsing/searching for the portlet you created. This will allow you do see the portlet in isolation from the page. Alternatively, you can return to the page you were on, to see the portlet where it is placed. The portlet should now be displaying a summarized version of the News Article you just created. You can control how the portlet displays the list by editing the template, which requires an understanding of Ruby/ERB and Html.
Browser CMS v3.55 Released
February 12, 2013 20:00 This release features a number of community contributed patches and fixes, plus testing with the latest version of Rails. Release notes are as follows:[#561] Fix invalid code in generated production.rb file (Thanks RoopeHakulinen)
[#557] Fix extra column on blocks index page (Thanks metalon)
[#543] Allow cms_file_field to use default label (Thanks josiahivey)
[#563] Continuous Integration - Get Travis CI up and working for the project.
[#539] Fix missing assets on CMS Login page (Thanks korin)
[#537] Better support core contributions by removing database.yml from checkin. Run `rake project:setup[mysql]` to create a database.yml for your local database. (Thanks josiahivey)
[#564] Update project to Rails 3.2.12 - Ensure tests to pass (there appeared to be some changes in inflection and html_safe between 3.2.5 and 3.2.8)
Most folks are probably aware there have been a number of rather serious Rails security patches recently. Since Browser CMS makes use of Semantic Versioning for our dependency with Rails, it should be a fairly straightforward task to just run the following with your Browser CMS project.
Conclusion
To conclude CMS Browser works on Other operating system(s) and can be easily downloaded using the below download link according to Freeware license. CMS Browser download file is only 1.3 MB in size.CMS Browser was filed under the General category and was reviewed in softlookup.com and receive 5/5 Score.
CMS Browser has been tested by our team against viruses, spyware, adware, trojan, backdoors and was found to be 100% clean. We will recheck CMS Browser when updated to assure that it remains clean.
CMS Browser user Review
Please review CMS Browser application and submit your comments below. We will collect all comments in an effort to determine whether the CMS Browser software is reliable, perform as expected and deliver the promised features and functionalities.Popularity 10/10 - Downloads - 166 - Score - 5/5
Softlookup.com 2023 - Privacy Policy
| Category: | General |
| Publisher: | BrowserMedia |
| Last Updated: | 23/11/2023 |
| Requirements: | Not specified |
| License: | Freeware |
| Operating system: | Other |
| Hits: | 647 |
| File size: | 1.3 MB |
| Price: | Not specified |
| Name: * |
E-Mail: * |
| Comment: * |
|