NoMachine
NoMachine is a free remote desktop application that has stacks of powerful features.NoMachine is a free remote desktop application that has stacks of powerful features. With NoMachine you can access all your files and folders, Watch DVDs, the TV, or YouTube videos from wherever you are. You can view smooth, high-resolution video and audio from your PC or Mac to any NoMachine-enabled device.
Go from your desktop to any NoMachine-enabled computer at the speed of light. Thanks to our NX technology, NoMachine is the fastest and highest quality remote desktop you have ever tried. Get to any computer in the world in just a few clicks! Take what's important where you go and share with who you want! NoMachine is your own personal server, private and secure. Did we say NoMachine is free? No strings attached.
The application even works with any USB controller, so you can play games remotely. With NoMachine you can access your devices. You can print a file located on the remote computer to a local printer. You can even access your pen drives, scanners and all your disks as if you were sat in front of them.
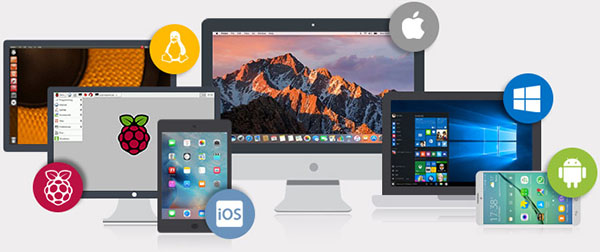
When speaking about NoMachine many think Linux. This is because NoMachine’s first product, in 2003, revolutionized Linux and the X-Windows system, the standard remote computing system of the Unix world. Since then NoMachine has developed its technology to cover all the leading server, desktop and mobile operating systems, so much it now runs on Windows, Mac, Linux, iOS, Android and Raspberry with the same incredible ease and performance.
KEY FEATURES INCLUDE:
- Travel to any desktop. With NoMachine you can access any computer and begin working as if you were sat in front of it.
- Work with any content. NoMachine gives you all of your content and programs to access remotely. Whether that be working with animated models, presentations or images.
- Meet with others where you work. The application lets you securely share your desktop and allows collaboration and file sharing between you and your work colleagues.
- Human Interface. NoMachine's human-machine interface gives you a remote link that is lightning fast. The application supports multiple operating systems so you don't have to be tied down to one OS.
What's new in NoMachine 6
If you're curious about what's new in NoMachine, you're in the right place. Here’s an overview of some of the most important enhancements in the latest version.Multi-factor authentication support
Seamless integration with multi-factor authentication tools such as Duo and PAM-OKTA further hardens NoMachine’s two-factor authentication support, allowing IT Admins to leverage NoMachine’s wide variety of authentication methods to tighten security around remote access to corporate data.
Wayland Support
It is now possible to remotely connect to physical Linux desktops running on Wayland, the default display server protocol for more recent Linux distributions.
Browser-based access for all Enterprise products
Web-based access is available in all products: Enterprise Desktop, Cloud Server and the Terminal Server suite. Remote users connecting from clientless endpoints can now connect to the desktop environment via any HTML-enabled browser.
New Cloud Server
The decision to extend browser-based access to our other products allows us to reposition the Cloud Server with a brand new feature-set. Cloud Server becomes a connection broker to all other NoMachine servers and foreign hosts and sits at the top of the NoMachine product hierarchy in the eponymous product suite. It consolidates the entire NoMachine server stack, providing centralized access to all other servers in the NoMachine infrastructure.
Streamlined product families
Linux virtual desktop is now exclusive to the Linux Terminal Server family with Enterprise Terminal Server at the helm, replacing both Enterprise Server and Cloud Server for Linux version 5 when used to run virtual Linux desktop sessions. Enterprise Terminal Server offers load-balancing of Terminal Server Nodes and failover as its predecessors did with the additional bonus of browser-based access.
Server-to-server
From version 6, the standalone Workstation and Terminal Server products can function as servers of Cloud Server. Customers using either of these products in version 5, or earlier, as nodes in their NoMachine cluster have the option to replace them with Terminal Server Nodes. Enterprise Desktop continues to provide remote desktop access on Linux, Windows and Mac, and function as a server of Cloud Server.
Support for H.264 in WebRTC
More exciting news for users connecting to the remote desktop via the browser. Web-based sessions can be streamed using the H.264 encoder on the server, provided the browser on the connecting client also supports the codec. Benefits of using H.264 encoding are reduced bandwidth usage and less CPU consumption - useful for less powerful computers and where network conditions are not as favourable as expected.
Automatic reconnection
Great news for NoMachine users who roam between networks at the office. NoMachine automatically tries to reconnect you when the connection is lost. So for users who move between WIFI networks whilst working or when the connecting client goes into sleep mode, NoMachine handles the reconnection without the need for user intervention.
Easily toggle your desktop's availability
Access to the local desktop and requests to connect can now be easily disabled for as long as the owner chooses, or until the desktop is closed, without having to stop the NoMachine services entirely.
Automatic detection for Proxy server
NoMachine detects whether there is a Proxy server in place on the local network through which outgoing traffic has to be tunneled. This is especially useful for those connecting from home and have configured a proxy server to screen their IP address, or when connecting from networks which have a logon requirement in order to gain access.
Raspberry support
Raspberry has officially been added to our list of supported platforms. Both RPi2 and RPi3 models can be used as connecting clients as well as pocket-sized servers. Depending on your set-up and needs you can choose from the free-to-download NoMachine & Enterprise Client products, as well as Enterprise Desktop.
Enhancements to clustered servers and failback mechanisms
Set-up of clustered environments is improved for admins with the use of GUIDs to identify failover clusters and facilitate installation of new servers to a NoMachine server federation. Additionally, primary and secondary roles can be restored according to connection saturation on the servers during failback.
Pre-configurable web sessions
Administrators can provide users with pre-configured connection files to easily connect their desktops and applications via web. It’s possible to define session type, screen resolution, display quality and more in advance to avoid customizing the session at every login. This allows admins to reduce manual configuration by the end user to the minimum.
Get started with NoMachine
Download and install the software for your operating system on the computer or device you are connecting from and on the Windows/Linux/Mac computer you want to connect to. You can easily share a remote desktop or control a server over any network. No matter where you are, NoMachine makes it safe and easy to quickly access a remote desktop within a few seconds.Download NoMachine for Windows
Windows i386/AMD64 XP/Vista/7/8/8.1/10/Windows Server 2008/2012/2016
Download NoMachine for Mac
Mac Intel 64-bit OS X 10.7 or later, macOS 10.12/10.13/10.14
Download NoMachine for Linux
Linux i386/AMD64, RHEL 4.4 or later, SUSE 10 or later, Fedora 10 or later, Debian 4 or later, Ubuntu 8.04 or later
Download NoMachine for Linux RPM x86_64
Red Hat Enterprise 4/5/6/7/8, SLED 10.x/11.x/12.x, SLES 10/11/12, Open SUSE 10.x/11.x/12.x/13.x/15.0/42.x, Mandriva 2009/2010/2011, Fedora 10/11/12/13/14/15/16/17/18/19/20/21/22/23/24/25/26/27/28/29/3
Download NoMachine for Linux DEB amd64
Debian GNU Linux 4.0 Etch/5.0 Lenny/6.0 Squeeze/7.0 Wheezy/8.0 Jessie/9.0 Stretch, Ubuntu 8.04 Hardy Heron/8.10 Intrepid Ibex/9.04 Jaunty Jackalope/9.10 Karmic Koala/10.4 Lucid Lynx/10.10 Maverick Meerkat/11.04 Natty Narwhal/11.10 Oneiric Ocelot/12.04 Precise Pangolin/12.10 Quantal Quetzal/13.04 Raring Ringtail/13.10 Saucy Salamander/14.04 Trusty Tahr/14.10 Utopic Unicorn/15.04 Vivid Vervet/15.10 Wily Werewolf/16.04 Xenial Xerus/16.10 Yakkety Yak/17.04 Zesty Zapus/17.10 Artful Aardvark/18.04 Bionic Beaver/18.10 Cosmic Cuttlefish/19.04 Disco Dingo
NoMachine for iOS
Compatible with iOS 8.0 or later
NoMachine for Android
Compatible with Android 4.1 or later
NoMachine for Raspberry Pi
Transform your Raspberry Pi into a powerful remote desktop client by installing NoMachine. Available for Raspbian and a number of other Linux flavors.
NoMachine for ARM
Here you'll find our experimental software packages for different flavours of pocket-sized boards running Linux ARM. If you have a BeagleBone Black, Radxa Rock or other device, this is the place for you.
Download NoMachine for Linux TAR.GZ x86_64
Red Hat Enterprise 4/5/6/7/8, SLED 10.x/11.x/12.x, SLES 10/11/12, Open SUSE 10.x/11.x/12.x/13.x/15.0/42.x, Mandriva 2009/2010/2011, Fedora 10/11/12/13/14/15/16/17/18/19/20/21/22/23/24/25/26/27/28/29/30, Debian GNU Linux 4.0 Etch/5.0 Lenny/6.0 Squeeze/7.0 Wheezy/8.0 Jessie/9.0 Stretch, Ubuntu 8.04 Hardy Heron/8.10 Intrepid Ibex/9.04 Jaunty Jackalope/9.10 Karmic Koala/10.4 Lucid Lynx/10.10 Maverick Meerkat/11.04 Natty Narwhal/11.10 Oneiric Ocelot/12.04 Precise Pangolin/12.10 Quantal Quetzal/13.04 Raring Ringtail/13.10 Saucy Salamander/14.04 Trusty Tahr/14.10 Utopic Unicorn/15.04 Vivid Vervet/15.10 Wily Werewolf/16.04 Xenial Xerus/16.10 Yakkety Yak/17.04 Zesty Zapus/17.10 Artful Aardvark/18.04 Bionic Beaver/18.10 Cosmic Cuttlefish/19.04 Disco Dingo
Using NoMachine for remote access to a computer on a local network
- Install NoMachine on the first computer- Download the NoMachine package for your operating system to the computer that you want to control remotely.
- After completing the download, launch the installer.
- Click Next and wait while Setup completes the installation.
- To connect to this computer you need to know its IP address. There are two ways you can check this. (i) Open NoMachine from the programs or applications menu. A Welcome panel will publish the local IP address of the computer on which you have installed the software. Or (ii) click on the !M icon (the NoMachine Monitor) which is visible in the computer's system tray. Click on 'Show the service status'
This IP address will be detected in the next stage when you connect to the computer from another device (NoMachine can detect all NoMachine-enabled computers on the same network which are available for access). If, on the other hand, you want to configure your connection manually,
- make a note of this IP address.
- You can now close the NoMachine application.
- Install NoMachine on the second computer
- Now go to your second computer, the computer that you want to connect from.
- Download and install NoMachine per the steps above.
Remotely connect to one computer from the other
Start your first connection
Make sure you are sitting at the computer you want to connect from and open NoMachine from the Programs/Applications menu. Click 'Continue' to go past the Welcome panel in Fig. 1. The next panel will present you with a choice (Fig. 3 - Recent Connections). For a guided approach select 'Click here to create a connection' or if you have already used NoMachine in the past, any available computers on your network, or connections you created will appear here. All NoMachine-enabled computers on the same network are advertized here. You can filter them by inserting the IP address or user name in the space available.
Click through the Connection Wizard to configure the remaining session details. You will be taken back to the Recent Connections panel. Select your remote connection and click Connect. Now proceed to Step 2.
Log in to the remote computer
You will be prompted to log in. Use the credentials for your account on the remote computer. Click OK and wait a few more seconds while NoMachine connects you to your remote desktop.
You are connected!
Your remote desktop is now at your fingertips.
You can now control your remote Windows, Mac or Linux desktop, open and edit files to work on documents, browse the internet, listen to your playlist, watch films, transfer some files and more.
Using NoMachine for remote access to a computer over the internet
- Install NoMachine on the first computer
- Download the NoMachine package for your operating system to the computer that you want to control remotely.
- After completing the download, launch the installer.
- Click Next and wait while Setup completes the installation.
- To connect to this computer over the internet you need to know its IP address and port number. There are two ways you can check this.
- Open NoMachine from the programs or applications menu. A Welcome panel will publish the IP address and port number of the computer on which you have installed the software .
- Or (ii) click on the !M icon (the NoMachine Monitor) which is visible in the computer's system tray. Click on 'Show the service status'.
- NoMachine will display it like this: nx://151.1.192.128:29382. Write this information down. If a port number is not displayed next to the external IP, NoMachine has detected that you don't need it in the next phase.
If your computer's public IP is not displayed, you'll need to manually configure your router (port-mapping) so that the NoMachine server can be reached over the Internet.
-Install NoMachine on the second computer
- Now go to your second computer, the computer that you want to connect from.
- Download and install NoMachine per the steps above.
- Remotely connect to one computer from the other
Start your first connection
Make sure you are sitting at the computer you want to connect from and open NoMachine from the Programs/Applications menu. Click 'Continue' to go past the Welcome panel in Fig. 9. The next panel will present you with a choice (Fig. 11 - Recent Connections). For a guided approach select 'Click here to create a connection' or if you have already used NoMachine in the past, any available connections you created will appear here. You can filter sessions by inserting the IP address or hostname in the space available.
Click through the Connection Wizard to configure the remaining session details. You will be taken back to the Recent Connections panel. Insert the IP address and port number (Fig. 14) you noted down earlier in the Quick Connect field like this: 151.1.192.128:29382. Hit Enter on the keyboard and wait a few seconds while NoMachine finds your computer.
Log in to the remote computer
You will be prompted to log in using the credentials for your account on the remote host.
Click OK and wait a few more seconds while NoMachine connects you to your remote desktop.
Your remote desktop is now at your fingertips.
You can now control your remote Windows, Mac or Linux desktop, open and edit files to work on documents, browse the internet, listen to your playlist, watch films, transfer some files and more.

NoMachine for the Enterprise
When remote desktop gets serious, you need a serious tool to do the job. NoMachine satisfies any enterprise remote access scenario and scales to fit your unique IT delivery needs. Be in control of your own data, hosted desktops, corporate computers and applications, where they're kept and how they're accessed. Secure, private and convenient.NoMachine Enterprise Desktop
Hassle-free remote control of any computer
Secure remote desktop access for employees
Seamless access for sysadmins from anywhere
Unparalleled performance on any OS
NoMachine Terminal Server
The fastest Linux terminal server now faster
Modern solution loaded with powerful features
Works with your Linux and your applications
Used by thousands across all industries
NoMachine Cloud Server
Flexible and scalable corporate desktop access
Centralized remote access management
Deploy thousands of desktops and servers
Fast delivery of IT resources across any network
NoMachine (free version) - Installation and Configuration Guide
1- Install, update or remove the NoMachine software on your system2- initiate your first connection to the remote computer
3- configure appearance of user interface and NoMachine's features.
Once installation has been completed with success, NoMachine is up-and-running and ready to accept connections to the physical desktop of its host machine. All the necessary services are automatically started.
A headless computer is configured to operate without a monitor, keyboard, and mouse. In this case, or when more in general the local X server cannot be found, NoMachine will use its own display service (that is an embedded X server) to let users connect seamlessly a physical desktop running in background on the remote machine. No manual intervention or configuration is needed, but a desktop environment needs to be installed on such machine.
How to set-up NoMachine
Install NoMachine
Supported Operating Systems
Windows 32-bit/64-bit XP/Vista/7/8/8.1/10
Windows Server 2008/2012/2016
Mac OS X Intel 64-bit 10.7 to 10.14
Linux 32-bit and 64-bit
RHEL 4 to RHEL 8
SLED 10 to SLED 15
SLES 10 to SLES 15
openSUSE 10.x to openSUSE 15.x
Mandriva 2009 to Mandriva 2011
Fedora 10 to Fedora 30
Debian 4.0 to Debian 9
Ubuntu 8.04 to Ubuntu 19.04
Raspberry Pi 2/3 ARMv6/ARMv7/ARMv8
Software requirements
A desktop environment must already be installed. This applies also to headless Linux machines.
Hardware requirements
The software is designed to work on computers with minimal HW requirements. Although the software may work with inferior CPUs or reduced RAM, for best performance NoMachine recommends you match the listed requirements.
- Intel Core2 Duo or AMD Athlon Dual-Core or equivalent
- 1 GB RAM
- Network connection (either a LAN, or Internet link: broadband, cable, DSL, etc…)
Size required on disk:
Windows 130 MB
Linux 110 MB
Mac 100 MB
ARMv6 95 MB
ARMv7 85 MB
ARMv8 105 MB
Compatibility between client/server versions 5 or 4 and v. 6 is fully preserved.
Windows Installation
INSTALL Download the package for Windows from the NoMachine web site and install it by double-clicking on the icon of the executable: a setup wizard will take you through the installation. Accept to reboot the machine, this is mandatory for completing the installation.
Provide your administrative credentials if requested to authorize the installation.
Step 1: Welcome to the installer! Click on Next to start the installation.
Step 2: Click Next to go on.
Step 3: Click Next to proceed and please wait while Setup completes the installation … You can then select where to install NoMachine or let the default location as it is.
What's important to remember is that all successive updates will take place there. To change the place of installation you will have to uninstall the software and proceed with a fresh install.
Reboot is requested to complete the installation.
Step 4: Accept to reboot your machine to complete the installation and exit the Installer.
There are two ways to update your current installation:
Automatic updates
You can update your installation from our repositories. Just open the NoMachine User Interface from your Programs Menu, access the 'Settings' panel and click on 'Server preferences'. Go to the 'Updates' panel and click on the 'Check now' button. NoMachine has the automatic check for updates enabled: it will periodically check our repositories (by default every two days) to verify if updates are available. In this case, NoMachine will prompt a dialog informing that a new version is available but it will never automatically update the current installation.
Checking for updates can be disabled from that dialog by selecting the 'Don't ask again for this version' option or in the Updates panel by unchecking the 'Automatically check for updates' option.
Update with NoMachine packages
Alternatively, you may download the latest available package from the NoMachine web site and click on the executable file to launch Setup. As for the installation, Setup will guide you through all steps necessary for updating your installation.
UNINSTALL: You can uninstall NoMachine from the Windows Control Panel and the 'Add or Remove Programs' in Windows XP or 'Program and Features' in Windows Vista, 7, 8 or 10. Find the NoMachine program in the list of installed programs and choose to uninstall it.
On Windows 8 or later you can use the Search box from the Charms bar on the right side of the screen: type Control Panel to open it. Then access the Programs - 'Uninstall a program' panel.
On Windows 7, Vista and XP, click on the Start button and click to open the Control panel from the Start menu. Then access panel 'Programs and Features' or 'Add or Remove Programs', depending on your Windows version. Reboot is requested to complete the uninstalling process.
Mac Installations
INSTALL: Download the DMG package from the above links and double click on the package icon to mount the disk image. Next double-click on the package to install it; the Installer will take you through the installation.
Step 1: Welcome to the installer! Click on Continue to start the installation.
Step 2: Click on Continue to proceed.
Step 3: Provide administrative credentials and confirm by clicking on Install Software. Then click on Install and wait until Installer completes.
Step 4: The installation phase is now complete, click on Close to exit Installer.
Automatic updates
You can update your installation from our repositories. Just open the NoMachine User Interface from Applications, access the 'Settings' panel and click on 'Server preferences'. Go to the 'Updates' panel and click on the 'Check now' button. NoMachine has the automatic check for updates enabled: it will periodically check our repositories (by default every two days) to verify if updates are available. In this case, NoMachine will prompt a dialog informing that a new version is available but it will never automatically update the current installation.
Checking for updates can be disabled from that dialog by selecting the 'Don't ask again for this version' option or in the Updates panel by unchecking the 'Automatically check for updates' option.
Update with NoMachine packages
Alternatively, you may download the latest available package from the NoMachine web site and click on the executable file to launch Setup. As for the installation, Setup will guide you through all steps necessary for updating your installation.
UNINSTALL
To uninstall, just drag and drop NoMachine from Applications to trash or select 'Move to trash' from the mouse button menu. Administrative credentials are requested.
Linux Installations
Installing for the first time You can install, update and uninstall using the graphical package manager of your Linux distribution or from command line by running commands from an xterm or similar with the sudo utility, or as root user if you don't have sudo installed. Instructions below refer to installation by command line .
Successive updates
The update procedure for server and node installations requires to stop all NoMachine services in order to correctly replace libraries and binaries. This implies that all running sessions are terminated during the update procedure and cannot be recovered later. This applies to upates made by using NoMachine packages and to automatic updates from NoMachine repositories.
Automatic updates
You can update your installation from our repositories. Just open the NoMachine User Interface from your Programs Menu, access the 'Settings' panel and click on 'Server preferences'. Go to the 'Updates' panel and click on the 'Check now' button. NoMachine has the automatic check for updates enabled: it will periodically check our repositories (by default every two days) to verify if updates are available. In this case, NoMachine will prompt a dialog informing that a new version is available but it will never automatically update the current installation.
Checking for updates can be disabled from that dialog by selecting the 'Don't ask again for this version' option or in the Updates panel by unchecking the 'Automatically check for updates' option.
Update with NoMachine packages
Alternatively, you may download the latest available package and use the graphical package manager of your system to install it or do it from command line as explained below.
RPM Packages
If you want to install to default location /usr/NX, run from a console any of the following commands as root:
INSTALL
rpm -ivh
UPDATE
rpm -Uvh
UNINSTALL
rpm -e nomachine
If you want to install to a non-default location, for example /opt/NX
INSTALL
rpm -ivh
UPDATE
rpm -Uvh
UNINSTALL
rpm -e nomachine
DEB Packages
If you want to install to default location /usr/NX, run from a console any of the following commands as sudo user:
INSTALL
sudo dpkg -I
UPDATE
sudo dpkg -I
UNINSTALL
sudo dpkg -r nomachine
If you want to install to a non-default location, for example /opt/NX
INSTALL
sudo NX_INSTALL_PREFIX=/opt dpkg -I
UPDATE
sudo NX_INSTALL_PREFIX=/opt dpkg -I
UNINSTALL
sudo dpkg -r nomachine
TAR.GZ Packages
If you want to install to the default location /usr/NX ensure that package is placed there.
INSTALL
cd /usr
sudo tar xvzf
sudo /usr/NX/nxserver --install
UPDATE
cd /usr
sudo tar xvzf
sudo /usr/NX/nxserver --update
UNINSTALL
sudo /usr/NX/scripts/setup/nxserver --uninstall
then, remove the installation dir:
sudo rm -rf /usr/NX
If you want to install to a non-default location, for example /opt/NX, extract the archive in /usr/NX and then use the following commands:
INSTALL
sudo NX_INSTALL_PREFIX=/opt /usr/NX/nxserver --install
UPDATE
sudo NX_INSTALL_PREFIX=/opt dpkg -I /usr/NX/nxserver --update
UNINSTALL
sudo /opt/NX/scripts/setup/nxserver --uninstall
then, remove the installation dir:
sudo rm -rf /opt/NX
The NoMachine Monitor in Your System Tray
Once you have terminated the installation or the update, including reboot when requested, a NoMachine icon (!M) will appear in your system tray. This is the NoMachine Monitor, a small application which gives you fast access to server management tools and User Interface and advises you when someone is requesting to connect. Click on the !M icon to open the menu and have quick access to its functionality:
Connect to NoMachine
Connect from Your Computer to a Computer with NoMachine Installed
If you want to connect to a computer, you will need to know its IP address. To know the IP address of a specific NoMachine host, open the NoMachine User Interface on that computer, and you will see a 'Welcome' panel like this one:
If you want to connect to this computer over the Internet, write down the external IP address and its port number. In our example: nx://151.1.192.128:29382. If you are connecting on a local network instead, you just need the private IP, 192.168.2.29 in this case. You will need this information when creating the connection to this host from your client device. Follow these quick steps:
Step 1: Go now to the client device from which you want to connect to this host. Install NoMachine, which can make connections as well as accept incoming connections) or NoMachine Enterprise Client.
Step 2: Run the NoMachine User Interface from the programs or applications menu.
Step 3: A wizard will take you through the steps necessary to set-up your first connection, just click on 'Create a new connection'. You will need the IP address and port number of the computer you want to connect to (you made a note of it earlier).
If you prefer to skip the wizard, click on 'Continue'. The fastest way to create a new connection is to write the name or IP of the NoMachine host you want to connect to in the text field and click on the 'Press enter to create a new connection' link. This method will use the default NX protocol on port 4000.
Alternatively, you can click on the 'New' icon next to the white text field to configure the session in more detail.
IPv6 is supported since version 4.1. Specify IP of the server host in IPv6 format (e.g. 2001:0:5ef5:79fb:30c6:1516:3ca1:5695) if you want to use it instead than IPv4.
What if the Remote Computer is a Headless Linux?
Pre-requisite is having a desktop environment installed. Steps to connect to the remote host are the same as described in the previous paragraph. When connecting, you are prompted with this dialog:
“Cannot detect any display running. Do you want NoMachine to create a new display and proceed to connect to the desktop?” Just click on 'Yes' to let NoMachine use its own display service.
Disabling Accepting Connection to your Desktop
When you are sit in front of the computer, you can switch off/on the ability to accept connections to your desktop via NoMachine. When you disable the sharing of your screen, nobody can connect.
You can configure this setting via the NoMachine Monitor menu (right click on the !M icon in the system tray to open it) by clicking on item "Accepting connection is now enabled/disabled".
This setting lasts until you change it again, even when you physically log-out from the system.
Be careful if you decide to disable accepting connections when you are connected from remote: you will be no longer able to reconnect to the desktop via NoMachine once the current session is closed. In this case, you can recover the ability to connect via NoMachine by changing settings in the Monitor menu on the physical computer.
Configurations and optimizations
The User Interface for Server's Administration
NoMachine comes with a graphical User Interface (the 'NoMachine preferences' GUI) which lets you manage settings and configurations for the server (Server preferences) and for the client (Player preferences).
This means that you have an administrative user interface for the server from which you can for example configure privacy settings or perform updates.
You have also an interface for configuring the client behaviour when you connect to another computer. For example change the language for the User Interface (Appearance tab) or define shortcuts to be used inside the session (Input tab):
Switch between the Player and the Server preferences interface by clicking on the link at the bottom of the 'NoMachine Preferences' panel. For a detailed description of the NoMachine client/server User Interface functionalities
Quick Access to Server Administration
The 'Server preferences' User Interface can be accessed in two ways: via the 'NoMachine preferences' interface, or via the NoMachine (!M) icon in the system tray of your computer by clicking on 'Show the service status'.
The 'Service status' panel provides quick access to information like the IP of the host machine and the possibility to stop and restart the server. Click on 'Server preferences' button to open the User Interface for the server.
The 'Server preferences' area of the User Interface takes care of configuration of how NoMachine functions when it accepts in-coming connections from other remote computers. For example, starting the NoMachine services automatically when the machine is rebooted. Locking the physical screen of this host when someone is connected from remote or checking for automatic updates can be configured in the 'Security' panel and 'Updates' panel respectively.
There are specific tutorials showing users how to blank the screen of the host while somebody is connected from remote, or how to disable access to the computer
Personalization of User's Interface and Other Settings for Connections to Another Computer
As mentioned earlier, it is possible to configure the appearance of the NoMachine User Interface.
Clicking on the !M shortcut icon on your desktop, or opening NoMachine from the Applications menu of your computer will open this interface to let you configure graphical elements, the language used and of course configure your connection. Just click on 'Settings'.
It's also possible to configure specific behaviour to be adopted when connecting to the remote host, such as using custom hot-keys and shortcuts which must be passed from the client side to the remote desktop.
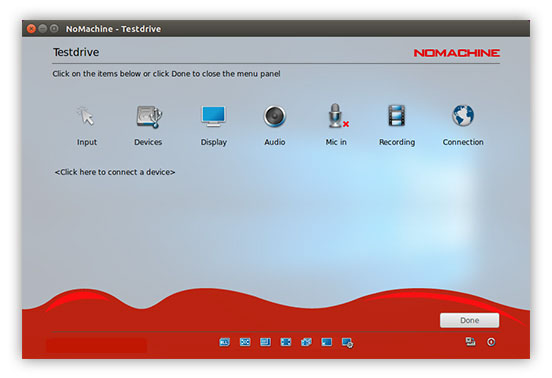
Optimization, Device Sharing and Other Functionalities During the Remote Desktop Connection
When you are connected to the NoMachine desktop, it's possible to share devices like disks and printers, change view mode for the remote display (e.g. resize the remote desktop, full-screen etc …), adjust display quality and performance or record desktop activities.
All of this and more can be done via the NoMachine menu panel inside the session. To open it, press ctrl+alt+0 inside the session or click on the page peel in the upper righ corner of the session.
Accessing files on local or remote disk drives
If you use your remote computer as a file server whether it's for storage or data security reasons, or simply find yourself having to upload and download files between computers frequently during a NoMachine session, a better solution might be to connect the disk, or drive. By forwarding a disk using NoMachine’s ‘Connect a disk’ feature, the contents of the remote or local operating system's disk are shared to or from the other computer.NoMachine lets you access any local or remote disk during the life of your remote desktop session. The remote and local systems can be Mac, Windows or Linux, it doesn’t matter. NoMachine lets you connect disk drives and access all the files and data on them for the duration of the session. You can redirect local disk drives, including the hard disk drives, CD-ROM disk drives, and mapped network disk drives to the remote side, and vice-versa, meaning that the connected disk will show up in the remote or local file explorer (on Windows), finder (on Mac) and file manager (on Linux) depending on which direction you forwarded it.
Follow the simple steps below.
Connecting a local disk to the remote desktop
Connecting a local disk to the remote desktop allows you to access its content whilst you are connected to the remote desktop.
Step 1: Connect to the remote computer
Start a connection from your computer to the remote computer you want to access.
Once connected, open the session menu (Ctrl-Alt-0).
Go to Devices and click on 'Connect a disk'.
Go to devices in the connection menu
Click on the disk you want to share e.g. the local Mac 'Mainframe' partition in Local disks.
Select the disk you want to connect in the session
Check 'Export this disk at session startup' if you want this to be automatically connected every time you run the session to the remote desktop.
You can provide a unique name for this disk or folder for easier identification (e.g., My_Office_Documents) in the 'Export as' field. The disk will appear with this name in the file manager of the remote computer.
NoMachine also indicates the path to the disk so you can locate it easily.
You can rename the disk which will be shown on the remote host for easier identification
Step 3: Wait for the disk to be connected
Click Connect, and check that a green dot appears next to your selected disk.
Once connected a green dot will show up by next to the disk's icon in the session menu
Step 4: Disk successfully connected
Close the session menu and browse to the file manager, or explorer, of the remote desktop. You will see the local disk or drive you just shared in the list of available resources.
Connecting a remote disk to the local desktop
Connecting a remote disk on the host computer to your local desktop allows you to access its content from within the file explorer or finder of the local computer during the life of your NoMachine session.
Step 1: Connect to the remote computer
Start a connection from your computer to the remote computer you want to access.
Once connected, open the session menu (Ctrl-Alt-0).
Go to Devices and click on 'Connect a disk'.
Go to devices in the connection menu
Step 2: Choose from the available disks
Click on the remote disk you want to share to the local file manager of the computer you are connecting from. In the example below, the disk to be shared is Windows 'D:' partition.
Select the disk you want to connect in the session
Check 'Import this disk at session startup' if you want this to be automatically connected every time you run the session to the remote desktop.
If you prefer, you can provide a unique name for this disk or folder for easier identification in the 'Import as' field. This is optional. The disk will appear with this name in the local file explorer, or file manager, of your computer.
NoMachine also indicates the path to the disk so you can locate it easily.
You can rename the disk which will be shown on the local host for easier identification
Step 3: Wait for the disk to be connected
Click Connect, and check that a green dot appears next to your selected disk.
Once connected a green dot will show up by next to the disk's icon in the session menu
Step 4: Disk successfully connected
You're done and close the session menu.
Browse to the file manager, or explorer, of the computer you are connecting from. You will see the disk or drive you just shared in the list of available local resources.
NoMachine Alternative
TeamViewer is the All-In-One Solution for Remote Access and Support over the Internet available for Windows, Mac, Android, iPhone and Windows Phone.TeamViewer connects to any PC or server around the world within a few seconds. You can remote control your partner's PC as if you were sitting right in front of it.
Why TeamViewer?
Six Reasons to Love TeamViewer
1- Quickly reconnect to previously accessed devices, see recent group on your Computers & Contacts list.
2- New UI for file transfers: flexible job queuing and mid-transfer file browsing.
3- Enhanced remote control performance with GPU for hardware accelerated image processing.
4- Streamline customer support, automatically assign new service cases from custom modules to a preset first assignee.
5- Expand IT service coverage with full mobile remote control support for Motorola devices running Android 7.1.1 and above.
6- Deliver always-on support, conserve battery and data usage of Android smartphones and tablets with one-click connections.
Conclusion
To conclude NoMachine works on Windows operating system(s) and can be easily downloaded using the below download link according to Freeware license. NoMachine download file is only 31.18 MB in size.NoMachine was filed under the Desktop Tools category and was reviewed in softlookup.com and receive 5/5 Score.
NoMachine has been tested by our team against viruses, spyware, adware, trojan, backdoors and was found to be 100% clean. We will recheck NoMachine when updated to assure that it remains clean.
NoMachine user Review
Please review NoMachine application and submit your comments below. We will collect all comments in an effort to determine whether the NoMachine software is reliable, perform as expected and deliver the promised features and functionalities.Popularity 10/10 - Downloads - 2014 - Score - 5/5
Softlookup.com 2023 - Privacy Policy
| Category: | Desktop Tools |
| Publisher: | NoMachine |
| Last Updated: | 7/11/2023 |
| Requirements: | Windows (All Versions) |
| License: | Freeware |
| Operating system: | Windows |
| Hits: | 4584 |
| File size: | 31.18 MB |
| Price: | Not specified |
| Name: * |
E-Mail: * |
| Comment: * |
|