IQOS charger won't charge
If you are an IQOS user, you may have encountered the frustrating issue of your device not charging. This can be a major inconvenience, especially if you rely on your IQOS device. In this section, we will delve into the various reasons why your IQOS may not be charging and explore potential solutions to get your device up and running again.IQOS Not Charging? Troubleshooting Guide and Solutions
Introduction: Understanding the Issue with IQOS Not Charging
If you are an IQOS user, you may have encountered the frustrating issue of your device not charging. This can be a major inconvenience, especially if you rely on your IQOS device. In this section, we will delve into the various reasons why your IQOS may not be charging and explore potential solutions to get your device up and running again.
One common issue that users face is when their IQOS charger stops working or fails to charge the device properly. This can be attributed to a variety of factors, including faulty wiring or a malfunctioning charger unit. Additionally, some users may experience problems with their IQOS battery itself, which could lead to difficulties in getting a full charge.
Understanding the root cause of these issues is crucial in order to find effective solutions. By identifying the specific problem with your IQOS not charging, you can take appropriate steps to troubleshoot and resolve the issue.
In the following sections, we will explore some common troubleshooting techniques and potential fixes for when your IQOS charger or battery is not functioning as expected. Whether it's a simple fix or something more complex requiring professional assistance, our aim is to help you get back to enjoying your IQOS without any charging-related hiccups.
Possible Reasons Why Your IQOS is Not Charging
Are you tired of dealing with constant charger issues for your IQOS device? Is Look no further! We understand the frustration that comes with a faulty charger, damaged charging cable, or a loose connection. But worry not, as we have the perfect solution for your common IQOS charger issues like: iqos charger wont charge or the iqos charger doesn't work
Introducing our reliable and efficient IQOS charger replacement. Our chargers are designed to address all your charging concerns and provide a seamless experience every time. No more struggling with malfunctioning chargers or worrying about damaged cables. With our high-quality chargers, you can enjoy uninterrupted sessions with your IQOS device.
We understand that time is of the essence, and our chargers are specifically engineered to save you valuable time and energy. You can say goodbye to the hassle of constantly having to troubleshoot charging issues. Our chargers are built to last, ensuring long-term durability so that you can rely on them day in and day out.
Say goodbye to the stress caused by unreliable chargers and embrace convenience with our top-notch IQOS charger replacements. Don't let faulty equipment hinder your enjoyment any longer – invest in a solution that will make your life easier.
Don't settle for subpar charging experiences any longer - trust us to provide you with a reliable fix for all your IQOS charging needs. Take charge of your vaping journey today!
Are you tired of constantly dealing with battery problems? Whether it's a depleted battery, sudden battery failure, or improper handling of your device, these issues can be incredibly frustrating and time-consuming. But fear not, because there is a solution that can save you from the hassle and inconvenience: advanced battery technologies. With the help of cutting-edge innovations, you can bid farewell to those never-ending battery woes. Let's explore how these advancements can make your life easier and more efficient.
Are you tired of dealing with dirty contacts and residue buildup that constantly hinders the charging process of your devices? We understand the frustration and inconvenience it can cause. But worry no more, as we have the perfect solution to tackle these cleaning and maintenance issues head-on. By implementing a few simple strategies and utilizing effective cleaning techniques, you can ensure smooth charging and optimal performance for all your devices. Say goodbye to the hassle of dirty contacts and residue buildup, and say hello to a hassle-free charging experience.
Troubleshooting Steps to Fix IQOS Charging Problems:
Step 1: Check the Charger and Charging Cable Connection:
When troubleshooting your IQOS charger, the first step is to inspect the charger connection and check the charging cable for any damage or loose connections. This simple yet crucial step can often resolve charging issues and ensure a seamless charging experience for your IQOS device.
Begin by examining the charger itself. Look for any visible signs of damage such as frayed wires or bent pins. If you notice any issues, it may be necessary to replace the charger to ensure safe and effective charging.
Next, carefully inspect the charging cable for any signs of wear or damage. Check both ends of the cable, including the USB connector and the connector that plugs into your IQOS device. Ensure that there are no loose connections or bent pins that could interfere with proper charging.
If you find any damage or loose connections during this inspection, it is recommended to replace the charging cable with a new one specifically designed for your IQOS device. Using a faulty cable can lead to inefficient charging or potential safety hazards.
By taking this important first step in checking the charger and charging cable connection, you can quickly identify and resolve any issues that may be preventing your IQOS device from charging effectively. This will help ensure uninterrupted usage and enhance your overall experience with this innovative heating system.
Step 2: Verify Battery Level and Clean Contacts:
Ensuring that your IQOS device is functioning optimally is crucial for a satisfying experience. In this step, we will guide you through the process of verifying the battery level and cleaning the contacts to ensure proper charging contact.
To begin, let's check the battery level of your IQOS device. This step is important as it allows you to plan your usage accordingly and avoid any unexpected interruptions. To check the battery level, simply press and release the Bluetooth button on your device. The LED light will indicate the current battery level, with four lights indicating a full charge and one light indicating a low battery.
Once you have verified the battery level, it's time to clean the contacts for proper charging contact. Over time, dirt or residue can accumulate on the contacts, hindering efficient charging. To clean them, gently remove the holder from your IQOS device and use a soft cloth or cotton swab to wipe away any debris from both ends of the holder and inside the device where they make contact.
By regularly checking the battery level and cleaning the contacts of your IQOS device, you can ensure consistent performance and maximize its lifespan. This simple yet essential step will help you enjoy uninterrupted sessions with your IQOS device.
Remember to refer to your user manual for specific instructions related to your model of IQOS device.
Step 3: Resetting the Device:
When encountering charging issues with your IQOS device, performing a reset can often resolve the problem. Resetting the device is a simple yet effective step that can help restore functionality and ensure a seamless experience with your IQOS device.
To begin the reset process, follow these steps:
1. Ensure that your IQOS device is not connected to any power source or charging cable.
2. Locate the reset button on your IQOS device. This button is typically found on the bottom or side of the device.
3. Using a small tool or pin, press and hold down the reset button for approximately 10 seconds.
4. Release the reset button after 10 seconds and wait for a few moments.
5. Once completed, you can reconnect your IQOS device to its charging cable or power source.
By performing this simple reset process, you are allowing your IQOS device to recalibrate and address any potential charging issues it may be experiencing.
Remember, if you continue to encounter charging problems after resetting your IQOS device, it is recommended to reach out to our customer support team for further assistance. They will be more than happy to provide additional guidance and ensure that any underlying issues are addressed promptly.
Resetting your IQOS device is just one of many troubleshooting steps available to enhance its performance and maintain an uninterrupted vaping experience. We strive to provide reliable solutions so that you can continue enjoying your IQOS without any disruptions.
Experience peace of mind by following these steps and resetting your IQOS device when faced with charging issues – it's a simple yet effective solution that can make all the difference in ensuring optimal performance.
Step 4: Contact Customer Support:
If you are experiencing any issues with your IQOS device's charging, it is essential to reach out to the customer support team for further assistance. They have the knowledge and expertise to help resolve any problems you may be facing.
To contact IQOS customer support, you can find their contact information on their official website or in the user manual provided with your device. It is recommended to have your device's serial number and purchase details ready when contacting customer support as it will help expedite the troubleshooting process.
The dedicated customer support team is committed to providing prompt and effective solutions to ensure that you can continue enjoying your IQOS experience without any interruptions. Don't hesitate to reach out for assistance - they are there to help address any concerns or queries you may have regarding your device's charging problem.
Preventive Measures to Avoid Future Charging Problems with IQOS:
In today's fast-paced world, our devices have become an integral part of our lives. From smartphones to tablets, we rely on these gadgets for communication, entertainment, and productivity. However, as we use them day in and day out, it's easy for dirt, dust, and grime to accumulate on the device and charger contacts.
Maintaining the cleanliness of your device and charger contacts is crucial not only for their longevity but also for your own safety. Dirty contacts can lead to poor connectivity and even damage your device or charger. By regularly cleaning these essential components, you can ensure optimal performance and prolong their lifespan.
One of the most effective ways to clean the contacts is by using a soft cloth or cotton swab lightly dampened with isopropyl alcohol. Gently wipe the contacts in a back-and-forth motion until they are clean. Avoid using harsh chemicals or abrasive materials as they may cause damage.
Regularly cleaning your device and charger contacts also helps prevent the buildup of bacteria and germs that can accumulate over time. These microorganisms can pose health risks if transferred from your hands to your face or other surfaces you come into contact with.
Additionally, maintaining cleanliness not only enhances the functionality of your devices but also improves their overall appearance. A well-kept device with clean contacts gives off a professional impression while ensuring that you get the most out of its features.
In conclusion, it is crucial to regularly clean the device and charger contacts to ensure optimal performance, extend their lifespan, maintain hygiene standards, and enhance overall appearance. By incorporating this simple task into your routine maintenance habits, you can enjoy a seamless experience with your devices while keeping yourself safe from potential hazards associated with dirty contacts.
Protecting your device from extreme temperatures and water is essential for ensuring its longevity and optimal performance. Exposing your device to extreme hot or cold temperatures can cause irreversible damage to its internal components, leading to malfunctions and decreased lifespan. Similarly, exposing your device to water can result in short circuits and corrosion, rendering it useless. By taking simple precautions and following a few guidelines, you can safeguard your device from these potential hazards and enjoy its full functionality for years to come.
Properly handling and storing your IQOS device is essential to ensure its longevity and prevent any physical damage. By taking a few simple precautions, you can enjoy the full benefits of your IQOS device for a longer period of time.
Firstly, it's important to handle your IQOS device with care. Avoid dropping or mishandling it, as this can lead to internal damage that may affect its functionality. Treat it as you would any other delicate electronic device, ensuring a secure grip when using and carrying it.
When not in use, always store your IQOS device in its designated case or pouch. This will protect it from external elements such as dust, moisture, and accidental impacts. Additionally, keeping it in a dedicated case will minimize the risk of misplacing or damaging it while on the go.
Furthermore, be mindful of the temperature and humidity conditions in which you store your IQOS device. Extreme heat or cold can have detrimental effects on its performance and overall lifespan. Ideally, store your device in a cool and dry place away from direct sunlight or excessive moisture.
Cleaning is another crucial aspect of maintaining your IQOS device. Regularly clean the holder and charger to remove any residue buildup that may affect its functionality over time. Follow the manufacturer's instructions for proper cleaning techniques to ensure optimal performance.
Lastly, keep your IQOS device out of reach from children or pets. It contains small components that could pose a choking hazard if mishandled or accidentally ingested.
By following these simple yet important guidelines for handling and storing your IQOS device properly, you can ensure its longevity and avoid unnecessary physical damage. Take care of this innovative technology investment so that you can continue enjoying the satisfying experience it offers for years to come
Conclusion: Resolve IQOS Charging Issues and Enjoy Your Vaping Experience Again
In conclusion, if you are experiencing charging issues with your IQOS device, it is important to address them promptly in order to fully enjoy your vaping experience again. By resolving these issues, you can ensure that your device is functioning optimally and providing you with the satisfaction and convenience that you deserve.
Whether it's a faulty charging cable or a malfunctioning battery, taking the necessary steps to resolve these issues will not only enhance your overall vaping experience but also extend the lifespan of your device. It is recommended to reach out to the customer support team of IQOS or consult an authorized retailer for assistance and guidance.
Remember, investing in a reliable and efficient charging solution for your IQOS device is crucial for uninterrupted usage and maximum enjoyment. So don't let charging issues hinder your vaping experience any longer - take action today and get back to enjoying the flavors and sensations that IQOS has to offer.
Troubleshooting Guide: Why Won't My IQOS Stick Charge?
If you're an avid IQOS user, you know how frustrating it can be when your device won't charge. But fear not, as we're here to help you troubleshoot the issue and get your IQOS Stick up and running again. In this comprehensive guide, we'll walk you through the potential reasons why your IQOS Stick isn't charging and provide you with practical solutions to fix the problem.From issues with the charging cable and battery to connectivity problems and software glitches, we'll cover all the possible causes that could be preventing your IQOS Stick from charging. Whether you're a newbie or a seasoned IQOS user, our troubleshooting guide will ensure that you have the knowledge and tools to resolve the issue on your own.
Don't let a dead battery dampen your IQOS experience. Read on to discover the solutions to your charging woes and get back to enjoying your heating device without any interruptions. Get ready to reclaim the power with your fully charged IQOS Stick. Let's dive in and solve the mystery behind your non-charging device.
Common reasons why IQOS sticks may not charge
When your IQOS Stick refuses to charge, it can be frustrating to pinpoint the exact cause. However, there are several common reasons why this issue may occur. Understanding these reasons can help you troubleshoot the problem more effectively. Here are some potential culprits:1. Charging cable issues: One of the most common reasons for a non-charging IQOS Stick is a faulty charging cable. The cable may be damaged, frayed, or simply not functioning properly. Inspect the cable for any visible signs of wear and tear, and try using a different cable to see if the problem persists.
2. Battery problems: Another possibility is that the battery itself is the issue. Over time, batteries can lose their capacity to hold a charge. If your IQOS Stick is old or has been heavily used, it's possible that the battery needs to be replaced. Consider contacting customer support to inquire about battery replacement options.
3. Connectivity issues: Sometimes, the charging contacts on the IQOS Stick or the charging port may become dirty or obstructed, resulting in poor connectivity. Dust, debris, or residue from IQOS sticks can accumulate over time and interfere with the charging process. Cleaning these contacts can often resolve the issue and get your IQOS Stick charging again.
Troubleshooting steps for a non-charging IQOS stick
Now that we've discussed the common reasons behind a non-charging IQOS Stick, let's dive into the troubleshooting steps you can take to fix the problem. Follow these solutions systematically, and hopefully, you'll be able to resolve the issue and get your device up and running again.-Checking the battery and charging contacts
Start by inspecting the battery of your IQOS Stick. Check for any signs of physical damage or corrosion. If the battery appears damaged, it may need to be replaced. However, if there are no visible issues, proceed to clean the charging contacts on both the device and the charging port. To clean the contacts, use a soft, dry cloth or a cotton swab. Ensure that there is no debris, dirt, or residue obstructing the charging connections. Gently wipe the contacts, being careful not to apply too much pressure. Once cleaned, reinsert the IQOS Stick into the charging port and check if it starts charging.
- Cleaning the charging port and stick holder If the previous step didn't resolve the issue, the problem may lie in a dirty charging port or stick holder. Over time, these areas can accumulate dust, lint, or residue from IQOS sticks, hindering the charging process. Cleaning these areas can often restore proper charging functionality. To clean the charging port and stick holder, use a clean, dry toothbrush or a soft brush. Gently brush away any debris or residue, ensuring that you don't damage any of the internal components. Once cleaned, reinsert the IQOS Stick and check if it starts charging. If not, proceed to the next step.
- Resetting the IQOS device If your IQOS Stick still refuses to charge, a simple reset might do the trick. Resetting the device can help resolve any software glitches or minor issues that may be causing the charging problem. To reset your IQOS Stick, follow these steps:
1. Remove the IQOS Stick from the charger and ensure it's not connected to any power source.
2. Hold down the power button for at least 10 seconds until the device turns off.
3. Wait for a few seconds and then turn on the IQOS Stick by pressing the power button again.
4. Reinsert the device into the charger and check if it starts charging.
- Updating the firmware of the IQOS device If the previous troubleshooting steps didn't solve the issue, it's possible that your IQOS Stick's firmware needs to be updated. An outdated firmware version can sometimes interfere with the charging process. To update the firmware, follow these instructions:
1. Connect your IQOS Stick to a power source using the charging cable.
2. Download the IQOS Connect app on your smartphone or visit the official IQOS website for firmware updates.
3. Follow the instructions provided by the app or website to update the firmware of your IQOS Stick.
4. Once the update is complete, disconnect and reconnect the device to the charger to check if it starts charging.
Contacting customer support for further assistance
If none of the above solutions work, it may be time to reach out to IQOS customer support for further assistance. Explain the steps you've already taken to troubleshoot the charging issue and provide them with any relevant information about your device. They should be able to guide you through additional troubleshooting steps or offer a solution to your problem.
How to clean the wet IQOS after washing, soaking with salt water or other liquid
Have you soaked your IQOS or holder? Did you wash it in the washing machine, it fell into beer or coffee? Learn how to proceed cleaning during the first few moments.Watered electronics is always a problem, and despite all user myths about functional drowned mobiles, it's actually very often about its irreparable damage. Learn how to give first aid to your IQOS and try to save it.
The mobile is an unstoppable device, occasionally falling, and when you are out of luck just in the water. In the best case. In the worse to sweetened drink, beer and the worst in the sea. Do not panic, it may not be all lost, but definitely hurry.
The ideal thing is not to treat the device and immediately take it to the first electronics service. The guarantee is gone anyway, so anyone with a little practice and tools can open it. Immediate cleaning will not ruin you as a future repair or purchase of a new one. Do not complain that nothing has happened, time is deciding, so fast to the service.
Do not heat the IQOS or the Heeter, you will just blow the liquid further than it was.
Do not force the device violently on hot heating, in a hot car, in a microwave or oven, to spoil more than to solve.
Immediately distribute the device to a maximum of detachable parts, the IQOS is hollow, so it will be full of water, but the covers can be easily removed.
Forget the rice, it will help you from moisture, but not after bathing. Moreover, only from the surface, of course, does not remove water from inside the device.
Water or coffee is not as bad as it would seem, worse is sugar.
How to reset IQOS for chagring problems when the red light flashes
IQOS charger reset, IQOS is fairly new electronics and its manufacturer constantly improves it . But it's not problemless at all. Some problems can be easily resolved by resetting the rechargeable base or restarting the holder. If you have IQOS Charging problem, or if the holder is charging for too long or if the holder flash with red light after pulling off from the base and not starts to heat the HEETS, you can try restarting before complaint device.IQOS Red Light Blinking when Charging
When charging your IQOS, if it starts to blink in red instead of normal white, this indicates the end of battery life approaches.IQOS Pen Blinking Red
IQOS pen blinking red is one of the common charging errors on IQOS indicated by the red light on the holder or the charger. The electronic device may have a malfunction or sometimes you need just reset it, try the simple steps to find a fault. If the Pen normally flashes during charging with red color instead of white but is always charged and can be used, it indicates the end of the battery life in the holder. So you need to get another holder.IQOS Charger Lights
IQOS Charger white Light: Solid white indicates that your device is fully charged, while blinking white indicates that your device is charging. Solid white means that the Pocket Charger is fully charged, while a blinking IQOS white light indicates that it's still charging.IQOS 2.4 Plus Pocket Charger
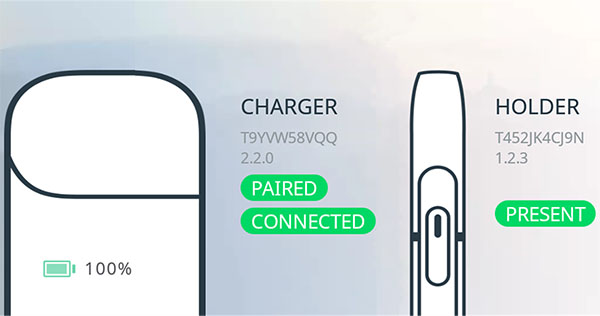
An IQOS Pocket Charger has three LEDs:IQOS Holder Battery Status LED: Solid white indicates that your device is fully charged, while blinking white indicates that your device is charging. A blinking IQOS red light means that your device has poor contact with the charger. If the IQOS red light is blinking, your charger may be malfunctioning.
IQOS Pocket Charger Battery Status LED: Solid white means that the Pocket Charger is fully charged, while a blinking IQOS white light indicates that it’s still charging. If just one of the LED lights remains white, your device will be out of charge soon.
The IQOS flashes red and stopped charging, how to fix or claim Does the IQOS charger or holder flash with a red light?
This may be a defect that you remove at home or will need a complaint at the IQOS Store, a sales representative or an IQOS PopUp stand. The most common error on IQOS is the charging error indicated by the red light on the holder or the charger (On IQOS 3 white flash too). An electronic device may have a malfunction or sometimes you need just reset it, try the simple steps to find a fault.IQOS 2.4 Red Light Blinking
IQOS Stick Red Light Blinking: is one of the common errors on IQOS. IQOS Charger Red Light Blinking indicates that the IQOS may have a malfunction or sometimes you need just reset it. A blinking IQOS red light means that your device has poor contact with the charger or your charger may be malfunctioning. When the end of battery life approaches, the holder can be used normally, but it starts to blink in red instead of normal white when charging.IQOS Charger all Lights on
when a all lights briefly turn ON and blink white, this indicate your device has been reset.How to properly charge IQOS to avoid IQOS charging problem
Like any battery-powered device, IQOS needs some recharging care. Current Li-On battery recharging results indicate that the longest battery life will be achieved by charging at 20% capacity, and it is not necessary or appropriate to discharge it to zero.How to charge IQOS?
After removing the IQOS stick from the holder, align the holder button with the charger’s hatch button and slide the holder back into the pocket charger.While it’s charging, the LED light on the pocket charger will start flashing green. When the LED stops flashing, your IQOS holder is ready to be used again. You need to charge the IQOS holder between each use.
The pocket charger also has LED lights to indicate how much battery you have left. The holder’s battery doesn’t take much time to charge but also remember to recharge the pocket charger itself after about 20 uses, either using the USB cable or AC power supply.
How to charge IQOS 2.4 plus
Press and hold the Pocket Charger Power Button until lights switch on. Press Lid Opening Buttonto open. Insert the Holder into the Pocket Charger, then close the Lid to charge. Fully charged when Holder Battery Status Light is solid white.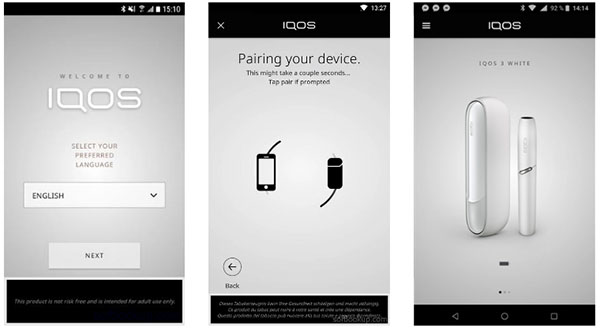
How long to charge IQOS Charger
The Holder can be charged up to 20 times with a fully-charged IQOS Pocket Charger. Only charge the device using the USB and power adaptors that have been provided with the device. It takes approximately 90 minutes to fully charge the IQOS Pocket Charger.IQOS first charge
The Charger does not require a full charge to work, however we recommend fully charging the Pocket Charger before the first usage. The Holder can be charged up to 20 times with a fully-charged IQOS Pocket Charger. Usually it takes around 90 minutes to fully charge your device. Use the original power adapters and USB only.How do I charge my IQOS?
When your IQOS battery reaches 25% the LED will start flashing white. When the LED turns red you will need to charge your device. Charging your IQOS is easy, just plug it into the AC adaptor provided within the IQOS Kit.How to reset IQOS 2.4 plus
Reset of the charger is pretty simple- At the same time press Bluetooth and Power buttons for short time and release.
- Wait for about 2 seconds to flash all IQOS lights.
- Reset is complete.
How to reset IQOS stick
If IQOS is not charging try resetting both IQOS parts, reset the charging base by pressing the Bluetooth button and the switch, reset the holder after discharging by holding down the button for a long time until it goes out. Restarting IQOS 3 can fix some problems with switching on or charging your device. A simple IQOS restart will help in most cases when the red LED control is flashing or IQOS charger won't charge or when the IQOS Blinking but not Charging properly.IQOS Charging base
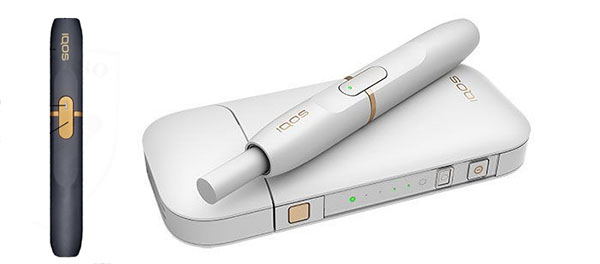
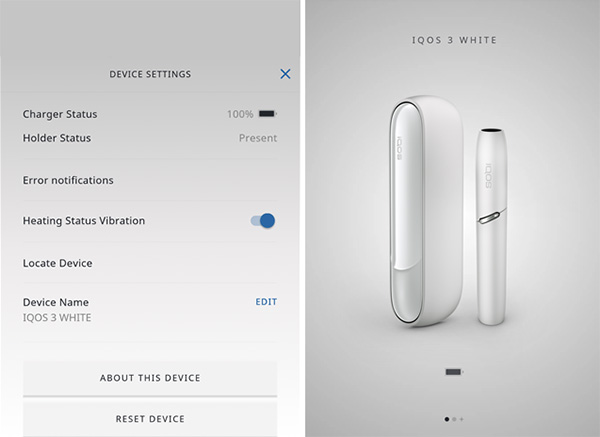
The IQOS unit is used to charge the holder, which must always be recharged. The base itself can charge holder for about 30 sticks than it will take about two hours for charging the base. Although it has the universal micro USB connector found on most mobile phones, use the supplied high-performance 2A charger. Besides charging, there is no need to take care of the base.The last generation IQOS has two buttons and a column of lights on the side. The first light shows the current charging of the holder, a series of four lights indicating the charging state of the base. The top button opens the base, the lower button is used to activate Bluetooth to connect to the mobile application on your smartphone. The application will allow additional IQOS settings, battery notification or status, and other useful information.
How to fix IQOS Charger
Does the IQOS charger or holder flash with a red light? Do you have IQOS charger problem. This may be a defect that you need to fix or you may need to file a complaint at the IQOS Stores.IQOS troubleshooting not Charging: To proceed with an IQOS malfunction, verify that the holder is correctly and freely plugged into the charger, always with a light towards the opening. Never pull it with force.
If the holder is properly plugged in, the cover is closed and the red light is on, connect the charging base. Sometimes it signals one or two dots, but it is already exhausted.
Try resetting both IQOS parts, reset the charging base by pressing the Bluetooth button and the switch, reset the holder after discharging by holding down the button for a long time until it goes out.
Clean the holder at the bottom, the touchpads get dirty sometimes and do not fit properly on the connectors, with plain rubber for example. You can blow up the base where there may be dirt or dust.
IQOS Charger repair
The IQOS product has a two-year warranty on purchase. The manufacturer replaces the faulty piece instantly in place for all faults, including mechanical damage of the heating blade or IQOS blade broken. If you have one defective piece, the the Complaint Department will later disconnect the original device from your account and attach new ones.IQOS blade broken
IQOS heat blade broken: If the blade is seriously damaged, you will not be able to use your IQOS device. So how is the heating blade damaged and how to deal with it. The heating blade is easy to break and cleaning is the main reasons why the blades break. Cleaning the holder is mainly to remove the dirt inside the IQOS with a special brush.Few people use cotton swab or baby swab to remove dirt inside the holder. Since cleaning involves touching the heating blade, it often breaks. Dirt often sticks to the heating blade. Some people use everything in their homes to remove this dirt. You need to be careful while cleaning so you do not break the heating blades.
IQOS Beginner’s Guide
The IQOS kit is easy to use, our below helpful guide will get the most out of your experience as a new user.The IQOS kit consists of:
A holder - the device which heats sticks using a specially controlled heating blade
A pocket charger for easy charging on the go
A cleaner – keeping your IQOS clean helps keep it perform at its best
IQOS cleaning sticks - your kit comes with 10 sticks for quick and easy deep cleaning
An AC power supply
A USB cable for charging
IQOS charger Manual
To download IQOS manuals and User guides please click on one of the below links:Download IQOS 3.0 Users Guide
Getting started with iQOS
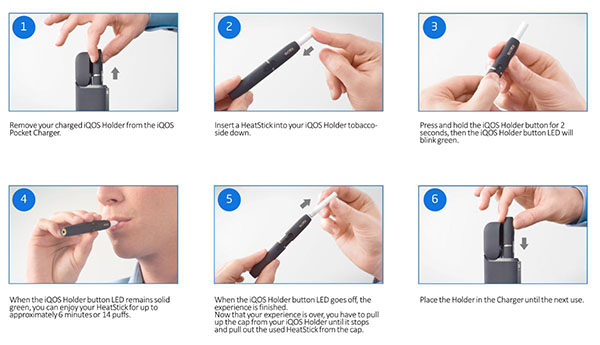
1. Load Open the iQOS Pocket Charger by pressing the hatch button 1 then load your iQOS Holder into the iQOS Pocket Charger and ensure that iQOS Holder contacts 10 are face down. The iQOS Holder button 8 must be facing the hatch button of the iQOS Pocket Charger, then close the hatch manually.You should not put pressure on the iQOS Holder while inserting it in the iQOS Pocket Charger. If you feel a resistance and persist your iQOS Holder will be misaligned and will not charge. If misaligned, your iQOS Holder will not charge. To remove it from the iQOS Pocket Charger, just pull it out firmly, align and load it back into the iQOS Pocket Charger.
2. Plug Take the USB cable provided, plug the USB end into the iQOS USB Power Adaptor, and plug the micro USB end into iQOS Pocket Charger Micro USB Charging Port 5 . Then, connect the iQOS USB Power Adaptor to an electrical outlet. You can also connect the USB end of the USB cable to any USB port to charge your iQOS Pocket Charger and iQOS Holder. However please note that charging via a laptop or a USB receiver will significantly increase the charging time.
3. Switch ON/OFF and charge Now that your iQOS System is plugged into an energy source, you must switch ON the iQOS System by pressing the iQOS Pocket Charger power button 4 for 3 seconds. iQOS Pocket Charger LEDs display 2.1 + 2.2 will be activated and you will see on the iQOS Pocket Charger that LEDs are blinking green, this is to inform you the iQOS System is charging. Your iQOS Holder will be charged and ready to be used in up to 6 minutes. Your iQOS Pocket Charger will be partially charged after around 45 minutes and fully charged after around 90 minutes. To switch OFF your iQOS System press and hold the iQOS Pocket Charger power button 4 for 5 seconds. The iQOS Holder and iQOS Pocket Charger will switch to OFF mode and it means that no automatic heater clean will be performed at this time. A partial charge of your iQOS Pocket Charger is enough for a few recharges of your iQOS Holder but it will not be enough to recharge your iQOS Holder 20 times.
How to use the cleaner?
-1 After having removed your iQOS Holder from the iQOS Pocket Charger, please remove completely the cap 12 from the iQOS Holder.-2 Pinch the iQOS Cleaner to separate the short brush and the long brush.
-3 Insert the iQOS Holder’s body 9 into the iQOS Cleaner long brush until it stops, then gently clean using a twisting motion. Remove the long brush from the iQOS Holder’s body, gently tap both to loosen and release any HeatStick fragments. Repeat until clean.
-4 Insert the iQOS Holder’s cap into the iQOS Cleaner short brush until it stops, then gently clean using a twisting motion. Remove the short brush from the iQOS Holder’s cap, gently tap both to loosen and release any HeatStick fragments. Repeat until clean.
How to properly charge IQOS, how long does it stay charged and how to keep battery life
The battery in the IQOS charger has about 7,000 charging cycles. It will charge the holder for about 20 times, so it should last for many years. How do I determine the battery status of the holder?While you can easily found out the battery status on the charger, depending on the number of charging the holder (HEETS fed), it initially lasts for 25 charging times, and then lasts for about 20 uses. You may encounter the situation that although the charger signals two more dots, it will not recharge, it is normal, the discharge indicator is not completely reliable.
Freeze IQOS? We do not recommend it
There are various mad guides on the Internet that you should put IQOS into the freezer, for example. We do not recommend these solutions, IQOS does not like the cold, it damages the battery, and we think it is only wetting the contacts for short time, which will not solve the problem.IQOS complaint
Nobody wants this last step. But if you are sure, that you checked and tried everything and nothing worked, you should complain the device. The IQOS complaint can be done in branded shops, pop-up stalls, and the Geco or Valmont shops while you wait. IQOS is exchanged for one piece per piece without more fault detection.Complaints at IQOS brand stores and in pop-up stalls in shopping centers.
Complaints by calling the IQOS Customer Center.
While claiming you just need to have an IQOS device registered to your account, you do not need a bill or a box. Only have one defective device, the worker will fill in the protocol with you, the Complaint Department will later disconnect the original device from your account and attach new ones. The operation takes only a few minutes.
How to determine the battery status in the holder
The holder of the passionate users daily goes through about twenty charges, the battery is frequent charging adjusted. During use, its life will, of course, be shortened. Whether it's okay to find out easily:Recharge the holder in the IQOS charger
Remove it from the charger and prepare the stopwatch (for example in your mobile phone)
Turn on the empty holder normally without HEETS
Simultaneously activate the stopwatch
Time is measured till full discharge when the holder itself goes out
If the battery is OK, you will reach approximately 5:40 to 6:00 minutes
When the end of battery life approaches, the holder can be used normally, but it starts to blink in red instead of normal white when charging.
The battery in the charger and holder is guaranteed by law for 12 months. IQOS has not been on the market for even a year. Philip Morris has yet solved all of the problems with the instant exchange without any problems. It is not yet clear how the post-warranty service will be solved after a two-year warranty. Experience from abroad suggests that IQOS is exchanged even after the warranty.
IQOS charger won't charge user Review
Please review IQOS charger won't charge application and submit your comments below. We will collect all comments in an effort to determine whether the IQOS charger won't charge software is reliable, perform as expected and deliver the promised features and functionalities.Popularity 10/10 - Downloads - 8349 - Score - 5/5
Softlookup.com 2023 - Privacy Policy
| Category: | General |
| Publisher: | Philip Morris International Management SA |
| Last Updated: | 01/12/2023 |
| Requirements: | Not specified |
| License: | Freeware |
| Operating system: | Android |
| Hits: | 4265 |
| File size: | 295 KB |
| Price: | Not specified |
| Name: * |
E-Mail: * |
| Comment: * |
|