LBE Helpdesk 4.0.188
LBE Helpdesk lets you create and manage a help desk with support for customer services, facilities management, order tracking, enquiry processing and clerical procedures. LBE Helpdesk is an easy to use helpdesk software, sensibly priced to suit all businesses.This multi-user helpdesk provides integrated MAPI-compliant e-mail for automatic notification of users and customers, a full audit trail of what actions were taken and by whom, category and job prioritization, target completion dates, real-time job monitoring, security access controls, and completion date targets.
Its report capability lets you create to do, problem summary, jobs per category, jobs per customer, overdue vs on-target, and frequency of jobs lists. It provides flexible querying reports and can monitor all jobs or only those jobs that meet a particular set of criteria.
Additional functions let you free-format and edited notes throughout the job's life, monitor which helpdesk user has a job open, transfer jobs between users, and incorporate customized access security. In addition, the multiple databases let you use one database for your help desk and another database for your order desk.
LBE helpdesk software will help you manage and control your helpdesk operation, without forcing you to change the way you work. LBE Helpdesk makes it easy to keep track of all of your customer service issues. The system keeps a full audit trail of all work and uses e-mail to keep both the customer and operators fully informed of progress.
LBE Helpdesk Features:
- Automatic escalation.- Automatic e-mail notification when Jobs become overdue by specified number of hours.
- Full audit trail of what actions were taken and by whom.
- Reports generated in HTML format to enable easy publishing to your own web site.
- Create 'child' jobs which must be completed before the 'parent' job can be completed.
- Link files to Jobs - useful for e.g. screen dumps of error messages.
- Define multiple views of your data - you control the formatting, even specify conditional formatting (e.g. to make all overdue Jobs appear in bold red).
- Define your own private and public views to share with other operators.
- Flexible filters of data allow you to e.g. show only overdue jobs assigned to yourself.
- Export data to text or html pages.
- E-mail notification keeps both customers and operators informed of progress.
- Manage support contracts by expiry date and/or number of new Jobs.
- Text macros simplify standard replies
- Classify jobs into categories.
- Prioritization of jobs.
- Transfer of jobs between operators.
- Specify target completion dates.
- Maintain customer, contact and Asset/Inventory details.
- Multiple jobs databases - so you could maintain one for helpdesk, one for orders etc.
- Individual privileges control those parts of the application available to each operator.
- Online tutorials and full, context sensitive help.
Sensibly priced: Many of our customers have told us they looked at helpdesk software which is more than 10 times our price but, in their words, wasn't anything like as good.
Easy to set up: You don't need an expensive on-site visit from us to install LBE Helpdesk. Just run the supplied setup, specify the location of your database and you are ready to start.
Simple to use: No extensive training is required. Our customers tell us that one of the major reasons they chose LBE Helpdesk is they found it very easy to understand.
Scalable: LBE Helpdesk uses industry standard databases Access, Microsoft Sql Server and Oracle. The same database can be shared by all our Helpdesk products.
Extensive Reporting: Supplied with many reports. If you need more, you can build your own using any of the commonly available reporting tools. Rich User Interface:Complete control over how data is presented (similar to MS Outlook), group records, change fonts/colors etc. Change format according to conditions you define (e.g. to show all overdue Jobs in red). Effectively a reporting tool built-in. Numerous pre-defined filters allow you to show only the information you need, and you can define your own filters. Share data views with other members of your team.
Save time: Text macros save on typing - enter a short word/phrase and the system will automatically replace it with pre-defined text. Ideal for standard replies. Other features:- Adapts to your organization structure. Manage support contracts by expiry date and/or number of new Jobs. Automatic escalation Transfer of jobs between operators. Target completion dates make it easy to see problems are dealt with in time. Track time/money spent.
Quick Start Guide
Welcome to LBE Desktop Helpdesk. This topic will get you up and running as quickly as possible.Installation
Each machine that needs to use the helpdesk must have run the installation routine.
Run the supplied setup.exe
Please do not install it onto a single machine and just shortcut to that exe from other machines. You must install and run it from your machine. The database can certainly be moved to a network server so that several people can share it. Simply move the .mdb file and connect to it from the File menu, Select Database.
Log In
Run the helpdesk from your Start menu. The helpdesk will load. After showing a splash screen then a Tip of the Day window, it will automatically connect to the default database (helpdesk.mdb) located in the same folder as you installed the helpdesk.
You will be asked to log in to the helpdesk:
If this is the first time select the user name 'Trial' and enter a password of 'password', then click the OK button.
The main window will be displayed:
Most of the buttons in the the toolbar at the top of the window are disabled at the moment.
On the left hand side of the window is a Tree view that shows you the main components of the system. The right hand side (empty at the moment) is used as a container for all the other windows in the system. You can click on the divider between these two areas and drag to resize their relative proportions if you wish.
On the tree view you can expand each level by clicking on the icon. The picture below shows the first three folders expanded:
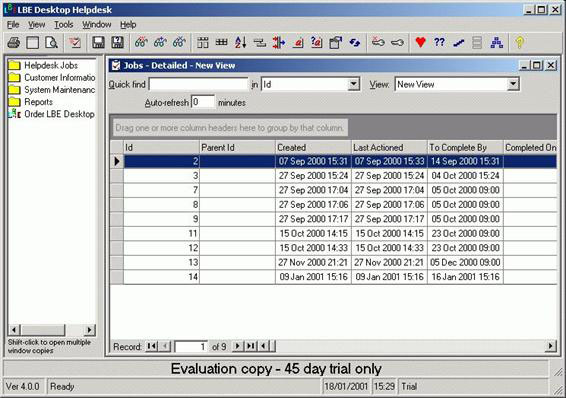
These will be discussed in more detail later. For now, click the "Detailed" icon beneath the "Jobs" folder. This shows a list of all the helpdesk jobs:
It is empty at the moment because we haven't created any Jobs. To create a new Job, you can either:
Press F3/F4.
Select New Job from the File menu.
Right click on the empty list and select "New Job" from the popup menu.
Do one of these now please.
You should see the New Job Window:
Resize the window so you can see all the fields, either by dragging a corner of the window or using one of the options from the Window menu.
Insert Problem and Solution from Knowledgebase
Clicking this will display a list of knowledgebase items, selecting one will insert the values into this Job. If the Solution field is not available (because the job status is not "closed") then only the Problem will be copied from the knowledgebase.
Problem Summary
Enter a description of the problem in the field labeled Problem e.g. 'Hard disk is making a strange noise'. By default, the system will copy the contents of a file named "newjob.txt" into the Problem summary. This is a simple text file and may be edited by you as required.
To Do
Enter a description of any actions that must be carried out before a successful completion of this Job e.g. 'Check if there is a backup of this user's data'.
Job Status
If the Job is completed, select Closed from the drop-down list and enter a description in the Solution field.
Time/Money Spent
You can specify how much has been spent on this Job in terms of both time and money. The Time Spent field will automatically increment for each minute you have this window open. If you wish, you can overwrite this with your own value (after which it will stop increasing automatically).
Contact
You must specify which individual raised this problem. The system uses a hierarchy of:
Customers
Departments
Contacts
Click the drop-down list to show a list of all Contacts (the database has one contact initially) and select one.
Notes
If you need to add more extensive notes, click the Notes tab on this window and enter them there. Anything you type into the Notes will be moved to the History when you save.
Finally
The rest of the information on the screen has already been completed for you. We will come back to these later. For now, just click the Save button.
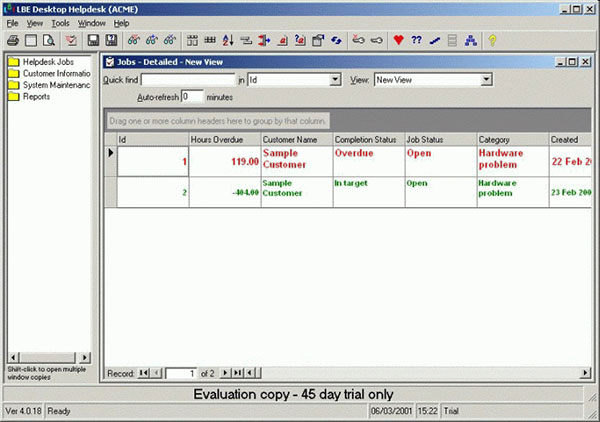
After clicking Save on the New Job, the window will close and the Jobs - Detailed view that we opened earlier will be refreshed. You should see something like:
The new job you created is listed. You can resize each column by dragging the dividers in the column headings, or click and drag a column to a new position if you wish. You can also change the font color and size (see Data Views).
Show History
Right click on the Job and select Show History. This will display a window showing the audit trail of what has happened on this job so far. You should be able to see all the Customer/Department/Contact information, plus a record of when the Job was actioned and your Problem/To Do and Notes.
Action this Job
Let's say that you telephoned the Contact and asked them to run some further tests (e.g. defragment the hard disk). You need to record this Action. So, right click on this job and select Action Job. You will be shown the same window that you saw when you created the Job. If you select the History tab you can view the Job's audit trail. Enter any new notes and click the Save button. When you return to the Jobs Detailed view, you will see that the 'Last Actioned' column has been updated, if you right click and select 'Show History', you will see a record of your last action has been made in the History.
Start the program with different databases
You can pass the database connection string as part of the command line e.g. create a shortcut whose target is:"C:\Program Files\lbe\LBEHDesk.exe" PROVIDER=MICROSOFT.JET.OLEDB.4.0;DATA SOURCE=z:\SHARED\HELPDESK.MDB;PERSIST SECURITY INFO=FALSE
Please note, although the path to the exe should be enclosed in " marks, the database connection shouldn't. This allows you to create multiple shortcuts which automatically connect to different databases.
Re-load my windows every time I use the helpdesk
From the main menu, select Tools, Personal Preferences.
In the Startup section of the window, check the box named Re-load windows. The next time you exit the help-desk it will store a list of all the windows you had open at the time. When you next run the helpdesk it will re-load these windows for you.
Log operators out after a specific time of inactivity
From the main menu: Tools, General Options.
In the "Operator timeout" section, enter the number of minutes. Enter 0 to disable this function. Every x minutes, the system will log out any operators who have not made an update in that period of time.
Speed up the loading of windows
See also: Personal Preferences
On some windows you need to select an item from what could be a very large number of choices (e.g. Contacts). If you have chosen to use drop-down lists, this means the system has to pre-load all the items in the list before displaying the window.
A better choice would be to use search boxes instead. That way, the system doesn't need to pre-load the list items. You can just type in the name of the item and the system will find the one that matches. If there is more than one possible match the system will show you a list of matching items in separate window.
Have multiple windows of the same type open
When you click on one of the icons in the tree view of the main window, by default it will open a new window or go to an existing window of that type. If you hold down the SHIFT key whilst you click the icon, it will always open a new window.
Use a drop-down list to select items
See also: Personal Preferences
On those windows where you need to choose an item (e.g. Customer Contact), you may use either a drop-down list or a search box. To use drop-down lists, from the main menu, select Tools, Personal Preferences. In the Select Lists section, choose "Drop-down lists".
Use search boxes instead of drop-down lists
See also: Personal Preferences
On those windows where you need to choose an item (e.g. Customer Contact), you may use either a drop-down list or a search box. To use a search box, from the main menu, select Tools, Personal Preferences. In the Select Lists section, choose "Free-entry input (searchable)".
Change your password
From the main menu, Tools, Change Password.
If you have the appropriate privileges you can also change an Operator's password from the Operator window.
Use keyboard macros to save typing
Quite often you find yourself typing the same paragraph again and again to answer common questions from your users. Macros are an easy way to store common text items and re-use them (see Using Macros). You can also use them to store scripts of commonly asked questions. To see a list of macros, open the System Maintenance folder in the tree view at the left of the main window then click the Macros icon :
This will display a View of your personal macros, plus any which other Operators have decided to publish.
In the example above, you can see that the current operator (Trial) has 2 macros defined, one of which they have decided to make public. The Admin operator has also published one of their macros, which is why it is visible here.
Create a new macro
Do one of the following:
Right click and select New Macro from the popup menu
File menu, New Macro
Press F4
This will display the Macro window.
Edit an existing macro
Do one of the following:
Right click and select Edit Macro from the popup menu
File menu, Edit Macro
Press F5
This will display the Macro window. If the macro is not your own, you will not be able to make changes.
Delete a macro
Do one of the following:
Right click and select Delete Macro from the popup menu
File menu, Delete Macro
Press F6
This will display a confirmation that you wish to delete. You can only delete your own macros. NB. This action cannot be undone.
Use e-mail in the Helpdesk
LBE Helpdesk uses e-mail to keep both Operators and Contacts informed. E-mail is used:
When actioning a Job you have the choice of sending an e-mail to the Contact and the Operator the Job has been assigned to.
To mail a list of overdue Jobs
Outlook Express
Outlook 98
Outlook 2000
Eudora (you must enable Automation from Eudora Options menu)
Lotus Notes *
Novell Groupwise *
Other MAPI compliant e-mail clients.
*depends on version
Alternatively, you can select SMTP and you don't need a local email client.
The system defaults to using Outlook (Express, 98 or 2000) as your e-mail client. If you have one of the other e-mail clients installed, select Tools, Personal Preferences from the main menu and select your mail client from the list.
Change the name of the Custom fields
Most windows display two custom fields which can be renamed and allow you to store up to 255 characters in each field. To rename these fields (see custom fields).
Remove the Custom fields from my windows If you don't use some or all of the Custom Fields, you can prevent them from being displayed by setting their names to blank (see custom fields).
Hide Customer or Department information if you don't use it
LBE Desktop Helpdesk uses a hierarchy of:
Customers
Departments
Contacts
Depending on whom you are supporting, you may not need all of these levels. For example if you are a small company, Customers and Department may not be relevant to you as you only have one. In that case you can specify your Organization Structure and the system will hide the irrelevant information.
NB any views that you created before changing the Organization Structure may still show e.g. Customer or Department information. But you can remove these columns yourself (see Data Views)
Temporarily delete Customers, Departments, Contacts, Operators etc.
Deleting records is permanent and when e.g. you delete a Customer, all related records are deleted as well. This will obviously affect your reporting. Sometimes you might want to disable e.g. a Customer or Operator so that they can't be used. To do this you will need to open the database in the relevant tool and update a record manually. Most tables in the database have a column named Deleted. Normally this is set to 0. To disable this record, set the value to 1.
For example, to hide a particular Customer, open the Customers table, locate the Customer record you wish to disable and set the Deleted value to 1. You can do this for Customers, Departments, Contacts, Operators, Assets, Asset Types, Categories and Prioirities.
Use Function Keys
The following function keys are available:
F1 - Help
F2 - View History *
F3 - New Job
F4 - New Item
F5 - Edit Item
F6 - Delete Item
F7 - Create Child Job *
F8 - View History *
*only available on Jobs-Detailed, Jobs-Summary and Jobs-Operator Activity views.
Conclusion
To conclude LBE Helpdesk works on Windows operating system(s) and can be easily downloaded using the below download link according to 45-day Trial license. LBE Helpdesk download file is only 4.2 MB in size.LBE Helpdesk was filed under the Help and Support category and was reviewed in softlookup.com and receive 5/5 Score.
LBE Helpdesk has been tested by our team against viruses, spyware, adware, trojan, backdoors and was found to be 100% clean. We will recheck LBE Helpdesk when updated to assure that it remains clean.
LBE Helpdesk user Review
Please review LBE Helpdesk application and submit your comments below. We will collect all comments in an effort to determine whether the LBE Helpdesk software is reliable, perform as expected and deliver the promised features and functionalities.Popularity 10/10 - Downloads - 1317 - Score - 5/5
Softlookup.com 2023 - Privacy Policy
| Category: | Help and Support |
| Publisher: | Leigh Business Enterprises Ltd. |
| Last Updated: | 07/29/2019 |
| Requirements: | Not specified |
| License: | 45-day Trial |
| Operating system: | Windows |
| Hits: | 4375 |
| File size: | 4.2 MB |
| Price: | Not specified |
| Name: * |
E-Mail: * |
| Comment: * |
|